4 Hard-to-Ignore Benefits of Cooking Your Own Food
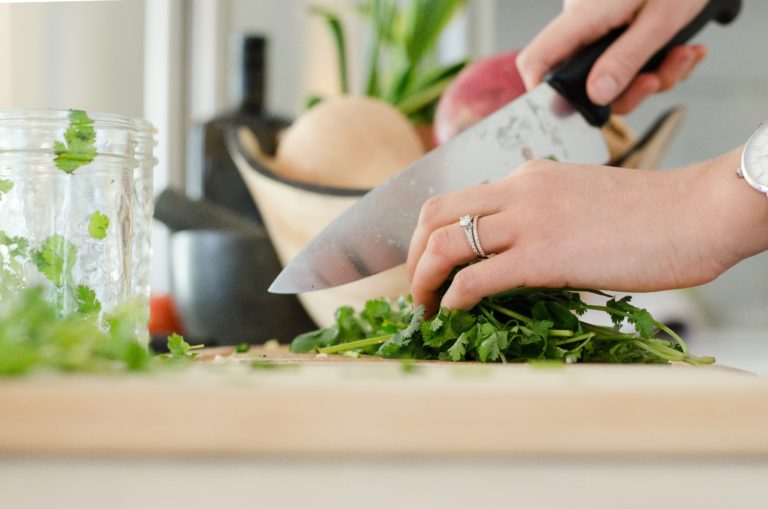
Let’s face it. We are a generation that is super distracted (thank you internet and social media), always busy, supremely ambitious, and of course, hard pressed for time. We are also blessed with a plethora of food options, with zillions of apps wooing us into trying their services every single hour. We are definitely spoilt for choice when it comes to choosing what to eat.

If you think about it, our parents never ate out as much as we do. Because eating out before the internet came into our lives meant actually stepping out of the house, or at least making a call to a nearby restaurant. Also, homecooked meals are always valued more among that generation than the millennials or the baby boomers. These options along with a crazy lifestyle are hampering our health because we mostly opt for ordering in or eating out.

I get it. It is not easy to plan meals or cook every single day with the kind of lives that we have. But I would like to tell you that cooking is also not impossible. I know so many people who are just tired of eating out every single day, tired of compromising on their health and spending shit loads of money on food they probably do not even enjoy so much anymore. The joy of a homecooked meal is something that cannot be compared to a quick snack. You all know what I am saying, right?

Most importantly – cooking is a survival skill. It is not about interest here. I know people would argue, that if I cannot dance, you cannot force me to become a dancer. If I do not like cooking, you cannot force me to learn it. But, you do not need to dance to survive. But you do need to eat. And the sooner you realize this, the easier and better it becomes.

Not just this, there are so many benefits of cooking your own food! It does require proper planning, but like every good habit, it requires some practice and inspiration.

Cooking equates to happiness for me. It is, in fact, my meditative therapy. Home cooking has always been a good thing, the only sustainable practice which not only fills our bellies with food but also fills our heart and soul with contentment and joy.

So here are the top benefits of homecooking.

    1. It will help you save tons of money

I cannot even begin to tell you how much money you are going to save if you eat in. I am sure you already know how much eating out on a regular basis makes your pockets empty. When we go out to eat, we do not only pay a heavy price for the food, we also end up paying so many different kinds of taxes. For someone like me who cooks on a daily basis, I actually feel the huge amount of profits that lie in every single plate of food that restaurants sell. You can make the same meal at home for less than half the cost most of the times.

Let me explain with a personal example. I love pasta. While there are a very few places that actually serve good pasta, I do have one favorite place which I visit from time to time. As delicious as their kinds of pasta are, they are also outrageously expensive. A simple plate of Aglio Olio costs me about 600 INR (about $8.10).

Now if I break this down, the amount of spaghetti served in the restaurant for one person would be about 80g. Along with this, the ingredients are olive oil, garlic, salt, pepper, and some fresh herbs. Now if I cook the same thing at home, firstly, I can get an entire packet of 500g spaghetti for as less as 120 INR. Which means 80g spaghetti would cost me about 20 INR. Also, 500 g would easily serve seven happy and hungry bellies. The amount of olive oil needed in the quantity served in a restaurant is about two to three tablespoons. If I buy a 250ml olive oil bottle, it will give me about 17 tablespoons for just INR 300. So basically one tablespoon will be about INR 35, so the cost of the olive oil in making one plate of Aglio Olio is about 70 INR. Let’s add another 50 INR for the garlic, salt, pepper, and herbs. So the actual cost of the plate is made at home is 20+70+50 = 140 INR! And I paid 600 INR! The difference is huge!

So think again before you eat out if you are on a financial crunch. You can make so many more plates of Aglio Olio at home at the same price. While I do agree that it’s chef made and the ambient experience also matters, but now at least you know the difference.

    2. It will keep you healthy

There is an explosion of food categories that we are constantly exposed to, ranging from healthy bars to cereals that promise to make us slim, fibre-rich biscuits. But the truth is – any kind of processed or packaged food remains questionable on the health quotient. Some of the things you are likely to find in the food that you don’t cook are partially hydrogenated oils, titanium dioxide, artificial colours, adulterated spices, sodium nitrate, and nitrite, to name a few.

I personally have a problem trusting packaged food that claims to be healthy. The health market has exploded with so many options, that claim to transform our bodies in a span of days or weeks. But more often than not, these products end up wrecking what we already have. There is just so much sugar in fizzy drinks, or so much salt and trans fat in chips or packaged snacks.

We are also aware of the consequences of junk food, and we know deep down that we should not consume too much of it. Do you even feel happy after eating those cookies or gulping down that soda? Even if you do, I’m sure you do realise its long-term health effects and you probably also plan to cut down on it sometime in the future.

Cooking your own food will enable you to make most of the things that you buy, feel much happier and content. And most important, happy. Cooking your own food would also mean using oils and spices in moderation, and always eating fresh. As opposed to eating something full of preservatives. It will also help you keep your weight in check. Become more mindful of what you eat and reduce the quantity of junk in your diet. You will see the mental transformation yourself in just a few weeks.

3. You will be in charge of portions

There are times when you want to eat just a slice of a cake, while there are days when indulging is all you think of. When you cook your own food, you can decide how much you want to eat, so that there is no wastage or more need to eat. It also helps you buy perishable food like vegetables or meat in restricted quantities, so that there is absolutely no wastage. And because you buy everything yourself, you are much more mindful of the quantities.

Photo by Katie Smith on Unsplash

So on days that I crave for a slight hint of sweetness after my meals, I bake just a small cupcake for myself. And on days when I know a couple of friends are coming over, I bake an entire cake, and indulge! If you are cooking just for yourself, you know how hungry you are. So you cook only that much that you would want to eat. And nobody can define that for you.

So control your portions the way you want to and be in total charge! Trust me, it feels amazing.

4. Gatherings become much more meaningful

I simply love entertaining and I end up having my friends over on weekends for hearty homemade snacks and meals. To me, food is all about sharing and eating together. And there is no higher gratification then feeding people food made by you and enjoying the compliments along the way!

Photo by rawpixel on Unsplash

When you start cooking, you also start realising the value of a shared meal. The joy of cooking for people you love and sharing little moments with them on the dining table is a beautiful feeling. And the compliments just keep pouring in! Cooking is a selfless effort and I always value people who cook for me. It is very emotional, as it requires a lot of patience, skill, and love. And cooking for others gives me immense happiness.

Just imagine if you make a meal for the first time for your parents, or your partner. It is bound to touch them because they know you made an effort. When we make an effort in cooking ourselves, we realise how much effort some amazing people like our mothers have put all our lives. Cooking makes us realise that effort, value the selfless labor much more and be more grateful.

All these points in no way mean that you cannot indulge! Do go out once in a while with your loved ones to have a meal at your favourite restaurant. Or order it from your favourite Chinese take away on that lazy weekend while you binge watch a series. But all I am saying is do not make that a lifestyle.

I hope this post inspires you to cook your own food. Do let me know what you think of this and you can always ask me any questions that you might have. I am also open to discussions in the comment section.

Connect with me on Facebook, Instagram, Twitter.

You can find all my recipe videos on YouTube.

Happy cooking!

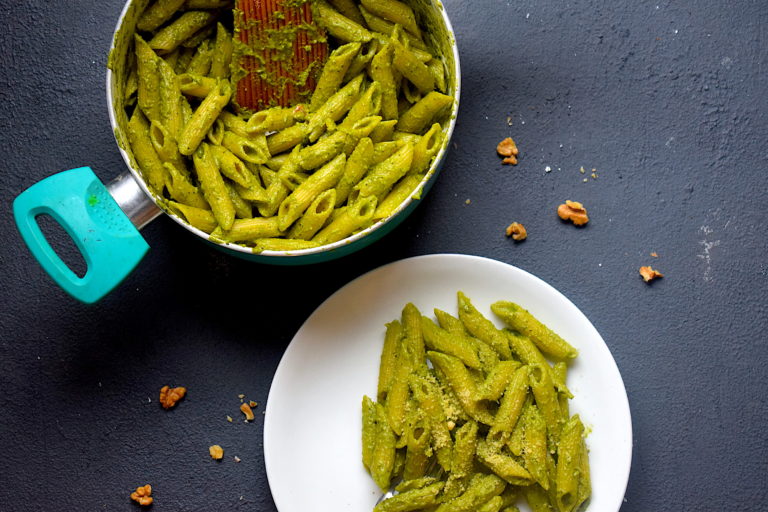
Penne with Pesto Sauce

The first time I ever made pesto pasta was at a friend’s place a few years ago. He had fresh Italian basil leaves growing in his campus, all green, healthy and beautiful. That was the first time I also realized it is possible to grow Italian basil in Indian soil as well.

So we grabbed some fresh basil from the garden and went home to make some spaghetti with pesto. The results absolutely amazed me! I had no idea something so simple could taste so good!

The traditional recipe for pesto is combining basil with pine nuts. Since it is almost impossible to find pine nuts at a regular store in India, we decided to go with walnuts. My friend dry-roasted some walnuts and ground it along with the fresh basil, garlic, salt, and olive oil. Now that was a magical combination.

pesto pasta

pesto pasta

It has been a couple of years since I got exposed to pesto and I have adapted it into my life quite well. I end up making pesto almost every fortnight. To be honest, it is one of my favorite dinner recipes. It is especially great on those tiring days where you want to get done with dinner in 15 minutes. Trust me, it will become your favorite too.

Preparation time – 15 minutes

Cook time – 20 minutes

Serves – 2 to 3 people

[ingredients title=”Ingredients”]

  • 500 g Italian basil leaves
  • 12 tbsp extra virgin olive oil
  • 500 g penne pasta
  • 200 g walnuts
  • 80 g garlic
  • 2 tsp freshly ground black pepper powder
  • 100 g grated parmesan cheese
  • Salt to taste [/ingredients]

[directions title=”Directions”]

  1. Cook the penne as per package instructions till al dente. You can also use any kind of pasta like fusilli, spaghetti or fettuccine.
  2. Dry roast the walnuts in a pan. Do not burn them. The roasting will help the walnuts from turning bitter in the final pesto sauce.
  3. In a grinder, put the washed basil leaves, salt, garlic cloves, and olive oil. Blend this together till you get a fine and thick paste.
  4. In a pot, add the cooked pasta. Pour the pesto on top and give it a good stir, making sure every strand of the pasta is covered in the pesto sauce. Make sure you don’t cook the pesto so remove the pot from the stove when you do this step.
  5. Garnish with black pepper powder and grated parmesan cheese. Serve immediately.  [/directions]

pesto pasta

pesto pasta

pesto pasta

This pesto pasta is such a simple and classic dish. I hope you try it and enjoy it as much as I do. If you have any questions, feel free to reach out to me with a comment or we can connect on Instagram or Facebook.

Want more such pasta recipes? Find them all here – https://bit.ly/2vXeBFt

Happy cooking!

Slurrp tip – Make sure the black pepper powder is freshly ground. It will make a lot of difference!

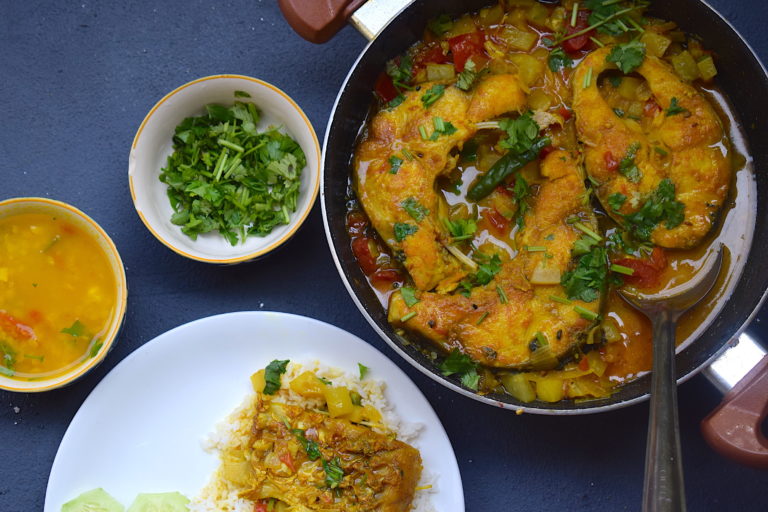
Assamese Fish Curry with Bottle Gourd & Potatoes

I hail from Assam, which is a state in the north-eastern part of India. Like every Indian state, Assamese cuisine is also vast and very unique. We rely on local produce and since we have a lot of rivers (the Brahmaputra being the main) and ponds, we consume a lot of freshwater fish in our diet.

If you visit an Assamese household for a meal, there will be some sort of fish for sure. We love our fish! And we make it with all kinds of vegetables and greens. Our spices are mild, yet packed with flavour.

Assamese fish curry

This fish curry is made with bottle gourd, known as lau in Assam. We have a lot of other varieties of gourd back home, from the ridge gourd, white gourd, pointed gourd and so much more! I love my fish with any kind of watery vegetable, and bottle gourd is easily available in cities as well. This curry is so comforting, something I have eaten innumerable times in my life, but never gets old. Its flavor and taste always take me back home, and I cannot help but feel comforted by it.

Assamese fish curry

I have used rohu fish in this curry, but you can use any fish of your choice. I have eaten and prepared the same curry with all kinds of big and small fish. The taste will vary depending on the kind of fish you use, but the steps will be the same.

Assamese fish curry

I hope you try it out for yourself. Give it a chance. I promise it will grow on you.

Preparation time – 20 minutes

Cook time – 30-40 minutes

Serves – 2-3

[ingredients title=”Ingredients”]

  • 500 g rohu fish
  • 8 tbsp mustard oil, for frying the fish
  • 2 tbsp mustard oil for the curry
  • 1 tsp panchphoran 
  • 1 medium onion, finely chopped
  • 2 tbsp turmeric powder
  • 1 tbsp ginger garlic paste
  • 2 tomatoes, finely chopped
  • 1 tsp cumin powder
  • 1 large potato, finely chopped
  • 1 small bottle gourd, finely chopped (about 300 g)
  • 500 ml water
  • 2 green chilies
  • Chopped coriander leaves for garnish
  • Salt to taste [/ingredients]

[directions title=”Directions”]

  1. Wash the fish pieces thoroughly. Pat dry with a paper towel.
  2. Marinate the fish pieces with salt and turmeric powder. Mix really well so that every piece of the fish is well coated with these two spices.
  3. Heat mustard oil in a kadhai and let it come to its smoking point. Fry the marinated fish, two minutes on each side. Do not overcook the fish as it will also cook in the gravy later. Set aside. Do not throw the oil away, as it has essential flavors in it. We will use that in the gravy.
  4. Heat mustard oil in another kadhai or use the same kadhai to make the gravy. Once the oil is hot, add a teaspoon of panchphoran. Panchphoran is a whole spice blend that consists equal quantities of the following five whole spices – fenugreek seeds, nigella seeds, cumin seeds, black mustard seeds, and fennel seeds.
  5. Add the onions to the oil and fry until the onions become translucent.
  6. Once the onions turn translucent, add the fresh ginger garlic paste to it. Saute it till the raw aroma of the ginger and garlic disappears.
  7. Add the chopped tomatoes to the onions and let it cook till the water releases from the tomatoes and assimilated with the rest of the gravy.
  8. Season with salt and cumin powder. Do not add too much salt because the fried fish will already have some.
  9. Stir till the tomato and onions melt.
  10. Since the vegetables are completely raw, add them to the tomato gravy and stir for about a minute. We would want the vegetables to be completely cooked which is why we will add some water at this point and cover and cook the vegetables like a stew.
  11. Cover and cook for about ten minutes in medium flame. Once done, open the lid and check if the vegetables are cooked.
  12. Once the potatoes and bottle gourd is soft, add the fried fish and two whole green chilies to the gravy. Add the marination here as well that you used to fry the fish. That oil will add lots of flavor to the gravy.
  13. Add more water, give it a gentle stir (don’t break the fish) and cover with a lid for another ten minutes. Let it boil in medium flame.
  14. Take the lid off, check the salt. Once done, take it off the stove. Garnish with fresh coriander leaves.
  15. Serve hot with rice!  [/directions]

Assamese fish curry

Assamese fish curry

Assamese fish curry

Related recipe – Assamese chicken curry

I hope you try out this delicious and easy fish curry. Let me know what you think! And stay connected 🙂

Happy cooking!

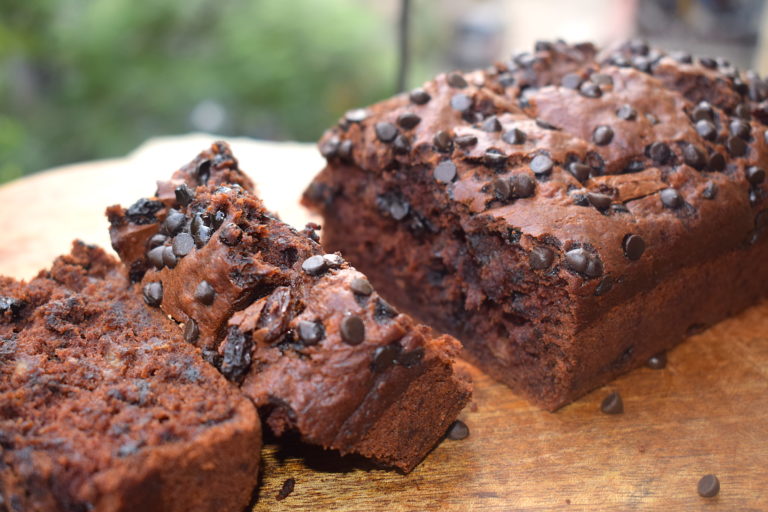
Eggless Double Chocolate Banana Bread Recipe | Slurrp

Have you ever discovered something beautiful when you were not even looking for it in particular? Feels good, right?

This eggless double chocolate chip banana bread was such a discovery for me. It all happened a few years ago when I had some really ripe bananas withering away in my pantry. And the best way to use those super ripe bananas is of course to mash them up with some flour and bake some comforting banana bread! That was exactly the intention.

eggless chocolate chip banana bread

But the curious cat in me did not want to gobble down a plain banana bread. Too boring! Especially so because I also found cocoa, chocolate chips, brown sugar, and some dark chocolate in my pantry. The advantages of having a stocked pantry and having an open mind? But the spoiler? I didn’t have any eggs. Which is the only reason why this is an eggless version.

It is almost unbelievable that this banana bread tastes as good without eggs as well. But it does!

The excitement started racing in my mind and I just HAD TO experiment with all these ingredients. And I am so glad I did. Just look at this beauty!chocolate chip banana bread

chocolate chip banana bread

I love this eggless chocolate chip banana bread so much that I end up baking it at least twice a month. It is moist, spongy and every chocolate lover’s dream come true. I love to grab a bite with my cup of chai in the mornings, or randomly stealing a bite at various times of the day. My friends love it and I have baked it a zillion times for so many people so far. So I can tell you that this recipe is absolutely full proof.

I hope you try this version of chocolate chip banana bread! Super simple and easy.

Preparation time – 15 minutes

Bake time – 40 minutes

Serves – 3-4 people

[ingredients title=”Ingredients”]

  • 150 g all purpose flour
  • 150 g butter, at room temperature
  • 80 g unsweetened cocoa powder
  • 80 g dark chocolate chips
  • 1 tsp baking soda
  • 1 tsp baking powder
  • 50 g brown sugar, crushed
  • 1.5 tsp vanilla essence
  • 50 ml milk
  • 3 very ripe bananas, mashed well
  • 1/2 tsp salt [/ingredients]

[directions title=”Directions”]

  1. Preheat the oven to 250 degrees.
  2. Add butter in a mixing bowl along with the crushed brown sugar. Mix well with a spatula till you get a creamy consistency.
  3. Pour in the vanilla essence into this and mix well.
  4. Add the mashed bananas to this and mix till everything comes together and there are no lumps.
  5. In another bowl, sieve the flour, baking powder, baking soda, and cocoa powder. Mix well.
  6. Gently add the flour to the butter and banana mixture, little by little. Take 4-5 rounds to complete this step.
  7. The final mixture might be too thick, so add some milk (room temperature) to get a thick batter.
  8. Take the chocolate chips and add to the batter, giving it one last mix with a spatula.
  9. Grease your loaf pan with butter or oil and add parchment paper on top.
  10. Pour in the banana bread batter into the loaf pan. Make sure it settles down completely.
  11. Garnish with lots of dark chocolate chips. I have also added a few chunks of my favorite dark chocolate on top. You can top it off with a few blocks of your favorite chocolate.
  12. Bake at 250 degrees for 40-45 minutes.
  13. Once done, allow the bread to cool completely before you cut it into pieces.
  14. Store in an airtight container once cut or finish it then and there! [/directions]

chocolate chip banana bread

chocolate chip banana bread

chocolate chip banana bread

This bread can be stored for up to a week. Once you cut the pieces, immediately transfer to an airtight container and store it in the fridge. But a bread this size will never last a week! 😉

chocolate chip banana bread

chocolate chip banana bread

chocolate chip banana bread

Slurrp pro tip: Whenever you bake bread or cake, always remember to mix the dry ingredients and the wet ingredients separately, and then slowly assimilate the dry into the wet ingredients in a number of rounds. And sieving the flour is extremely crucial, as it is to preheat the oven.

If you want regular access to more such delightful food, you can follow me on Facebook, Instagram, Twitter, and YouTube.

Happy baking!

Nasi Goreng at Home (Indonesian Fried Rice) | Slurrp

Nasi Goreng literally translates to fried rice in Indonesia. I have had several versions of this delicious dish in India and Thailand. But the one you get in its place of origin, i.e. Indonesia is at a different level.

My recent trip to Bali consisted of eating Nasi Goreng for almost every meal. I just couldn’t stop eating it wherever I went. It was just so darn delicious! I had to learn the basics there and make it for myself.

nasi goreng

What makes this Nasi Goreng unique?

Making Nasi Goreng is really simple and you do not really need to hunt down for any ingredients. The Indonesian addition to this unique fried rice is the Sambal. Sambal is a hot sauce or a paste made with chilies, garlic, oil, salt, sugar, and a few other spices. You can call it the Indonesian version of a Schezwan paste. You can either make your own or get it directly from the store. I used the store bought Sambal which was quite good.

I learned this recipe from a local chef in Bali. And that’s when I realized Nasi Goreng is pretty much like any fried rice. Only the addition of Sambal sauce gives it an edge.

Nasi Goreng is usually served with an egg on top, some cucumbers on the side and some prawn crackers. It is spicy and sweet at the same time. The dark brown color of the sauce comes from sweet Indonesian soy sauce, which can be replaced with regular dark soy sauce mixed with some sugar.

nasi goreng

nasi goreng

How to make the perfect fried rice every time

Fried rice might be a simple dish but it requires a few things done right every single time. Since Nasi Goreng is also a version of fried rice, the same rules apply to this as well.

  • Always use a wok for making fried rice because it helps is faster and uniform cooking.
  • Make sure your wok is really hot before you add oil and other ingredients.
  • Make sure the vegetables you add are chopped finely so that they can cook quickly.
  • The rice that you add to any fried rice should always be cold. Otherwise, it will stick to the wok and become lumpy.
  • If you add any protein like chicken or shrimp, cook them before you add the vegetables.
  • Add the soy sauce and vinegar just before you remove the wok from the gas stove.

There are obviously many variations of Nasi Goreng like every other recipe. This is my homemade version for a comforting weeknight dinner. This version is also without shrimp, and just with some moist chicken and lots of vegetables. And the best part? It’s all done at lightning fast speed in 20 minutes.

nasi goreng

Why this version of Nasi Goreng?

  • Delicious and super easy!
  • Healthy and quick
  • Better than takeout
  • You need 20 minutes to make this
  • Made with basic Chinese pantry essentials, except the Sambal sauce.
  • Highly customizable!
  • Top it off with toasted sesame seeds for extra crunch.

nasi goreng

Preparation time – 15 minutes

Cook time – 25-30 minutes

Serves – 3

[ingredients title=”Ingredients”]

  • 200 g chicken thighs, cut into small pieces
  • 250 g rice
  • 50 g butter
  • 8-9 garlic cloves
  • 4 tbsp vegetable oil
  • 2 eggs
  • 100 g green beans, thinly sliced
  • 100 g carrots, thinly sliced
  • 100 g cabbage, thinly sliced
  • 2 tbsp Sambal Paste
  • 1 tbsp sugar
  • 2 tbsp dark soy sauce
  • 1 tsp black pepper powder
  • Salt to taste [/ingredients]

[directions title=”Directions”]

  1. Heat oil in a wok. Add the butter and mix the oil and butter.
  2. Add the sliced garlic and mix it together.
  3. Add in the chicken pieces and cook for about two minutes. Season with some sugar and mix well.
  4. Once the chicken is cooked 90 percent, add one beaten egg into the oil and cook till it’s done.
  5. Next, add the beans, carrots, and cabbage and saute for a minute. Do not overcook the vegetables as they need to remain crunchy.
  6. Add the Sambal paste and mix well with the vegetables.
  7. Season with salt and pepper.
  8. Add the boiled and cold rice to the mixture. Mix well till the rice is heated through and everything gets mixed together perfectly.
  9. Pour in the soy sauce and mix well until every grain of the rice gets stained in the sauce.
  10. Fry an egg sunny side up, one for each plate.
  11. Transfer the nasi goreng onto a bowl and serve it on a plate upside down, as shown in the picture. Top it off with a fried egg.
  12. Serve with cucumbers and tomatoes on the side. [/directions]

nasi goreng

nasi goreng

I hope you try this version of Nasi Goreng! Super simple and easy. Please feel free to substitute the chicken with any protein of your choice. If you are a vegetarian, you can skip the steps where I add chicken and egg, and substitute with tofu and more vegetables.

If you have any questions, feel free to reach out to me with a comment or connect with me on Instagram or Facebook. For all my videos, you can subscribe to me on YouTube.

Related recipe – 30 Minute Stir Fry Noodles

Happy cooking!

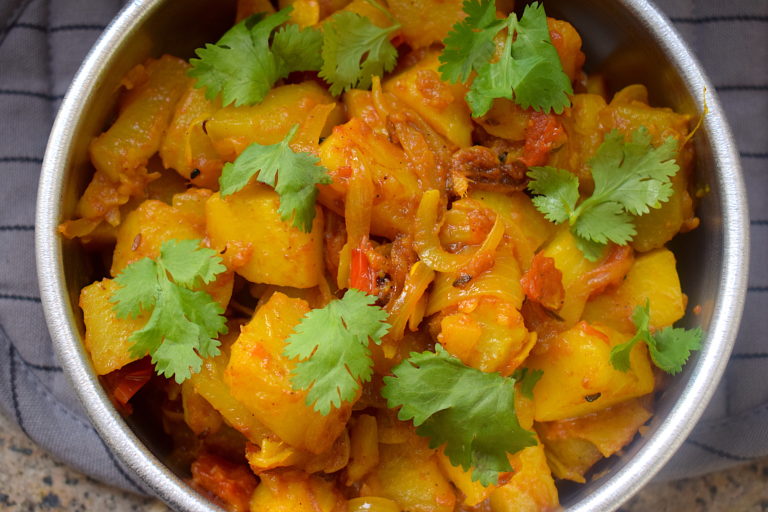
Pumpkin fry with potatoes | Veg recipes

I remember being a fussy child when it came to food. I didn’t like most vegetables and gave my parents a hard time when it came to eating healthy food. I would say no to most veg recipes.

My father used to be very worried about me. He would always come up with creative ways to make veg recipes to make me gulp down some greens. Who would’ve thought that same kid would one day become an advocate of eating healthy and homemade food😁

veg recipes

veg recipes

But for some strange reason, I always loved pumpkin. I think the idea of a sweet vegetable was intriguing to my childlike brain. But again, the fussy me only liked when my mom made it a particular way.

veg recipes
So here is an attempt at recreating that wonderful and sweet pumpkin with potatoes. I have used nigella seeds, raw mango powder, ginger, chili, and some basic spices. It is my mother’s recipe. Didn’t turn out as good as hers but still was quite tasty. A perfect accompaniment to some fluffy luchis. Make sure you eat those seasonal pumpkins before they run out of stock.

Preparation time – 20 minutes

Cook time – 30 minutes

Serves – 4

[ingredients title=”Ingredients”]

  • 1/2 kg seasonal pumpkin, cut in chunks
  • 1 big potato, cut in chunks
  • 1 large tomato, finely chopped
  • 2 tbsp mustard oil
  • 1 bay leaf
  • 1 large onion, finely chopped
  • 2 green chilies
  • 1 tsp panchphoran
  • 1 tsp turmeric powder
  • 1 tsp raw mango powder (amchur)
  • 10 g grated ginger
  • 20 g ginger garlic paste
  • 1 tbsp sugar
  • 1 tsp cumin powder
  • 1 tsp black pepper powder
  • 100 ml water
  • 1/2 tsp garam masala
  • Coriander leaves for garnish
  • Salt to taste [/ingredients]

[directions title=”Directions”]

  • Heat mustard oil in a kadhai. Allow it to come to a smoking point. Add a bay leaf and the panchphoran (The Indian five spice mix).
  • Add the chopped onions and add it to the mustard oil at this time. Stir for two to three minutes till onions start to get translucent.
  • Time to add the ginger paste. Stir all the ingredients together in the kadhai till the raw aroma of it dissipates.
  • Once the onions are cooked, add the tomatoes and stir till tomato starts releasing its own water to form a thick gravy. This would take about ten more minutes.
  • If the mixture gets stuck to the kadhai, add just a dash of water to prevent it from happening.
  • Season with salt, turmeric, cumin, and raw mango powder. Mix well for another minute.
  • Once the tomatoes are cooked, add the pumpkin and the potatoes. Stir this for about two to three minutes. Add some water if it gets stuck to the kadhai.
  • Cover and cook on low flame for ten minutes. If you want a gravy version, you can add some more water.
  • Remove the lid, sprinkle the garam masala and give it one last stir.
  • Garnish with fresh coriander leaves.
  • Garnish with some freshly chopped coriander leaves and green chili.
  • Serve hot with parathas or roti. [/directions]

veg recipes

veg recipes

If you want regular access to more such delightful food, you can follow me on Facebook, Instagram, Twitter, and YouTube.

Happy cooking!

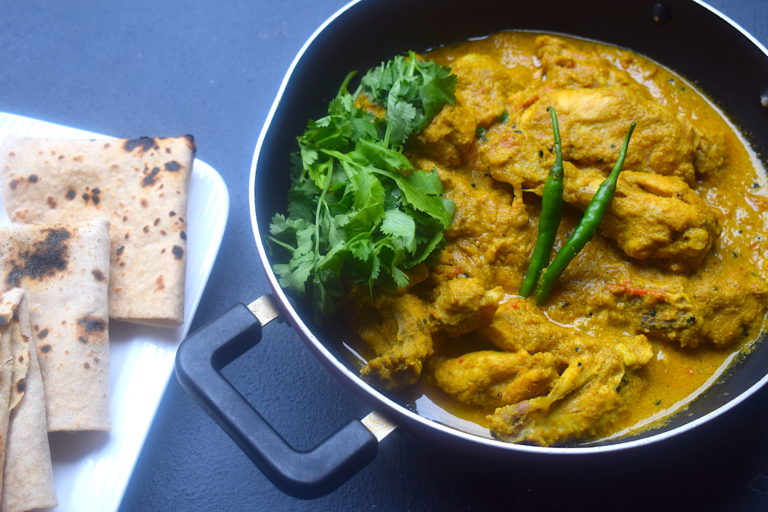
Chicken With Poppy Seeds and Cashew | Chicken Recipes

Poppy seeds or khus khus is an oilseed obtained from poppy. It is used extensively in Bengali and Assamese cuisine, and I have been quite familiar with it since my childhood. It is what we also call posto in Bengali cuisine.

While I love alu posto and potol posto, I also like the usage of poppy seed paste in chicken curry. This chicken curry recipe with poppy seeds and nigella seeds is creamy, luxuriously thick and extremely delicious.

It goes very well with parathas, roti or rice. I like mine in a semi gravy but you can get the consistency as per your preference.

chicken recipes
Chicken with poppy seeds and cashew

Before you make this recipe, make sure you soak the poppy seeds in lukewarm water for at least 3-4 hours. This step is essential to get a thick paste when you grind the seeds.

You also need to soak 6-7 cashews in water for about the same time before grinding it into a fine paste with some water.

Preparation time – 20 minutes

Cook time – 50-60 minutes

Serves – 4

[ingredients title=”Ingredients”]

  • 1 kg chicken
  • 1 bay leaf
  • 50 g poppy seeds
  • 2 medium onions, ground to a paste
  • 2 medium tomatoes, finely chopped
  • 6-7 cashews, ground to a paste
  • 2 green chilies
  • 20 g ginger garlic paste
  • 1 tbsp sugar
  • 1 tsp nigella seeds (kalonji)
  • 3 tbsp mustard oil
  • 1 tsp cumin powder
  • 1 tsp meat masala
  • 1 tsp turmeric powder
  • 1 tsp black pepper powder
  • 500 ml water
  • 1 tsp garam masala
  • Salt to taste [/ingredients]

[directions title=”Directions”]

  1. Soak the poppy seeds in lukewarm water for three to four hours. Drain them and put it in a grinder. Add the green chilies to it with one tablespoon of water. Grind it to a thick paste.
  2. Heat mustard oil in a kadhai. Allow it to come to a smoking point. Add a bay leaf and nigella seeds at this time.
  3. Make a fine paste with the onions and add it to the mustard oil at this time. Stir for two to three minutes till onions start to get translucent.
  4. Time to add the ginger garlic paste. Stir all the ingredients together in the kadhai till the raw aroma of it dissipates.
  5. Once the onions are cooked, add the tomatoes and stir till tomato starts releasing its own water to form a thick gravy. This would take about ten more minutes.
  6. If the mixture gets stuck to the kadhai, add just a dash of water to prevent it from happening.
  7. Season with salt, pepper, cumin, turmeric powder, and meat masala. Mix well for another minute.
  8. Once the tomatoes are cooked, add the chicken pieces. Fry the chicken in the tomato and onion paste for about fifteen minutes till they start to brown and all the water gets released. Make sure the chicken pieces are clean and dry, otherwise there will be too much water.
  9. Once the chicken is semi-cooked, add the poppy seeds paste and cashew paste, and mix well. Make sure every piece of the chicken gets coated in this thick masala. Be gentle with the stirring so that you do not break any meat.
  10. Keep stirring at regular intervals for another five minutes. Add water, cover and cook for another 15 minutes on medium heat. This is an essential step to ensure the chicken gets super soft.
  11. Take the lid off and check the chicken. It will be done by this time. As the last step, sprinkle some garam masala on top and give it one last stir.
  12. Garnish with some freshly chopped coriander leaves and green chili.
  13. Serve hot with parathas or roti. [/directions]
chicken recipes
Chicken with poppy seeds and cashew

chicken recipe

chicken recipes

Related recipe – Kasturi Chicken

If you want regular access to more such delightful food, you can follow me on Facebook, Instagram, Twitter, and YouTube.

Happy cooking!

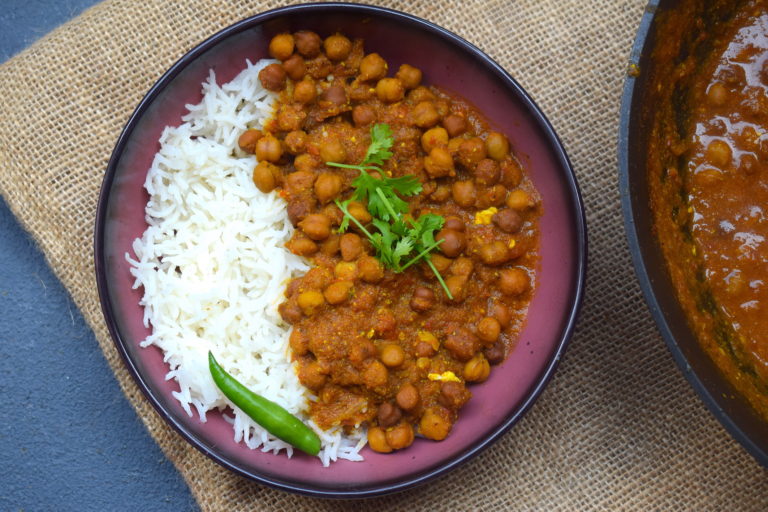
Dahi Kala Chana Curry | Veg Recipes

Time is such a thing. Things which you thought would never change or you could alter about yourself end up being history. If I have to substantiate this with an example, I would use one which is food related. As a child or even during my teenage years, I had always detested certain kinds of food. But the passage of time and experience has made me value those very same things, which I enjoy now.

dahi kala chana

Kala chana (black chickpeas) is such an example. I have never really enjoyed Kala chana in a curry. The maximum I have gone is eaten it raw in a salad or a prasad. But now, I cannot get enough of it. It is one of my favorite kind of sprouts. Also because with time I have become wiser in terms of understanding what food is good for me, and how it can be made tasty.

dahi kala chana

You probably have seen a lot of Kala chana recipes on the internet. But trust me this one is different. The game changer is the use of curd. And oh, the results are absolutely stunning.

I invented this recipe a few years ago when I didn’t have anything else but some Kala chana at home. I was perhaps too broke to order in. As they rightly say, necessity is the mother of invention. And this splendid recipe emerged out of experimentation in the kitchen.

dahi kala chana

I usually enjoy Kala chana in its raw form. Assamese people have soaked Kala chana along with soaked moong dal as prasad. So I’ve been used to eating in that form since my childhood. I also enjoy it in my salads in its uncooked form.

But this dahi Kala chana curry makes me go weak in my knees. Made with ginger, garlic, garam masala, curd, tomatoes and lots of onions, I have been loving this sweet, spicy and tangy curry for a few years now. Adding that pinch of salt while boiling the chana in the pressure cooker makes a lot of difference.

The spices and condiments used in this are very basic and mostly lying around at home. The one big difference that makes this curry truly tasty is fresh garam masala. I make my own by dry roasting equal amounts of cardamom, cinnamon, and clove together. And the biggest secret to any good pulse curry is to add salt while boiling. The salt gets infused into every grain and makes a huge difference.

dahi kala chana

dahi kala chana

Before boiling the Kala chana, I soaked it in water overnight. Kala chana takes some time to soften so make sure you leave it in water for eight to twelve hours.

Preparation time – 20 minutes

Cook time – 60 minutes

Serves – 2-3 people

[ingredients title=”Ingredients”]

  • 100 g Kala Chana
  • 2 tbsp mustard oil
  • 2 medium onions, ground to a paste
  • 3 medium tomatoes, ground to a paste
  • 1 tsp sugar
  • 20 g fresh ginger garlic paste
  • 1 tsp cumin powder
  • 1 tsp coriander powder
  • 1 tsp turmeric powder
  • 1 tsp black pepper powder
  • 50 g thick curd
  • 1 tsp garam masala
  • Salt to taste [/ingredients]

[directions title=”Directions”]

  • Soak the Kala chana in water overnight. Boil it with 1 tsp salt in a pressure cooker with about 500 ml water.
  • In a kadhai, heat some mustard oil. Once it starts smoking and acquires a pale yellow color add the onion paste.
  • Cook the onions gently till its raw aroma disappears. Add the ginger garlic paste to it.
  • For a sweet flavor, add some sugar. This will also give a beautiful caramelized color to the gravy.
  • Once the raw aroma of the onions and ginger and garlic disappears, add the tomato paste. Saute this till all the water from the tomato reduces and a thick paste gets formed. This step is absolutely crucial otherwise you will have a curry with raw tomato smell.
  • Season with salt, cumin powder (jeera), black pepper powder, turmeric powder, and coriander powder. Mix well till the spices completely assimilate with the rest of the ingredients in the masala.
  • Now add the boiled Kala chana and water to this cooked masala paste. Stir well and boil it in high heat till you get your desired consistency.
  • Beat the curd well in a bowl and add it to the gravy. Give it a good stir. Make sure you use good quality, thick and fresh curd for this.
  • Just before you take it off the stove, add the garam masala and give it one last stir.
  • Serve with roti, rice or pulao with onions and pickle. [/directions]

veg recipes

Related recipe – Dhaba Style Chana Dal

If you want regular access to more such delightful food, you can follow me on Facebook, Instagram, Twitter, and YouTube.

Happy cooking!

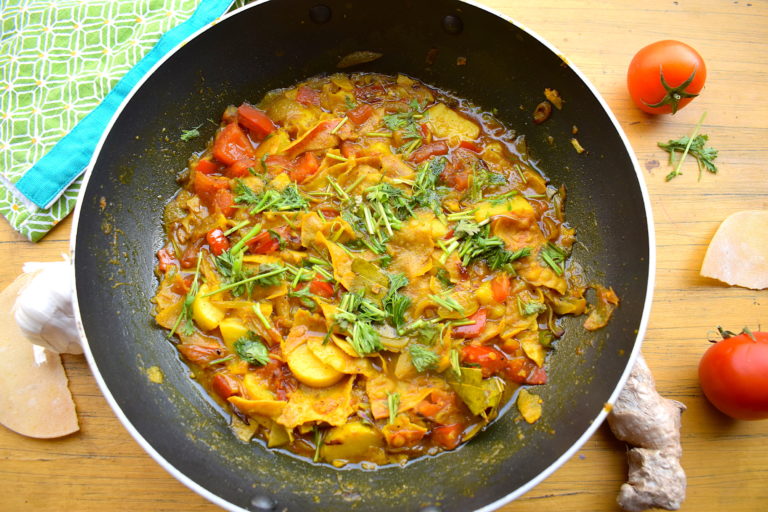
Indian Papad Curry | Veg Recipes

If you follow my recipes, you must have seen this trend where I often post recipes that trigger nostalgia, mostly from my childhood. Today’s recipe is no different.

Indian food is so vast, but some basics are the same in every state. A papad or a pappadum is a thin, crisp snack from the Indian subcontinent, with hundreds of varieties. Papad can be with gram flour, tapioca, potatoes and many other varieties. Different spices are added to it to prepare various renditions of this versatile snack. It is very easily available across stores in India and a regular in Indian meals.

This papad curry is one of those veg recipes I have loved throughout my childhood. My mother used to whip it up not too often, which made me ecstatic every time she would present it at the lunch or dinner table. I really do not know what I liked the most, but I enjoyed the fried papad in its soft form, along with the basic spice curry. But every time I would get my hands on this curry, it would always give me a warm, fuzzy feeling. I found it extremely comforting.

veg recipes

This dish is very easy to prepare. There is nothing extra that is needed to make it, just the usual onions, tomatoes, ginger, garlic, chilies, and coriander. I also like to out some boiled potatoes as that’s how I remember it. I have used basic papad here. You can replace it with any papad of your choice.

So here goes the childhood favorite recipe. Add this to your collection of veg recipes. I hope you try it.

Preparation time – 10 minutes

Cook time – 20 minutes

Serves – 2-3

[ingredients title=”Ingredients”]

  • 4 papads, deep fried in oil
  • 2 tbsp vegetable oil
  • 1 bay leaf
  • 2 medium onions, thinly diced
  • 2 green chilies, finely chopped
  • 1 tsp fresh ginger garlic paste
  • 1 tsp sugar
  • 1 tsp turmeric powder
  • 1 tsp cumin powder
  • 1 tsp black pepper powder
  • 2 tomatoes, finely chopped
  • 500 ml water
  • 2 boiled potatoes, cut in cubes
  • Chopped coriander leaves for garnish
  • Salt to taste [/ingredients]

[directions title=”Directions”]

  1. Heat oil in a kadhai. Deep fry four to five papads. Set aside for gravy.
  2. In another kadhai, heat some oil. Add the bay leaf, followed by the chopped onions.
  3. Saute the onions for about two minutes till they turn translucent. Add the slit green chilies to it.
  4. In order to add a beautiful brown color to the gravy and some sweetness, add the sugar at this point.
  5. Once the onions turn brown, add the fresh ginger garlic paste to it. Saute it till the raw aroma of the ginger and garlic disappears.
  6. Season the onion mix with salt, turmeric, cumin powder and black pepper powder. For best taste, make sure all these spices have been freshly ground.
  7. Finely chop the tomatoes and all at this point. The tomato will release its own juices which will add more flavor and texture to the gravy.
  8. Let the spices assimilate with the onions and tomatoes. Fry everything together in medium flame for about another minute till it all comes together. If the masala gets stuck to the bottom of the kadhai, add a dash of water so that it does not burn.
  9. Check when the tomato melts and completely harmonizes with the rest of the curry. At this point, crush the fried papads with your hand and add it to the gravy. Give it a gentle stir.
  10. It is at this time when you need to add the water, and cover and cook for another five minutes till you get your desired consistency. I like mine in a semi gravy.
  11. Garnish with freshly chopped coriander leaves and serve hot with plain rice, roti or pulao. [/directions]

veg recipes

veg recipes

I hope you like this extremely simple and hearty meal. It is one of my most favorite veg recipes. If you want, you can add some garam masala to this as well. Do let me know if you try this.

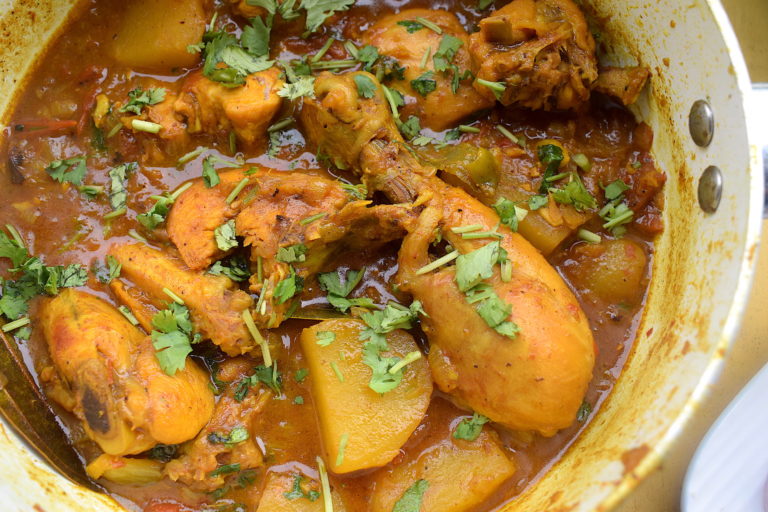
Assamese Style Chicken Curry With Chunky Potatoes

How many times do you take a bite of a dish that immediately transports you to a beautiful memory of times gone by? I love food that reminds me of my childhood or makes me nostalgic about events. This Assamese style chicken curry does this the best!

An Assamese chicken curry is simple, earthy and full of flavor. Having grown up in an Assamese household myself, I have never seen any spice being bought from the market. Everything is ground or pounded fresh at home, mostly just before making any dish.

Assamese chicken curry

How to make perfect chicken curry – A few tips

Making chicken curry is not a herculean task. Just a few factors learned and remembered right, and you can have a delicious bowl of it every now and then. No matter what kind of chicken curry you are making, just keep the following points in mind.

Always pat the chicken pieces dry before making them. You can do this with a paper towel. If your raw chicken has water dripping from it, the curry will not be its best version.

  • Always fry onions well before adding ginger-garlic paste and the rest of the spices. Onions should be fried till they turn golden brown and start to melt before adding spices and chicken.
  • Add a little sugar to the onions while cooking them. This not only helps onions caramelize faster but also lends a wonderful brown color to the gravy.
  • Add the tomato after the chicken pieces. This helps them cook faster.
  • Fry (bhuno) the chicken into the masala for at least ten to twelve minutes before adding water.
  • For best results, always use chicken with bones. Half the flavour lies in the bones.

Assamese chicken curry

Why do we use potatoes?

Assamese people love their potatoes and we put them in almost every dish. We couple potatoes with vegetables, meat, egg curries and varied kinds of fish. This chicken curry also has potatoes in it which is cooked along with the chicken. Adding potatoes actually gives them a whole new flavor, making them sweet as you bite into them once done.

The benefit of adding potatoes to chicken is that you know if the potato is cooked, the chicken is cooked too. My father taught me this technique. Quite a handy kitchen tip, right?

Why this chicken curry?

  • Delicious and super easy!
  • Healthy and quick
  • Simplest of ingredients which are probably already lying in your pantry.
  • A one pot meal, where you need to throw everything in a singular vessel.
  • Filling and a beautifully comforting meal with rice or roti.

Assamese chicken curry

Most people would have different versions of this Assamese chicken curry. Mine is a simple one, using less oil and water as a base of the gravy. I also believe Indian curries taste best when cooked with mustard oil, which is what I always use. So here’s the quick recipe for my favorite Assamese chicken curry. I hope you try it 🙂

Preparation time – 20 minutes

Cook time – 30-40 minutes

Serves – 2-3

[ingredients title=”Ingredients”]

  • 500 g chicken
  • 4 tbsp mustard oil
  • 2 bay leaves
  • 3 large onions, finely chopped
  • 2 green chilies, slit in half
  • 1 tbsp ginger garlic paste, fresh
  • 2 medium potatoes, cut in 4 large cubes each
  • 1 tbsp cumin powder
  • 1 tsp black pepper powder
  • 1 tsp turmeric powder
  • 2 tomatoes, chopped
  • 1 tsp fresh garam masala
  • 500 ml of water
  • Chopped coriander leaves for garnish
  • Salt to taste [/ingredients]

[directions title=”Directions”]

  1. Heat mustard oil in a kadhai till it comes to its smoking point.
  2. Add the bay leaves, followed by the chopped onions.
  3. Saute the onions for about two minutes till they turn translucent. Add the slit green chilies to it.
  4. Once the onions turn brown, add the fresh ginger garlic paste to it. Saute it till the raw aroma of the ginger and garlic disappears.
  5. Since we have cut the potatoes in big chunks, they will take some time to cook through. Add the to the kadhai at this point. I also fry the potatoes a bit so that it has its own taste in the final gravy.
  6. Season the onion mix with salt, turmeric, cumin powder and black pepper powder. For best taste, make sure all these spices have been freshly ground.
  7. Let the spices assimilate with the onions, add the chicken pieces. Fry everything together in medium flame for about another minute till it all comes together. If the masala gets stuck to the bottom of the kadhai, add a dash of water so that it does not burn.
  8. While the chicken is cooking along with the rest of the spices and potatoes, add the chopped tomatoes. The reason why I am adding tomatoes at this stage is so that the there is more water from the tomato that the chicken can use to cook in.
  9. Check when the tomato melts and completely harmonizes with the rest of the curry. It is at this time when you need to add the water, and cover and cook for about 15-20 minutes till the chicken becomes perfectly soft.
  10. Take off the lid, check the salt and if the chicken and potatoes are cooked through. Get your desired consistency. I like mine in a semi gravy.
  11. Garnish with freshly chopped coriander leaves and serve hot with plain rice, roti or pulao. [/directions]

Assamese chicken curry

Assamese chicken curry

I hope you try out this delicious and easy chicken curry. Let me know what you think! And stay connected 🙂 Here’s the video for this recipe:

If you have any questions, feel free to reach out to me with a comment or connect with me on Instagram or Facebook. For all my videos, you can subscribe to me on YouTube.

Happy cooking!

Related recipe – Simple Chicken Curry