Vegan Coriander Rice
With most of us in quarantine, we are all cooking a lot more in our kitchens and looking for ways to maximise the time we spend in the kitchen. Be it one-pot meals or easy recipes that can be made in large batches, the need for easy and healthy cooking has never been more. So I thought of doing my bit by sharing really easy and simple means which come together in no time, but also add a lot of cheer to the mind in these tough times. Here is an easy coriander rice recipe that remains a favorite in these times and I thought I should share the joy with all of you too.

coriander rice

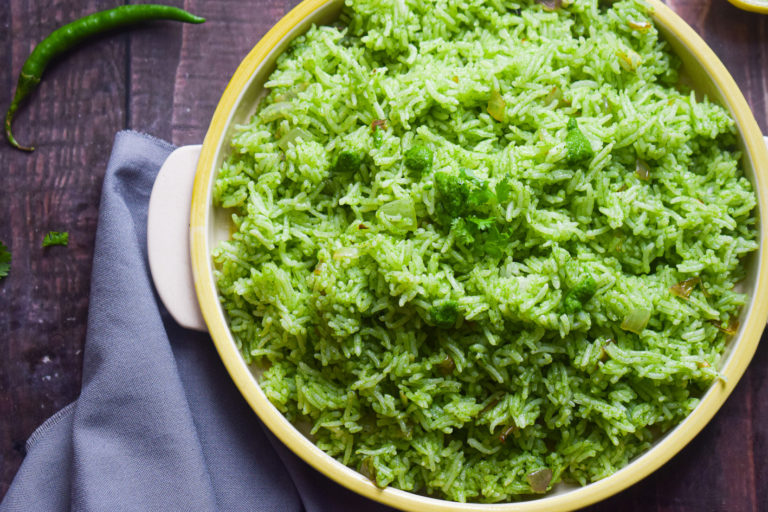
I honestly cannot emphasize enough on the brilliance of this simple recipe. Easy, local, economical and so delicious, this vegan coriander rice is such a great way to jazz up the regular white rice we have all been eating these days. It has so much flavour and freshness and uses just a handful of ingredients that are mostly available in Indian households. If you want to add some extra comfort to your meals, I would urge you to try this recipe.

The best part about this coriander rice is how you can use all the coriander lying in your house in one go, without wasting the stems. The maximum flavour comes from those stems so never ever throw them away while searching for the leaves. Spicy, sweet, tangy and filling, this rice can be made in big batches and served as a great side dish. I really hope you try it soon and love it as much as I do. You can also add some mint to this if you have or use a mixture of mint and coriander.

coriander rice

Hope you try this recipe and love it as much as I do.

coriander rice

Preparation time – 15 minutes

Cook time – 15 minutes

Serves – 4

[ingredients title=”Ingredients”]

  • 1 bunch fresh coriander leaves (about 60g)
  • 2 green chillies
  • 2 garlic cloves
  • 3 tbsp olive oil
  • Salt to taste
  • 1 large onion, finely chopped
  • 2 tbsp vegetable oil
  • Juice of half a lemon
  • 1 tbsp sugar
  • 5 tbsp water
  • 5 cups cooked white rice [/ingredients]

[directions title=”Directions”]

  1. Clean and pat dry the fresh coriander. Cut it just above the tip of the roots. We will use the stems and leaves to make the chutney.
  2. In a grinder, pack in the coriander, garlic, salt, chillies, olive oil and water. Grind to form a smooth paste. Set aside.
  3. Heat vegetable oil in a pan. Add the onion. Saute till they turn brown and translucent.
  4. Add the cooked white rice and gently mix on low heat.
  5. Season the rice with salt. Mix well in low heat.
  6. Once the rice seperate from each other, add the coriander chutney to it. Mix gently. Keep the flame on low at all times.
  7. Mix till everything combines well. Check for salt and sugar, add more if you desire as per your taste.
  8. Serve hot! [/directions]

coriander rice

For more such delightful food, follow me on Facebook, Instagram, and YouTube.

15 Minute Vegetable Fried Rice

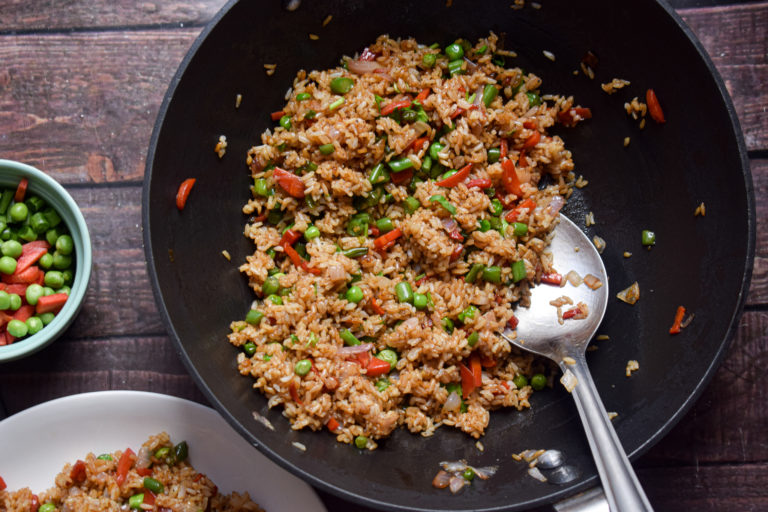
Here’s an easy way to whip up dinner in 15 minutes, while also ensuring you eat your vegetables. This vegetable fried rice is one of my go-to recipes every other day and I can never get enough of it.

The best part about this recipe is its ease and highly customisable option. You can make a large batch and add eggs, chicken or more vegetables of your choice. This vegetable fried rice uses the most minimal ingredients and is as simple as it can get. The it’s beauty lies in the freshness of its ingredients.

How to make the perfect fried rice every time

Fried rice might be a simple dish but it requires a few things done right every single time. The best kind of vegetable fried rice are those where each grain of rice is separate and cooked to perfection. Nobody likes a soggy plate of fried rice, nor does one want half cooked rice bites in their spoon. Apart from that the way the vegetables are cooked also matter a lot! They cannot be soggy or raw – just the right amount of crunch.

vegetable fried rice

vegetable fried rice

Here are some of the tips you might want to follow to make that perfect fried rice every single time.

  • Always use a wok for making fried rice because it helps is faster and uniform cooking.
  • Make sure your wok is really hot before you add oil and other ingredients.
  • Make sure the vegetables you add are chopped finely so that they can cook quickly.
  • The rice that you add to any fried rice should always be cold. Otherwise, it will stick to the wok and become lumpy. It’s best to use a day old rice.
  • If you add any protein like chicken or shrimp, cook them before you add the vegetables.
  • Add the soy sauce and vinegar just before you remove the wok from the gas stove.
  • Always garnish in the end after turning the gas off.

vegetable fried rice

vegetable fried rice

Cooking the perfect rice for frying

In this recipe, I have used joha rice, which is a flavourful small grained rice found in Assam, India. It is starchy and has a beautiful fragrant. You can use jasmine rice too. The quality of rice can really change the game. If you do not have jasmine rice, you can use any small grain rice available near you – broken basmati is a great choice!

vegetable fried rice

For small grained rice, wash them thoroughly under runnign water till the water is clear. Once they are thoroughly washed, add them to a pan, instant pot or a pressure cooker. If you are using 1 cup rice, use 1.5 cups of water to cook it. And once cooked, keep the rice covered for 10-15 minutes after turning off the gas. Keep the rice in the fridge overnight, and use it the next day for making fried rice.

Why this vegetable fried rice?

  • Delicious and super easy!
  • Healthy and quick
  • Better than takeout
  • You need 15 minutes to make this
  • Made with bare minimum pantry essentials.
  • Highly customizable!
  • Can be made in large batches.

vegetable fried rice

Preparation time – 15 minutes

Cook time – 15 minutes

Serves – 3

[ingredients title=”Ingredients”]

  • 30 ml vegetable/sesame oil
  • 2 slit green chillies (optional, add it if you like spicy food)
  • 100 g onions, finely chopped
  • 15 g garlic, finely chopped
  • 80 g carrots, chopped
  • 80 g green beans, chopped
  • 80 g fresh green peas
  • Salt to taste
  • 4 g black pepper powder
  • 150 g cooked white rice
  • 30 ml dark soy sauce
  • Coriander/spring onion greens for garnish [/ingredients]

[directions title=”Directions”]

  1. Heat oil in a wok. Let it smoke.
  2. Temper the oil with slit green chillies (optional).
  3. Add the chopped onions and fry till it starts to brown and becomes translucent.
  4. Add the sliced garlic and saute till its rawness fades.
  5. Next, add the beans, carrots, and peas and saute for about a minute or two on medium flame. Do not overcook the vegetables as they need to remain crunchy.
  6. Season with salt and pepper.
  7. Add the boiled and cold rice to the mixture. Mix well till the rice is heated through and everything gets mixed together perfectly.
  8. Pour in the soy sauce and mix well until every grain of the rice gets stained in the sauce.
  9. Garnish with fresh herbs – coriander or spring onion greens – whatever you have available!
  10. Serve with cucumbers and tomatoes on the side. [/directions]

vegetable fried rice

I hope you try this version of vegetable fried rice! Super simple and easy. Please feel free to add more vegetables or any protein of your choice.

If you have any questions, feel free to reach out to me with a comment or connect with me on Instagram or Facebook. For all my videos, you can subscribe to me on YouTube.

Related recipe – 30 Minute Stir Fry Noodles

Happy cooking!

Lehsuni Paneer

Having lived in Delhi for a decade, my love for North Indian food has grown immensely. From a person who was only about her plate of rice with fish and greens, I have become a fond lover of North Indian dhaba food.

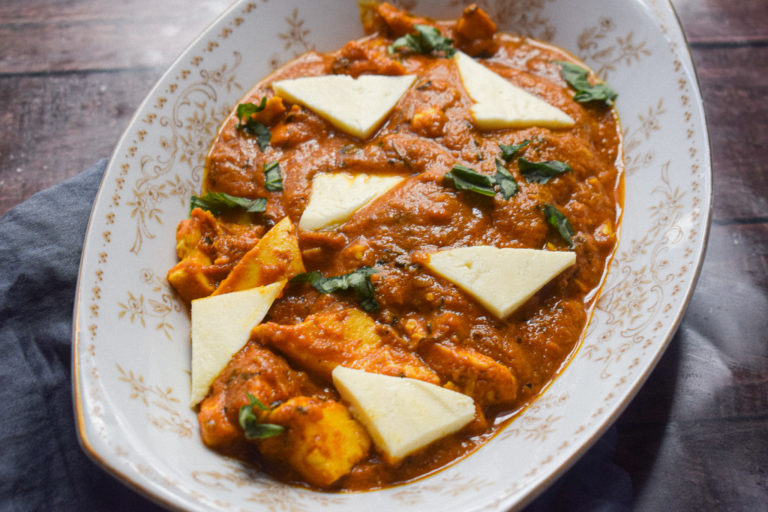
Here is an experiment for that love – Lehsuni paneer. I am a big fan of lehsun (garlic) so loved this recipe to bits. It is extremely simple to prepare and goes really well with some hot phulkas. I think tomatoes are usually not added to this recipe, but I added some tomato puree because I love to experiment, and it turned our all in the favour of great taste.

lehsuni paneer

This lehsuni paneer is a thick gravy, packed with loads of flavour. The aromatics and spices are quite minimal, but they bring about a really great balance of flavours. I hope you try this soon.

lehsuni paneer

Preparation time – 20 minutes

Cook time – 30 minutes

Serves – 3-4 people

[ingredients title=”Ingredients”]

  • 200 g paneer, cut in cubes
  • 30 ml mustard oil
  • 120 g onion paste
  • 2 green chillies, slit in half
  • 15 g garlic, finely chopped
  • 100 g tomato puree
  • 1 tsp cumin powder
  • 80 ml fresh cream
  • Salt to taste
  • 4 g turmeric powder
  • 4 g cumin powder
  • 200 ml hot water
  • 4 g kasuri methi/dried fenugreek leaves
  • 2 g garam masala
  • 15 ml ghee
  • Chopped coriander leaves for garnish [/ingredients]

[directions title=”Directions”]

  1. Heat mustard oil in a kadhai or skillet.
  2. Once the oil starts to smoke and turns into a pale yellow colour, add the onion paste. Saute till the rawness of the onion disappears.
  3. Add the green chillies and finely chopped garlic. Saute for a few seconds. Do not burn.
  4. Pour the tomato puree and stir in medium heat till its rawness leaves.
  5. Season with salt, turmeric powder and cumin powder. Mix well.
  6. Pour 50 ml hot water to prevent the masala from sticking.
  7. Beat fresh cream into the pan and mix till everything combines well.
  8. Add the rest of the hot water and let it come to a boil.
  9. Garnish with kasuri methi and stir.
  10. Add the paneer cubes towards the end to prevent them from breaking.
  11. Drizzle a tablespoon of ghee on top.
  12. Used chopped coriander leaves and garnish and serve hot with rotis or parathas. [/directions]

lehsuni paneer

lehsuni paneer

For more such delightful food, follow me on Facebook, Instagram, and YouTube.


30-Minute Vegetable Stir Fry Noodles

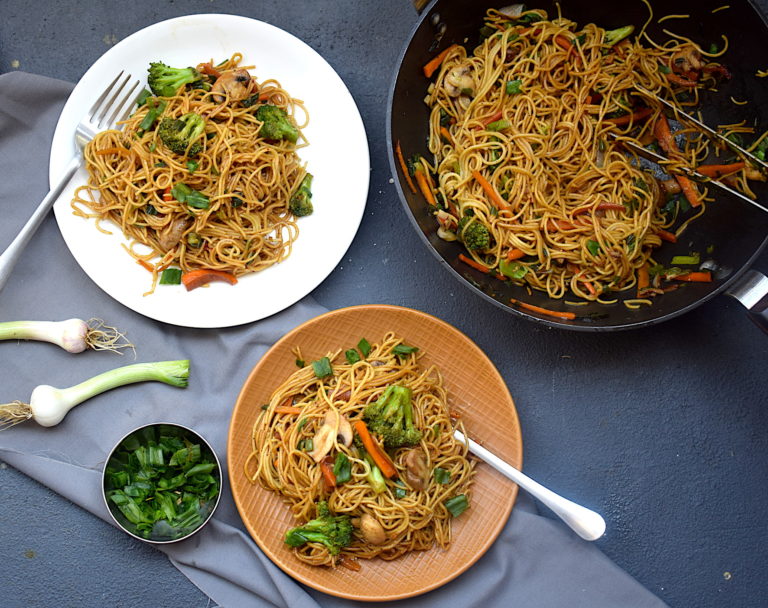
Vegetable stir-fry noodles are a great way to make something healthy for a busy day. For this easy noodle recipe, all you need are some of your favorite vegetables, a few basic Chinese ingredients, and good quality egg noodles. The vegetable add crunch, color, and health, the noodles are the perfect carbs and the sauces and spices make everything taste heavenly. If you ask me, it is one of the easiest dinners to make which also tastes really good!

easy noodle recipe

How to make perfect noodles every single time?

Making noodles the perfect way requires some amount of precision. You have to make sure that it is cooked just right – not over or under. Different kinds of noodles require different methods to get cooked perfectly. For lo mein or stir fry noodles recipe like this one, make sure you follow the package instructions.

  • For this particular recipe, I boiled the egg noodles for 2-3 minutes in salted water. Make sure the water is bubbling when you put in your noodles. The trick is to take it out when it is 70 percent cooked because the noodles will keep getting softer while they are still hot. So take it out immediately once they are 70 percent there.
  • Add enough water so that the noodles are completely submerged in it. I usually fill up the whole pot with water (about 1.5 liters of water). Otherwise, there is a chance of noodles getting stuck at the bottom or worse – getting burnt!
  • Strain off every last bit of water and mix any neutral oil without any smell. I use vegetable oil.  You can also cook the noodles and immediately wash it under cold water so that it stops cooking. But since I added salt to min, I don’t do that. But like I mentioned, each kind of procedure will vary according to the package instructions to make sure you follow the instructions.

Why this vegetable stir fry noodles?

  • Delicious and super easy!
  • Healthy and quick
  • Better than takeout
  • You need 20 minutes to make this
  • Made with basic Chinese pantry essentials
  • Highly customizable!
  • Top it off with toasted sesame seeds for extra crunch.

easy noodle recipe

You guys love the Pan-Asian recipes on the blog so much so I thought I should add this as well. Because this is a regular for me on those rushed days. Because my aim is to make it easier for you guys to cook your own food and not order it every single day. Nothing tastes better than homemade food, right?

The ingredients used in this recipe are minimal. The aromatics include a lot of ginger and garlic because they are the champions of flavor in Chinese food. Sesame oil gives this recipe an authentic taste and flavor, so I would suggest you do not use any substitutes. But if you do not like sesame oil at all, go ahead and use vegetable oil.

Preparation time – 10 minutes

Cook time – 20 minutes

Serves – 3-4 people

[ingredients title=”Ingredients”]

  • Egg noodles, 200 g
  • Sesame oil, 2 tbsp
  • Finely chopped ginger, 50 g
  • Garlic, finely chopped 50 g
  • One small broccoli, cut into florets
  • Button mushrooms, 150 g
  • One small carrot, cut into matchsticks
  • Brown sugar, 1 tsp
  • Chopped spring onion greens, 100 g
  • Sweet chili sauce/schezwan sauce, 1 tbsp
  • Oyster sauce, 1 tbsp
  • Dark soy sauce, 1 tbsp
  • 2 tsp black pepper powder
  • Salt to taste [/ingredients]

[directions title=”Directions”]

  1. Boil water in a pot. Add a handful of salt and stir.
  2. Once the water starts to boil, add the egg noodles to it and cook for 2-3 minutes (or follow package instructions).
  3. Drain water using a sieve. Transfer the noodles to another vessel and layer it with vegetable oil so that the noodles don’t stick to one another. Use a pair of tongs to mix the oil uniformly. Tongs will ensure the noodles don’t break. Set aside.
  4. Heat sesame oil in a wok. Once hot, add the ginger and garlic and saute for a minute.
  5. Add the broccoli, mushroom, and carrots to the oil and saute for two minutes. We do not want to overcook the vegetables because they need to remain crunchy in the final recipe.
  6. Add the spring onion greens and stir for ten seconds.
  7. Now add the cooked noodles to the wok. Mix the chili sauce, oyster sauce, and soy sauce and toss everything up a pair of tongs. Do not use a spoon or fork to do this as you do not want your noodles to be broken.
  8. Check the salt and season with salt and some pepper. Give it a good mix with the tongs.
  9. Garnish with some more spring onion greens and sesame seeds.
  10. Serve hot! [/directions]

easy noodle recipe

easy noodle recipe

Some more tips:

  • You can add any kind of vegetables or protein here. Vegetarians can add tofu and non-vegetarians can add chicken or scrambled eggs. Chicken thighs work best as they are tender and juicy without the probability of getting overcooked.
  • If you like things spicy, you can make your own Schezwan sauce at home and store it. I have a recipe on the blog for that that so many readers have loved 🙂
  • Always check on the salt before you add more.

I hope you try this really easy noodle recipe at home. Do not forget to share your stir fry noodles picture and link it to #slurrpitup on Instagram.

easy noodle recipe

If you have any questions, feel free to reach out to me with a comment or connect with me on Instagram or Facebook. For all my videos, you can subscribe to me on YouTube.

Happy cooking!

The BEST Fudgy Chocolate Brownie Recipe

Chocolate brownies are love. The fudgier, the better. Right?

fudge chocolate brownie

If you also are a lover of fudgy chocolate brownies like me, I am going to give you my secret recipe which has taken years to form. Because making the best, fudgy chocolate brownie might not be as simple as it may seem.

I have tried many versions over the years and this particular recipe is the one that I have come to swear by. And trust me, it is simple once you have the recipe with you. Anyone can make it!

fudge chocolate brownie

fudge chocolate brownie

This fudgy chocolate brownie is perfect, with a gorgeous crackle on top and a gooey center. Each bite is rich and dense and will transport you into dessert heaven. That’s my promise.

This recipe is made in two fundamental steps, for which you will need two glass bowls. The first step uses a double boiler to melt the butter and the chocolate. The second step is to mix the dry and wet ingredients to form the batter. The brownie batter is a mixture of the two steps.

Preparation time – 15 minutes

Bake time – 30-40 minutes

Quantity – 5-6 pieces

[ingredients title=”Ingredients”]

  • Semi-sweet dark chocolate, 200 g
  • Butter, 110g
  • Granulated white sugar, 120 g
  • Brown sugar, 50 g
  • 1 tsp instant espresso powder (optional)
  • 1 tsp vanilla essence
  • 3 medium eggs
  • All-purpose flour, 180 g
  • Unsweetened cocoa powder, 80g [/ingredients]

[directions title=”Directions”]

  1. Grease a baking tray with oil or butter and line it with parchment paper, leaving an overhang on all sides.
  2. Preheat your oven at 200 degrees celcius/392 degree Fahrenheit.
  3. Take some water in a saucepan and heat it. Once the water starts to simmer, place a glass bowl on top of it in a way that it does not touch the water. Keep the flame at low.
  4. Cut the semi-sweet dark chocolate into small pieces and add them to the glass bowl on top of the saucepan. We call such an arrangement a double boiler.
  5. To the same bowl, add the butter, instant espresso powder (optional). Mix it and let it melt completely. The instant espresso powder will elevate the taste of the chocolate without adding any coffee flavor. If you want, you can skip adding the espresso powder.
  6. Keep the flame at low at all times. Once done, take out the glass bowl and allow the chocolate and butter mixture to cool.
  7. In another glass bowl, mix the white sugar and the brown sugar. I have used very small white and brown sugar. I like the texture of it in the final brownie. You can crush your sugar if you want.
  8. To the sugar, add one egg at a time and mix till it becomes creamy and acquires a pale yellow color.
  9. Pour some vanilla essence to the creamy sugar and egg mixture. Mix well with a spatula or a whisk.
  10. Now pour the cooled down chocolate and butter mix into this bowl. Make sure it’s completely cooled down otherwise the eggs can get scrambled.
  11. Mix the chocolate, butter and egg mixture very gently with a spatula till it turns dense and dark.
  12. Sieve the all purpose flour and cocoa powder through into chocolate and egg mixture. Fold gently with a spatula till it all comes together. Do this slowly, but make sure not to overmix.
  13. Pour the brownie batter over the prepared baking tray and spread it evenly with the spatula.
  14. Bake in your pre-heated oven for 35-40 minutes till you see a brownish golden crackle on top.
  15. Let it cool for at least 30 minutes before you cut the fudgy chocolate brownie into pieces.
  16. Enjoy your fudgy chocolate brownie with some ice cream and chocolate sauce drizzled on top. Or grab one just like that! [/directions]

fudgy chocolate brownie

fudgy chocolate brownie

I hope you try this really delicious and fudgy chocolate brownie for yourself and enjoy it as much as I do. Do not forget to share your chocolate walnut brownie picture and link it to #slurrpitup. You can also add walnuts if you like 🙂

If you have any questions, feel free to reach out to me with a comment or connect with me on Instagram or Facebook.

Happy baking!

Prawn Curry With Lemongrass and Coconut

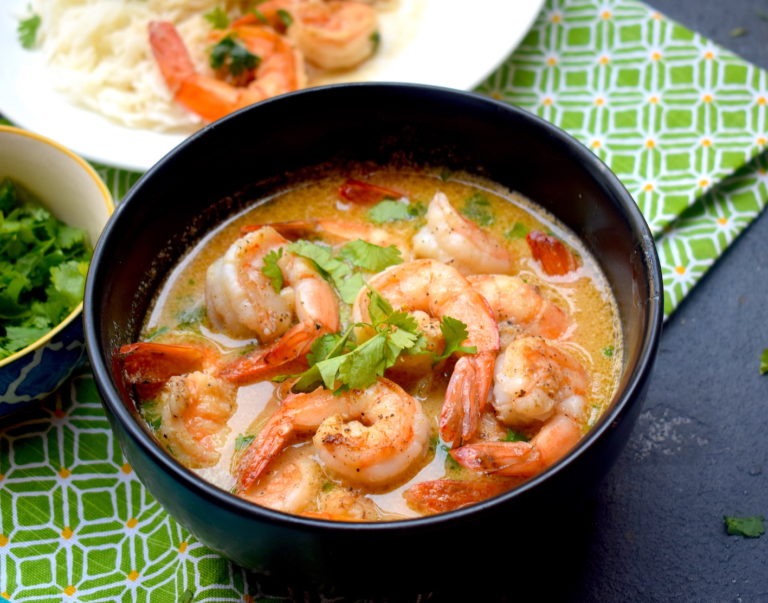
I am a huge fan of light curries. Curries that are not super rich in texture, but are full of flavor and taste. This prawn curry with lemongrass and coconut is one of my absolute favorites.

The fragrance of lemongrass is known to all, and this curry is so fresh and refreshing that it will make your heart skip a beat.

prawn curry with lemongrass

prawn curry with lemongrass

I got the inspiration for this recipe when I visited Bali in 2018. I had one of the best dinners in Ubud – a lemongrass prawn curry and rice. One bite into it and I knew I was in love. Such distinct and fresh flavours, and simple style of cooking. It appealed to me immediately and I have told everyone I know about that particular prawn curry. So I noted it down and have been making it ever since at home.

prawn curry with lemongrass

The broth of this curry has been reduced after putting together a lot of delightful ingredients, and the lemongrass is the hero. The coconut gives a lot of creaminess, flavor, and texture to the gravy. The broth is silky smooth as I have strained it completely, extracting all the flavor and juices out of the ingredients. Every drop of it is heaven, along with the juicy prawns. Pure bliss and one of my personal favorites. I hope you try it and love it as much as I do.

Preparation time – 30 minutes

Cook time – 30 minutes

Serves – 3-4 people

[ingredients title=”Ingredients”]

  • 400 g prawns, cleaned and deveined
  • 80 g fresh lemongrass stalks, cut into chunks
  • 2 medium onions
  • 40 g ginger
  • 1 dried red chili, soaked in warm water for 30 minutes
  • Salt to taste
  • 2 tsp pepper powder
  • 50 g fresh coconut
  • 1 tsp sugar
  • Juice of 1 lemon
  • 400 ml hot water
  • Chopped coriander leaves for garnish
  • 3 tbsp vegetable oil [/ingredients]

[directions title=”Directions”]

  1. Clean and devein the prawns. I have kept the tail on but you can remove it if you like. Pat the prawns dry with paper towel.
  2. Add the prawns to a mixing bowl. Marinate with salt and 1.5 teaspoons of freshly ground black pepper powder. Mix well with a spoon till every prawn is coated with the salt and pepper.
  3. Heat two tablespoons of oil in a pan. Fry the prawns in the hot oil, one minute each side. Set them aside.
  4. Get fresh lemongrass. Look for stalks that are fragrant, tightly formed and lemony green in color in the lower stalk (near the bulb). Chop off the lower stalk as that is the most fragrant part. Chop it into chunks.
  5.  Add the lemongrass chunks, ginger, onions, soaked red chili and lemon juice. Add a little water and grind it all to form a thick paste.
  6. Heat 1 tablespoon oil in a pan. Once hot, add the lemongrass paste to it. Fry this till the raw aroma of the onions and ginger completely disappear. Keep the flame at medium so that it does not burn.
  7. Add sugar to the paste. Mix well.
  8. Once the paste releases all its water and the raw aroma disappears completely, add 400 ml of hot water. Mix well till the gravy starts to bubble.
  9. Now turn off the heat for a minute and strain the gravy (see video) onto a bowl. Make sure you extract every drop out of the base so that all you are left with are the shreds of the lemongrass and ginger.
  10. Put this strained and silky smooth gravy back into the pan and let it boil.
  11. Once the gravy starts to bubble, add the fried prawns. Give it a good mix and let it bubble away aggressively for about two minutes. Check salt and add more if required.
  12. Do not overcook. Garnish with fresh coriander leaves. Serve hot with boiled rice. [/directions]

prawn curry with lemongrass

prawn curry with lemongrass

For more such delightful food, follow me on Facebook, Instagram, Twitter, and YouTube.

If you are new to the kitchen or are confused about what to buy for my recipes/kitchen tools, I can help. I have curated a special list that you can order right from Amazon and get the best products for your kitchen. Click here to explore.


Whole Wheat Masala Paneer Puris

I am a big fan of puris. Though in Assam we have luchis, which are lighter and fluffier flatbreads, I don’t mind puris as well. India serves its people so many varieties of puris. Spinach, masala, potatoes – there is something for everyone! But have you ever heard of masala paneer or cottage cheese puri?

whole wheat paneer puris

whole wheat paneer puris

Well, I had not either till I experimented with these whole wheat paneer puris one day. The results were so fabulous that it took me by surprise. These puris are not just yummy, but so crunchy and perfect. It is just one of my best discoveries and it will blow you away too, I promise.

So let’s get straight to the recipe without any delay:

Preparation time – 30 minutes

Cook time – 20 minutes

Serves – 3-4 people

[ingredients title=”Ingredients”]

  • 250 g whole wheat flour (atta)
  • 1 tbsp ghee
  • 200 g paneer (cottage cheese)
  • 2 tsp Kashmiri red chili powder
  • 50 g coriander leaves, finely chopped
  • 2 tsp carrom seeds (ajwain)
  • 1 tsp garam masala
  • Salt to taste
  • 2 tbsp Kasuri methi or dried fenugreek leaves
  • Water for kneading
  • Refined oil for deep frying [/ingredients]

[directions title=”Directions”]

  1. Grate the paneer and add it to the whole wheat flour in a mixing bowl. Mix the two together gently with your fingers, forming a light crumble.
  2. Add the ghee and mix it well with the flour.
  3. Mix the salt, carrom seeds, red chili powder, fenugreek seeds, chopped coriander leaves and garam masala to the flour and paneer mix. Combine everything well with your hands.
  4. Add water at room temperature, little by little, till a soft dough is formed. Add water in intervals, to ensure the dough doesn’t get too sticky. You will not need too much water because the cottage cheese will release some water into the dough as well.
  5. Once the dough is ready, rub it with some oil on all sides. Cover and keep it aside for 30 minutes.
  6. Make small rounds with the dough. Roll them out with a rolling pin into small puris. Don’t make them too thick or thin.
  7. Heat oil in a kadhai. The oil should be enough that the puri gets completely immersed in it.
  8. Once the oil is hot, fry the puris. Press it with your cooking spoon and let the puri get immersed in the oil. Flip the puri and cook both sides.
  9. Enjoy hot and crispy with chole, raita, subzi or gobble them up just like that! [/directions]

whole wheat paneer puris

whole wheat paneer puris

whole wheat paneer puris

For more such delightful food, follow me on Facebook, Instagram, Twitter, and YouTube.

If you are new to the kitchen or are confused about what to buy for my recipes/kitchen tools, I can help. I have curated a special list that you can order right from Amazon and get the best products for your kitchen. Click here to explore.

whole wheat paneer puris

And as always, happy cooking! <3

Tomato Chicken Curry | Dinner Recipes

There are certain kinds of recipes that stay your favorite all life. They evoke memories, take you back to happier times and definitely make your meal special. This simple chicken curry holds that kind of significance for me.

It is one of the most comforting recipes that I love whipping up every now and then in my kitchen. This recipe is easy, takes a little bit of patience, and comes together as a gorgeous combination with rice and parathas. Just like everyone has their own version of homemade chicken curry, this one is mine. And it never disappoints!

chicken curry

chicken curry

The main difference in this chicken curry comes from everything being used in its paste form. This mainly means that you have to cook the onion and tomato paste for a tad longer than usual, making sure it is cooked through to make way for a rich gravy. And it tastes best that way. The highlight, of course, is the fresh tomatoes which add lots of flavor, texture, and color to the chicken gravy.

chicken curry

chicken curry

The curd or yogurt is also a common man’s addition to make any gravy taste and look royal. I have used curd here as well, the thickest kind you can find around you. Please do not opt for “slim” or “toned” versions of dairy, because full fat is what we need!

Preparation time – 20 minutes

Cook time – 40 minutes

Serves – 3-4 people

[ingredients title=”Ingredients”]

  • 1 kg of chicken
  • 4 tbsp mustard oil
  • 3 medium onions, ground to a paste
  • 4 medium tomatoes, ground to a paste
  • 1 tbsp fresh ginger garlic paste
  • 1 tsp cumin powder
  • 1 tsp coriander powder
  • 1 tsp turmeric powder
  • 1 tsp black pepper powder
  • 100 g thick curd
  • 1 tsp garam masala
  • 500 ml hot water
  • 2 green chilies
  • Chopped coriander for garnish
  • Salt to taste [/ingredients]

[directions title=”Directions”]

  1. Wash and pat dry the chicken pieces with a kitchen towel. Set aside.
  2. Heat mustard oil in a pan. Once it starts smoking and turns into a pale yellow color add the onion paste. Saute for about eight minutes on medium flame till the raw aroma of the onion disappears and the water from it evaporates.
  3. Add the fresh ginger garlic paste to the onions and saute for two to three minutes.
  4. Once the onions and ginger garlic cooks, add the fresh tomato paste. Saute this till all the water from the tomato reduces and a thick paste gets formed. This step is absolutely crucial otherwise you will have a curry with raw tomato smell.
  5. Season with salt, cumin powder (jeera), black pepper powder, turmeric powder, and coriander powder. Mix well till the spices completely assimilate with the rest of the ingredients in the masala.
  6. Once the tomato forms a thick paste and is completely cooked, add the chicken pieces. Saute the chicken pieces gently mixing it into the tomato and onion masala. Make sure every part of the chicken gets assimilated well with the masala. Stir for five to seven minutes till chicken starts to cook.
  7. Pour in hot water into the masala and stir well. Cover and cook this on a medium flame for twenty minutes.
  8. Take the lid off and check if the consistency of the gravy is at your desired level. Based on the consistency you want, you can let the curry simmer for more or less time.
  9. Add garam masala and fresh coriander leaves for garnish. Serve hot with rice, pulao or flaky parathas! [/directions]

chicken curry

If you want regular access to more such delightful food, you can follow me on Facebook, Instagram, Twitter, and YouTube.

Happy cooking!


Rainbow Noodle Soup

A perfect combination of health, color, and comfort, this rainbow noodle soup is a must have! Especially on those rainy or cold nights where all the heart seeks is some comfort food. Try out this rainbow noodle soup and fall in love with it. Extremely simple to make and also highly customizable, and the egg on top is like a cherry on the cake!

rainbow noodle soup

The key ingredients in this rainbow noodle soup are lots of vegetables, cooked carefully till they are crunchy but not soggy (nobody likes that!). The results are absolutely amazing. Here’s the recipe:

Preparation time – 20 minutes

Cook time –  30 minutes

Serves – 2-3 people

[ingredients title=”Ingredients”]

  • 100 g noodles (any kind would do)
  • 250 g button mushrooms
  • 100 g baby corn
  • 1 medium carrot
  • 6-7 cloves of garlic
  • 50 g butter
  • 2 tbsp vegetable oil
  • 200 ml of vegetable stock
  • 1 tbsp dark soy sauce
  • 1 tbsp sesame oil
  • 1 green chili (optional)
  • 2 tsp black pepper powder
  • Spring onion greens for garnish
  • Salt to taste [/ingredients]

[directions title=”Directions”]

  1. Dice all the vegetables (except the mushrooms) into medium pieces. Wash and set aside.
  2. Cook the noodles in boiling water as per package instructions. Add some oil and salt in it so that they do not stick to each other. Strain and set aside.
  3. Heat vegetable oil in a pot. Add the butter and stir the two together.
  4. Put in the finely chopped garlic into the bowl. Stir it into the oil in low heat. This will enable the flavor of the garlic to get infused into the oil and not burn it. This technique is known as sweating the garlic.
  5. After around two minutes, add the vegetables to the oil and fry for two to three minutes. Season with salt and pepper powder. I like my vegetables to be crunchy in the broth which is why I do not overcook them. Two to three minutes is enough for the vegetables to transform from the raw stage to the crunchy sauteed stage. Once done, take the vegetables out of the pot and set them aside.
  6. In the same pot, pour in the vegetable stock and let it come to a full boil. Season with salt and pepper as required. Make a mix of sesame oil and dark soy sauce and add it to the broth. Cook an egg till the broth reduces by one-third.
  7. Time to assemble. Take a large bowl, pour in the seasoned broth. Now add the cooked noodles to it. Top it off with the sauteed vegetables and a fried egg.
  8. Garnish with chopped spring onion leaves and chili if you would like some heat as well. Serve hot! [/directions]

rainbow noodle soup

rainbow noodle soup

rainbow noodle soup

Feel free to add any vegetables of your choice to this noodle soup. Broccoli, cauliflower, spinach, tofu, and beans can be some great additions. Just go with your instinct and preference. For non-vegetarians, you can add some chicken or any other protein you prefer. I hope you do try this gorgeous and colorful noodle soup for yourself. I promise it will not disappoint.

If you have any questions or suggestions, feel free to reach out to me with a comment or connect with me on Instagram or Facebook.

Happy cooking!

One Pot Yellow Moong Dal

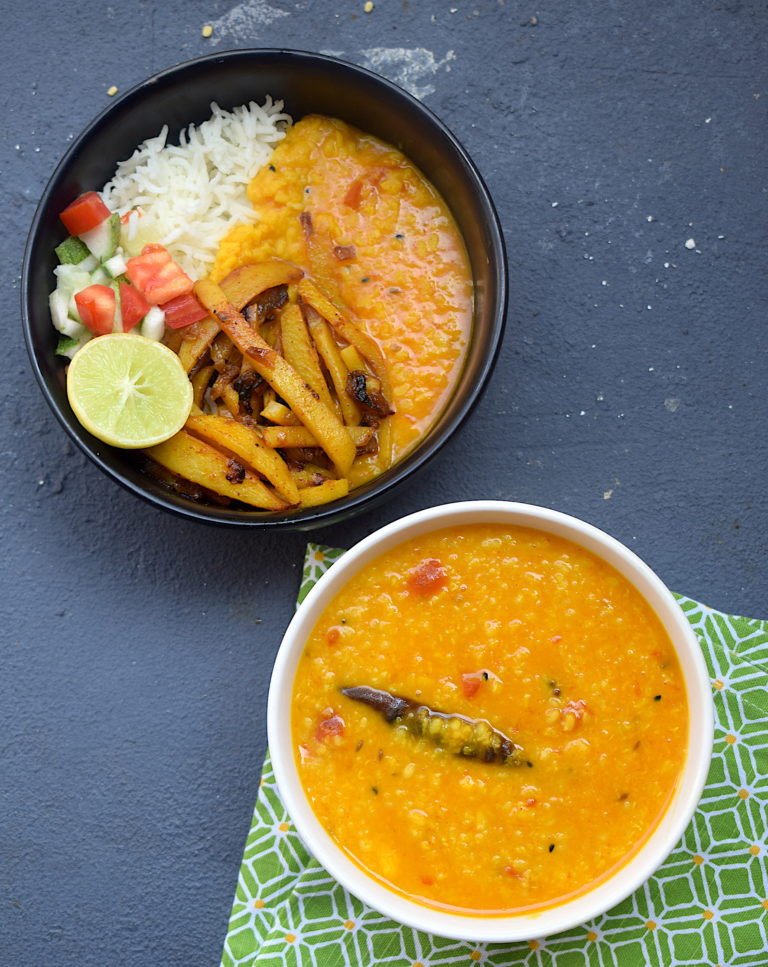
Try out this 30-minute yellow moong dal recipe and never go hungry again! I have been making this dal for years now, and it is a regular in my kitchen. Super simple and loved equally by all, this vegan dal is a crowd pleaser. Make this along with some rice and potato fry and you have a winning combo! I love cooking with yellow moong dal since it takes no time to get ready.

The key differentiator here is the panchphoran. For those new to this term, panchphoran is a Bengali five spice mix which is easily available in any Indian grocery store. You can make your own by mixing equal portions of the following whole spices – fennel seeds (saunf), mustard seeds (rai), fenugreek seeds (methi), cumin seeds (jeera) and nigella seeds (kalonji).

yellow moong dal

yellow moong dal

The ingredients in this vegan yellow dal are minimal, but the results are absolutely amazing. A hearty and comforting dal recipe ready to go in minutes. Here’s the recipe:

Preparation time – 10 minutes

Cook time –  30 minutes

Serves – 3-4 people

[ingredients title=”Ingredients”]

  • 200 g yellow moong dal
  • 2 tbsp mustard oil
  • 1 tsp panchphoran
  • 1 dried red chili
  • 1 tomato, finely chopped
  • 1 tsp crushed garlic
  • 1 tsp turmeric powder
  • 500 ml of water
  • 1 tsp Kashmiri red chili powder
  • Salt to taste [/ingredients]

[directions title=”Directions”]

  1. Thoroughly wash the yellow moong dal. Soak it in water for ten to fifteen minutes. This will help cook them faster and also get rid of preservatives or color if any. Set it aside once done.
  2. Heat mustard oil in a pressure cooker. Allow the heat to release smoke and turn into a pale yellow color.
  3. Add the dried red chili, followed by the panchphoran and garlic and stir for about five seconds. Do not burn.
  4. Finely chop the tomatoes and add to this mixture. Stir for a minute till onions soften.
  5. Once the onions soften, add the washed yellow moong dal into the pressure cooker. Stir well.
  6. Season with salt, turmeric powder and red chili powder. Stir well.
  7. Pour in the water and give it one last stir.
  8. Pressure cook the dal for two whistles and allow it to cool.
  9. Remove lid once al the pressure comes out of the cooker. Serve hot with boiled rice. [/directions]

yellow moong dal

yellow moong dal

yellow moong dal
Tastes perfect with alu bhaji, salad and lemon!

I hope you do try this vegan yellow moong dal for yourself. I promise it will not disappoint.

If you have any questions or suggestions, feel free to reach out to me with a comment or connect with me on Instagram or Facebook.

Happy cooking!

yellow moong dal