Easy Dal Makhani | With Video
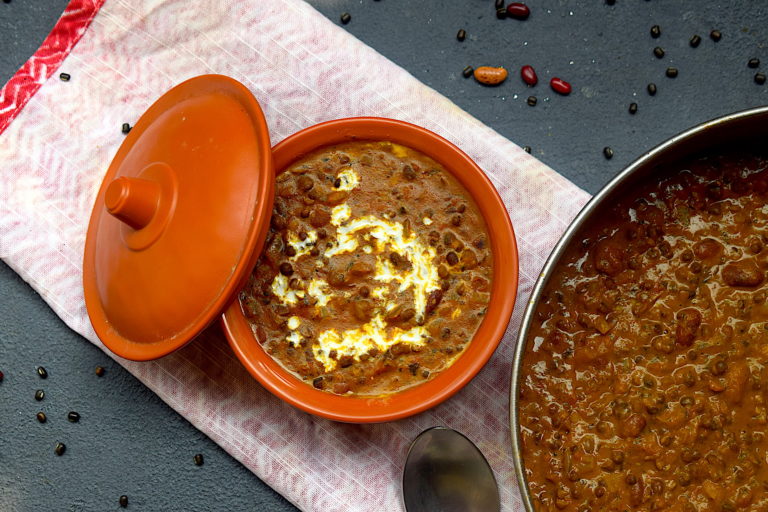
Who doesn’t like a nice, steaming bowl of dal makhani? It is one of the most popular dal recipes of north India and so for a reason. Rich, creamy and utterly delicious, there is no reason to not make this dal makhani recipe at home.

dal makhani

This dal makhani is a regular at my house. While the traditional and authentic dal makhani (or dal Bukhara) recipe requires slow cooking for hours and an addition of a lot of heavy elements to it, this version is NOT that. This rendition is lighter, very simple and involves just 30 minutes of simmering.

Dal makhani literally translates to dal being cooked in makkhan or butter. Again, this recipe is very light on butter and cream. It is not as heavy as a restaurant version, but what I can say with all my confidence is that it is DELICIOUS! I get messages from so many of you asking for tasty and easy recipes. Well, there you go! Make dal makhani without getting intimidated by it and make it like a pro!

dal makhani

Preparation time – 30 minutes

Cook time –  40 minutes

Serves – 4 people

[ingredients title=”Ingredients”]

  • 200 g black lentils
  • 50 g red kidney beans
  • 500 ml of water
  • 2 onions, finely chopped
  • 2 tbsp ginger garlic paste
  • 3 large tomatoes, pureed in a blender
  • 2 tbsp ghee
  • Salt to taste
  • 1 tsp turmeric powder
  • 1 tsp Kashmiri red chili powder
  • 1 tsp cumin powder
  • 1 tsp coriander powder
  • 3 tbsp fresh cream
  • 50 g butter
  • A handful of Kasuri methi
  • 1 tsp garam masala
  • Salt to taste [/ingredients]

[directions title=”Directions”]

  1. Thoroughly wash the black lentils and red kidney beans. Soak it overnight in water.
  2. Drain the lentils and keep aside the next morning.
  3. In a pressure cooker, put the black lentils and kidney beans. Add one tablespoon salt and water. Mix well. Let this cook for six to seven whistles. Set aside.
  4. Heat ghee in a kadhai. Add the chopped onions. Saute till onions become translucent and start browning.
  5. Once the onions are cooked, add the fresh ginger-garlic paste. Stir till the raw aroma of the ginger and garlic disappears.
  6. Add the tomato puree and cook for about ten to fifteen minutes. The water from the puree needs to dry up completely and stir till oil starts to release from the paste.
  7. Do not let this burn, cook in medium flame. Add warm water whenever necessary to prevent it from sticking to the bottom of the kadhai.
  8. Season with turmeric powder, Kashmiri red chili powder, coriander powder, and cumin powder. Mix well.
  9. Pour in the pressure-cooked dal into this gravy and mix till it all comes together. Check salt and add if required.
  10. Bring the dal to a boil and once it gets thick, add the cream and mix well.
  11. Add the butter after the cream and mix well.
  12. Next, add a handful of dried fenugreek leaves or Kasuri methi and give the dal one last stir before you let it simmer.
  13. Cover and let the dal simmer in low heat for another 30 minutes.
  14. Remove lid and season the dal with garam masala.
  15. Pat a spoonful of ghee on top and enjoy hot with parathas or plain rice. [/directions]

dal makhani

dal makhani

dal makhani

I hope you do try this simple and mouth-watering dal makhani for yourself. You have to ensure that the lentils are soaked in water for at least six hours. And the simmering, in the end, is also required to get a thick and delicious consistency. A little bit of patience and you can have a wonderfully thick gravy in about an hour.

If you have any questions or suggestions, feel free to reach out to me with a comment or connect with me on Instagram or Facebook.

Happy cooking!

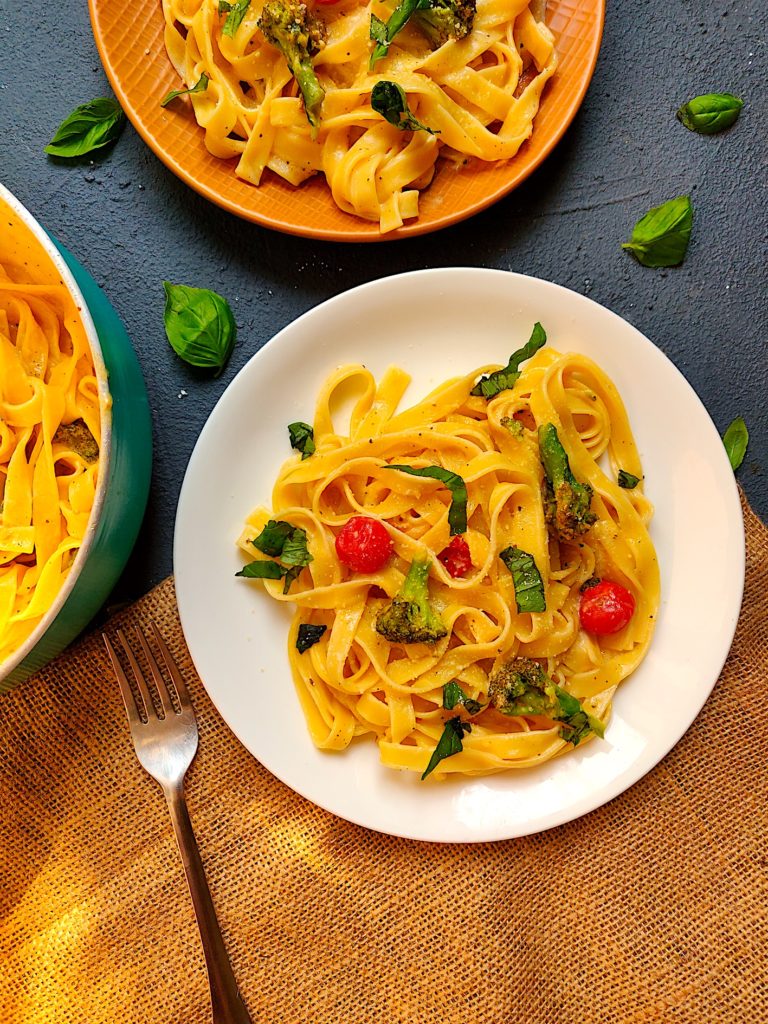
Fettuccine Alfredo With Broccoli & Cherry Tomatoes

Alfredo sauce is love! Anything with Alfredo in it makes life better. Don’t you agree?

But usually, Alfredo makes people think of a thick and heavy sauce that makes you full till your neck. Fear not! This fettuccine alfredo is light, yet creamy. Believe it or not, a major part of the sauce is the reserved pasta water.

fettuccine Alfredo

fettuccine alfredo

It is one of the simplest dishes that comes together in 20 minutes tops, and it tastes heavenly even in its most basic form. Unlike most Alfredo recipes, the sauce for this one is quite thin, yet super luxurious. The secret is the pasta water and very little cream. So what you end up eating is a very light pasta that does not leave you gasping for breath. It is not overloaded with cream or cheese, but tastes just beautiful in all its simple glory. I went ahead and added some broccoli and cherry tomatoes.

You can seriously throw in whatever vegetables or protein you like. If you get the basic technique right, there is no way this is going to taste any less delicious. Or maybe you can come up with your own version and let me know about it someday!

So let’s get straight into the secret of this delightful pasta dish.

Preparation time – 20 minutes

Cook time –  30 minutes

Serves – 3 people

[ingredients title=”Ingredients”]

  • Fettuccine pasta, 300 gms
  • Steamed broccoli florets, 300 g, steamed for five minutes.
  • Cherry tomatoes, 200 g
  • Garlic, 3 cloves
  • 30 g butter
  • 3 tbsp extra virgin olive oil
  • 3 tbsp fresh cream
  • 1/2 cup Italian Basil leaves
  • 1 tbsp pepper
  • 100 g grated Parmesan cheese
  • Salt to taste [/ingredients]

[directions title=”Directions”]

  1. Boil water in a wide pot. Add two tablespoons of salt to the water and let it bubble.
  2. Add the fettuccine pasta to the water and let it cook it is al dente (80% cooked). See the package for exact instructions.
  3. While the pasta is boiling, start making the sauce simultaneously. Heat olive oil in a pan. Keep the flame at low intensity.
  4. Throw in the butter and lightly stir, allowing the butter to melt softly and assimilate with the olive oil.
  5. Finely chop the garlic and add it to the olive oil and butter. The heat has to be low at all times so that nothing is burnt. What you want is to let the garlic and its juices get infused into the fat of the oils. Let this remain for five minutes.
  6. After five minutes of letting the garlic sweat into the oil, add one cup of boiling pasta water into the pan and stir. Let it come to a boil.
  7. Add the heavy cream to the water and keep stirring in low flame till you get a thick consistency.
  8. Throw in the fresh cherry tomatoes right before you add the al dente pasta into the sauce. Stir gently.
  9. Add the boiled pasta to this sauce and cook till it is completely softened. Keep adding more boiling pasta water as and when required.
  10. Once you get your desired consistency and the fettuccine is cooked completely, turn off the heat.
  11. Season with freshly ground black pepper powder.
  12. Put the steamed broccoli florets into the pan and stir.
  13. Garnish with grated Parmesan cheese and stir.
  14. Serve immediately with fresh Italian basil leaves as garnish. Enjoy! [/directions]

fettuccine alfredo

fettuccine alfredo

I do hope you try this pasta recipe. It will truly change the way you look at, feel about or cook Alfredo in the future. Happy cooking!

If you have any questions or suggestions, feel free to reach out to me with a comment or connect with me on Instagram or Facebook.

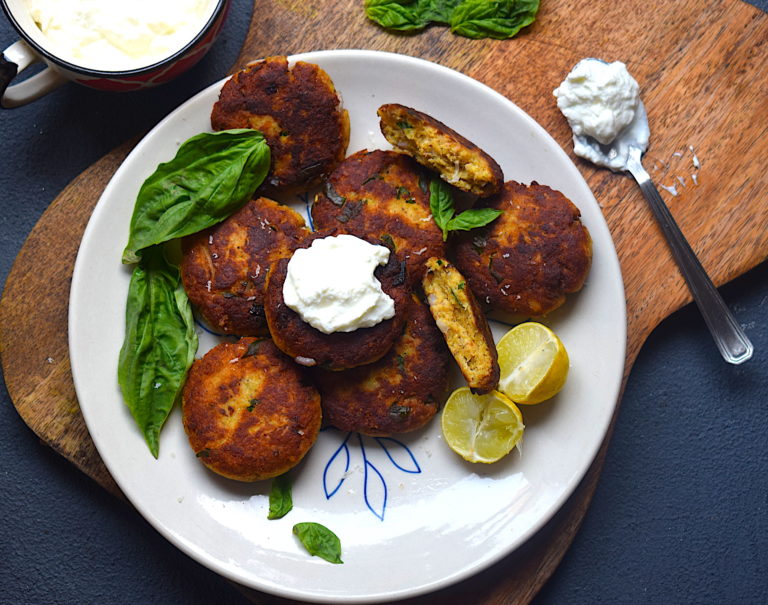
Italian Fish Cakes

These Italian style fish cakes with Parmesan cheese and basil as the heroes served alongside a delicious yogurt dip is the perfect appetizer option for a get-together. Soft, fragrant, mushy and perfectly cooked, these fish cakes are every fish lover’s dream. This homemade version is so much better than anything you get out there. Try it for yourself and see the difference!

fish cakes

You can substitute tuna in this recipe if you prefer. I have used basa fillet. Since this is an Italian version, it has to involve some good amount of cheese! Over here, I have used Mozzarella and Parmesan, and these two ingredients just elevate the recipe to a whole new level.

fish cakes

Preparation time – 30 minutes

Cook time –  30 minutes

Serves – 4 people

[ingredients title=”Ingredients”]

  • Basa fish fillet, 800 gms
  • 500 g potatoes
  • 1 onion, finely chopped
  • 50 g Italian basil leaves
  • 4 garlic cloves, finely chopped
  • 1 tbsp black pepper powder
  • 1 egg
  • 100 g Mozzarella cheese, grated
  • 80 g Parmesan cheese, grated
  • 50 g breadcrumbs
  • 50 g butter
  • Sunflower oil, for shallow frying
  • 2 lemons
  • Salt to taste [/ingredients]

[directions title=”Directions”]

  1. Thoroughly wash and pat dry the basa fillet pieces. Heat water in a saucepan, add salt to it and bring it to a boil. Add the basa fillets to it and let it cook in water for ten minutes, till soft.
  2. Take the fish fillet pieces out of the water carefully and set them aside to cool. Put them on paper towels so that the excess water gets sucked into it.
  3. Peel the potatoes and cut them into 2cm chunks. Cook them in salted boiling water for ten minutes. Once done, set them aside.
  4. Mash the potatoes till there are no lumps. Add the boiled fish to it and combine it together.
  5. Beat in the egg into the mash.
  6. Season with salt and pepper. Make sure you taste it before you add more salt. Mix well.
  7. Add the finely chopped garlic and onion into the mash.
  8. Add chopped Italian basil leaves to the mix.
  9. Add the Mozarella and Parmesan cheese to the mash and give it a nice mix.
  10. Once everything is combined well, add the breadcrumbs and give it one last mix with a spatula. Be gentle.
  11. Make round shaped cakes or tikkis, or any shape you desire.

fish cakes

11. Freeze the fish cakes in the freezer for at least ten minutes. You can also cover them up and freeze them for longer, frying as and when needed.

12. Heat oil and butter in a pan. Shallow fry the cakes in the pan, about five minutes on each side till golden brown and crispy.

fish cakes

fish cakes

13. Serve on a plate with a generous drizzle of lemon juice on top.

14. Pat with a dollop of hung curd dip and some rocket leaves on top. [/directions]

fish cakes

fish cakes

I hope you try out this easy and delicious Italian fish cakes recipe for yourself. If you do, let me know how it turned out for you.

If you have any questions, suggestions or feedback, please leave me a comment here. Or connect with me Instagram, Facebook or YouTube.

Happy cooking!

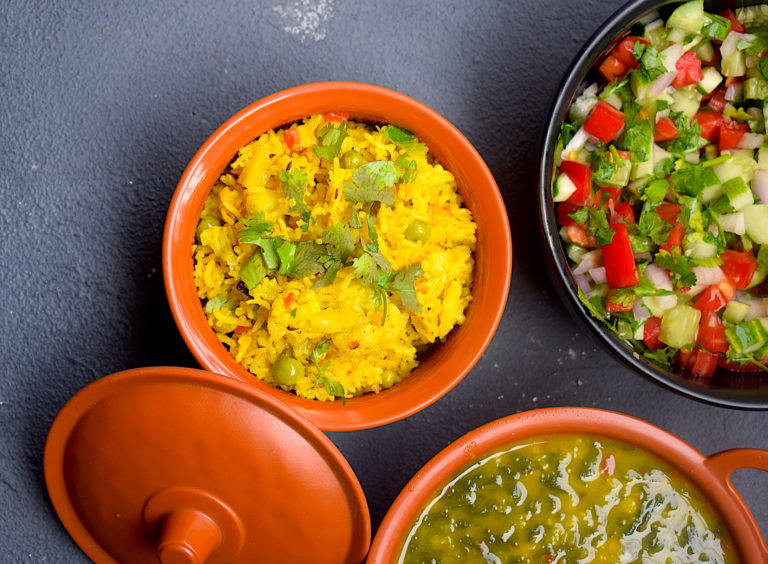
Pressure Cooker Vegetable Pulao

Pressure cooker recipes are everyone’s favourite. This rage in the cooking world is rightly justified as it makes our lives so much easier, especially on those rushed days when we do not have time to cook elaborate meals.

This pressure cooker vegetable pulao is one such easy hack to a tasty and healthy meal. I have made this in the pressure cooker but you can also make it in a pot. It is my go-to meal on most days and one of the best ways to eat rice. Include it in your lunch or dinner meal with some raita and you will not regret it. Honest, real and simple – just the way I prefer.

It is extremely easy to make and comes together in no time. It is loved by everyone alike. Like all my pulaos, the garam masala takes centre stage for the dominant flavour.

pressure cooker vegetable pulao

The rice in this pulao can be any fragrant one. I prefer using broken rice for pulao, as it gives the entire meal a different flavor. Here, I have used good quality broken basmati rice, but you can go ahead with any rice. Just make sure the quality of the rice is not compromised upon.

pressure cooker vegetable pulao

Also, for the perfectly fluffy and well-cooked pulao, you should soak the rice in water for at least 30 minutes before you cook it. Make sure you wash the rice thoroughly under a strainer till you get clear water from the end of the sieve. These two tips help the rice cook perfectly.

Preparation time – 20 minutes

Cook time –  30 minutes

Serves – 3-4 people

[ingredients title=”Ingredients”]

  • 250g rice
  • 1 tbsp ghee
  • 1 bay leaf
  • 2 cardamom pods
  • 2 small cinnamon sticks
  • 2 cloves
  • 2g mace
  • 1 tsp cumin seeds
  • 7 cashews
  • 1 tsp sugar
  • 1 onion, finely chopped
  • 2 green chilies, finely chopped
  • 1 tsp ginger garlic paste
  • 100 g green peas
  • 1 carrot, finely diced
  • 1 small cauliflower, broken into florets
  • 1 medium potato, finely diced
  • 1 tsp turmeric powder
  • Salt to taste
  • 500 ml of water
  • 1 tsp garam masala
  • Coriander leaves for garnish [/ingredients]

[directions title=”Directions”]

  1. Wash the rice thoroughly with cold water under a running tap till it releases clear water.
  2. Soak the rice in water for 30 minutes.
  3. Heat ghee in a pressure cooker. Add the bay leaf, cardamoms, cloves, cinnamon, and mace. Give it a light stir.
  4. Add the sugar and cashew nuts. Stir till the sugar melts and the cashews turn slightly brown on the sides.
  5. Add the onions and stir for a minute till they brown.
  6. Add the chopped chilies and ginger garlic paste and stir till their rawness evaporates.
  7. Chop all the vegetables and add them to the onions. Green peas, cauliflower florets, and potato. Mix well for another minute on medium flame.
  8. Season with salt and turmeric powder. Stir well.
  9. Pour in the water and give it one last stir.
  10. Sprinkle the garam masala on top and mix.
  11. Close the pressure cooker with a lid and allow it to let out two whistles.
  12. Once all the pressure releases, open the pressure cooker.
  13. Garnish with fresh coriander leaves.
  14. Serve the pulao hot with raita or curd. [/directions]

pressure cooker vegetable pulao

pressure cooker vegetable pulao

pressure cooker vegetable pulao

I hope you do try this simple, mouth-watering, and super healthy vegetable pulao recipe. It is a perfect option for a homely meal filled with health and happiness.

If you have any questions or suggestions, feel free to reach out to me with a comment or connect with me on Instagram or Facebook.

Happy cooking!

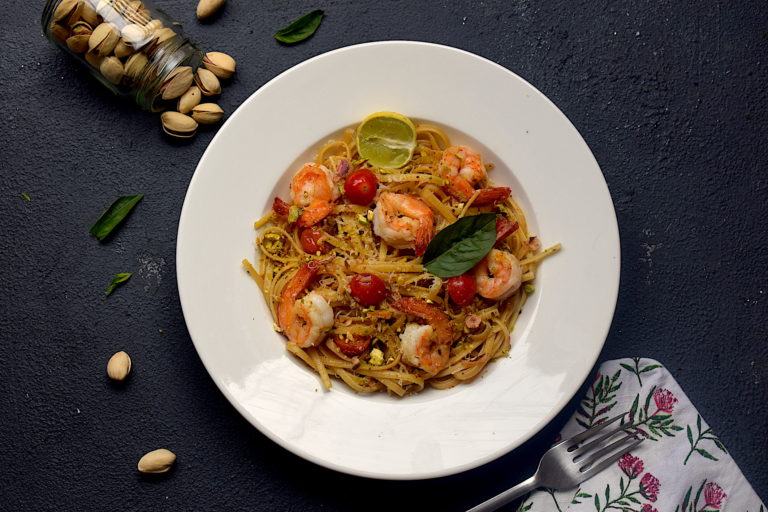
Linguine With Shrimps & Pistachio

Here is an easy pasta recipe with a twist. If you are a lover of shrimp, pasta and are bored of the regular variations, this linguine with shrimp and pistachio will be a welcome change.

pasta with shrimp

The inspiration for this recipe is from Jamie Oliver’s book – Jamie Cooks Italy that I purchased a few months back. It has the most delicious pasta ideas, and authentic ones at that! The idea of adding crushed pistachios to the pasta really intrigued me, and that’s how I adapted that idea to make this recipe. Cherry tomatoes are also a great addition and the freshness of lime juice just elevates it to just another level.

pasta with shrimp

pasta with shrimp

This recipe is also super quick as shrimp hardly takes any time. Cooking the pasta till al dente in salty pasta water in one pot, and the main recipe is another. Simultaneous cooking is advised for best results.

Preparation time – 15 minutes

Cook time –  30 minutes

Serves – 2 people

[ingredients title=”Ingredients”]

  • 150 g linguine
  • 10 garlic cloves, finely chopped
  • 8-10 cherry tomatoes
  • 150 g unsalted pistachios, finely crushed in a mortar and pestle
  • 2 tbsp olive oil
  • 50 g butter
  • 100 g grated parmesan cheese
  • Juices extracted from two limes
  • 1 tsp chili flakes
  • 50 g fresh Italian basil leaves
  • Salt to taste
  • 1 tbsp pepper powder, freshly crushed [/ingredients]

[directions title=”Directions”]

  1. Boil water in a pot. Add 2 tbsp salt and mix.
  2. Cook the pasta as per package instructions till al dente.
  3. While the linguine is cooking, heat another pot. Add the olive oil and butter. Keep the heat at low.
  4. Fry the shrimps in this oil, one minute each side. Set them aside.
  5. In the same pot, add the garlic and saute for about a minute in low heat. Do not burn.
  6. Add the chili flakes and mix.
  7. Add the cherry tomatoes and give it a light stir.
  8. Mix the linguine into the pan and stir gently with a spatula.
  9. Season with salt and pepper and mix it all well with the linguine.
  10. Add three tablespoons of salty pasta water and cook till everything comes together well.
  11. Turn off the gas and add the cooked shrimps on top and mix.
  12. Garnish with grated parmesan cheese and basil leaves.
  13. Add the crushed pistachios, drizzle the fresh lime juice on top and give it one last stir.
  14. Serve immediately. [/directions]

I hope you do try this simple, mouth-watering and fresh pasta soon. It is a perfect option for a quick fix for dinner or a lazy lunch.

pasta with shrimp

pasta with shrimp

If you have any questions or suggestions, feel free to reach out to me with a comment or connect with me on Instagram or Facebook.

Happy cooking!

Chicken Pulao

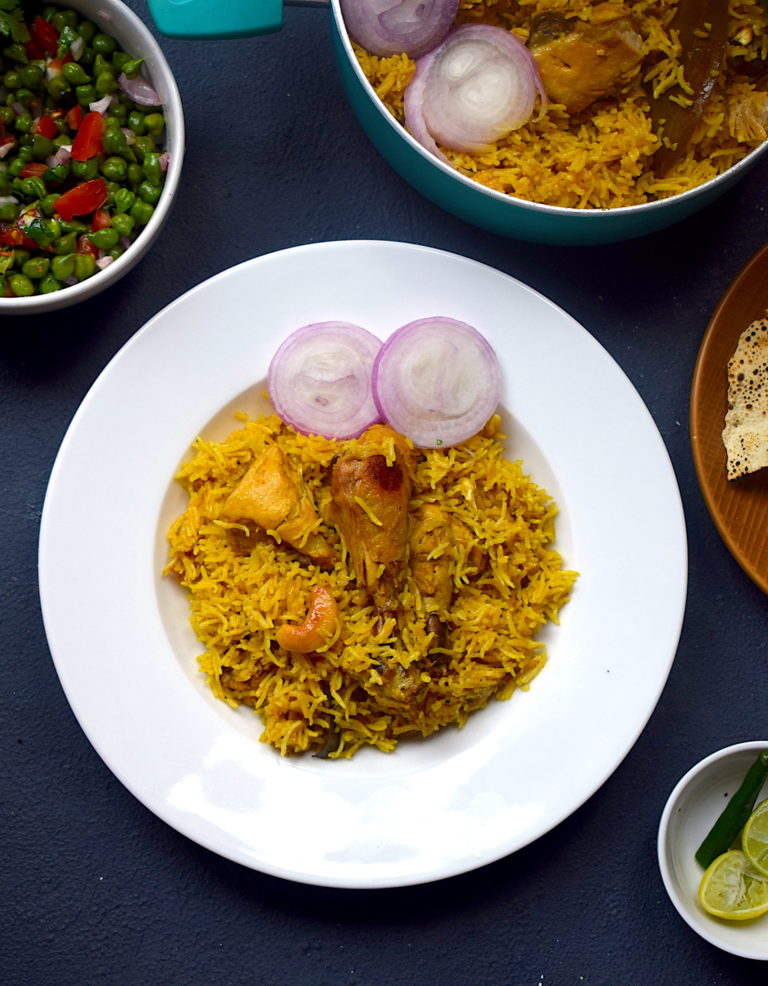
Indian pulaos are one-pot dishes that combine wholesome flavours and spices to create magical tastes. The predominant ingredient in most pulaos is the garam masala. The most basic garam masala is a spice made by grinding dry-roasted cinnamon, cardamom and cloves.

This chicken pulao recipe is a quick fix for those special cravings. It is a one-pot recipe and comes out beautifully in about 40 minutes. It can be had as a meal in itself.

This recipe is very special to me because it was an essential part of my childhood. Pulao used to be served with chicken or mutton curry in birthday parties or to the guests. Although my family never really made chicken pulao, the fundamental ways to cook any pulao remains the same. Chicken pulao is something I have been making for myself and my loved ones over the years, and it has always remained a favourite.

chicken pulao

chicken pulao

The rice in this pulao can be any fragrant one. I prefer using broken rice for pulao, as it gives the entire meal a different flavor. Here, I have used good quality Basmati rice. The quality of the rice should be of supreme concern in this meal.

I mostly make chicken pulao with joha rice. Joha rice is a variety of rice grown in India and is notable for its aromatic and excellent taste. My home state, Assam, is the largest cultivator of this rice, and hence I am very particular about using it in most of my recipes involving rice. But you can go ahead and use high quality and aromatic broken basmati too.

chicken pulao

chicken pulao

I like my pulao to have a little sweetness since that is how I have eaten it throughout my life. There is a delicate hint of sugar and part of the flavor also comes from some dry fruits that this dish includes. Another important tip that I would like to share is to always use fresh ingredients. For example, the ginger garlic paste should be freshly ground. The only ready-made spice that I have used here is the meat masala.

Even though this recipe is made in a pressure cooker, you can also go ahead and make it this way. If the rice is soaked for some time, it takes lesser time to cook.

Making Perfectly Fluffy Rice

  • Soaking

For this pulao, find yourself the best quality long grained basmati rice. Wash the rice thoroughly with water till its clear. Next, soak it for exactly 30 minutes in room temperature water. After that, strain the water and keep the rice as dry as possible. I used a sieve to release the water and keep it undisturbed. Do not soak for more than 30 minutes as the rice will become too wet and will cook very fast, and end up sticking to each other. Soaking for longer duration might also break the rice. Soaking is an essential pre-requisite to get the perfectly fluffy rice that you see in this egg pulao.

  • Correct water quantities

Next is the perfect amount of water for the rice to cook. I have added the exact measurements for this recipe, but the usual and easy rule to follow is – For every cup of rice that you use, use half cup more water than that. For example, if you use 1 cup of rice, use 1.5 cups of water. If you use 2 cups of rice, use 2.5 cups of water. And the water should always be hot if you’re making the rice in a pot. Otherwise, the temperature difference might ruin the rice. This rule applies only if you soak the rice for 30 minutes before cooking it.

  • Low flame and rest

Lastly, perfectly fluffy rice is always cooked in low flame. If you’re making rice in a pot, make sure you cover and cook it in the lowest flame possible. And once its done, do not serve immediately. Turn off the gas and let it rest for another 10-15 minutes. This will give the perfect edge to the rice and make it bloom to its best ability.

Here is the recipe for my version of a Chicken pulao. Every step brings out a different flavour and uniqueness. I hope you enjoy it.

Preparation time – 30 minutes

Cook time – 60 minutes

Serves – 4-5 people

[ingredients title=”Ingredients”]

For the chicken marination:

  • 1 kg chicken (curry cut)
  • 1 tbsp salt
  • 2 tsp Kashmiri red chilli powder

For the rice

  • 500 g biryani rice
  • 3 tbsp vegetable oil
  • 2 tsp ghee
  • 1 inch cinnamon stick
  • 2 cardamoms
  • 2 cloves
  • 2 bay leaves
  • 20 raisins
  • 15 cashews
  • 1 green chilli, slit in half
  • 2 cups finely sliced onions
  • Salt to taste
  • 1 tbsp coriander powder
  • 1 tbsp cumin powder
  • 1 tsp black pepper powder
  • 1 tsp turmeric powder
  • 1 tsp garam masala powder
  • 1 tsp sugar [/ingredients]

[directions title=”Directions”]

  1. Wash the rice thoroughly under running water till all excess starch is drained. Soak in water for 30 minutes.
  2. Wash and pat dry the chicken pieces with a paper towel. Rub the chicken pieces with salt and Kashmiri red chilli powder. Mix really well and marinate for 30 minutes.
  3. Heat oil in a pot. Add the ghee. Temper with all the whole spices – cinnamon stick, cardamom, clove and bay leaves.
  4. Add the raisins and the cashews and fry it on low heat for just a few seconds, making sure they don’t burn.
  5. Add the onions and green chilli and fry on medium heat for 7-10 minutes till they turn translucent and start to brown.
  6. Add sugar at this point. Sugar will help the onions caramelise and also add a beautiful brown colour to them.
  7. Once the sugar is mixed, add the marinated chicken. Mix well for 10 minutes on medium flame.
  8. Cover and cook the chicken on low flame for 20 minutes.
  9. Take lid off and five one good mix. Season with salt, turmeric powder, black pepper powder, coriander powder and cumin powder. Mix well.
  10. Once done, add the soaked rice and mix everything gently so that rice grains remain intact.
  11. Pour hot water and mix. Add garam masala and stir it into the rice.
  12. Cover and cook on low flame for 1-20 minutes till rice is cooked.
  13. Take off flame and let it rest for 15-20 minutes before serving.
  14. Serve hot with salad and raita. [/directions]


chicken pulao

chicken pulao

I hope you try this delicious chicken pulao super soon! If you have any doubts, comments, or feedback, please reach out to me in comments or my social media handles.

Find me on Instagram – www.instagram.com/slurrpilicious

Find me on Facebook – www.facebook.com/slurrpilicious

Find me on Youtube – https://www.youtube.com/channel/UCA-cJoo27OLSCswI4sy6lzA?

Happy cooking!

Green Moong Dal

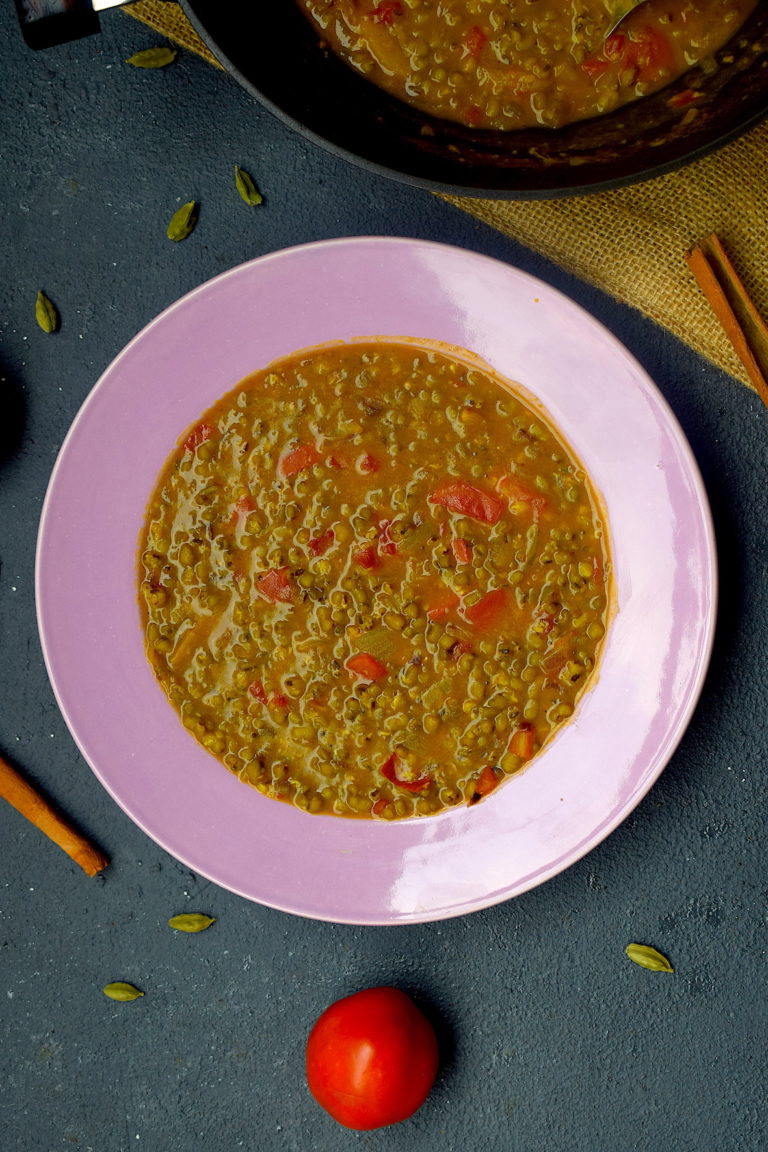
Indian dals are so healthy and comforting. And such a wide variety to choose from! Every part of the country has its own plethora of dal versions. Cannot imagine an Indian thali without a dal, right?

green moong dal

This green moong dal is my absolute favorite since childhood. We eat a lot of green moong dal back in Assam, especially in its raw form. It is actually one of the main elements in our prasad that we offer during our pujas. Apart from this fun fact, I also know that green moong or the mung bean is very healthy!

Mung beans are packed with healthy nutrients with high antioxidant levels. It is rich in potassium, magnesium and loaded with fiber. I remember Ma telling me about the health benefits of mung beans since I was a kid. So I ensure I consume this powerful legume every once in a while.

green moong dal

green moong dal

green moong dal

This recipe is fairly simple and straightforward. With just a handful of fresh ingredients, you can make this delicious green moong dal in no time. The only important thing to consider here is that unlike most days, green moong dal has to be soaked overnight before cooking. Now let’s take a look at the recipe.

Preparation time – 20 minutes

Cook time –  60 minutes

Serves – 4 people

[ingredients title=”Ingredients”]

  • 400 g green moong dal/mung beans, soaked overnight
  • 500 ml water
  • 30 g ginger, cut in thin slices
  • Salt to taste
  • 1 green chili
  • 2 medium onions, finely chopped
  • 1 tbsp ghee
  • 1 tsp ginger garlic paste
  • 2 medium tomatoes, finely chopped
  • 1 tsp turmeric powder
  • 1 tsp Kashmiri red chili powder
  • 1 tsp cumin powder
  • 1 tsp garam masala [/ingredients]

[directions title=”Directions”]

  1. Wash the green moong dal and soak it overnight in water.
  2. Drain and rest the dal.
  3. In a pressure cooker, add the green moong dal, one green chili, the ginger slices, salt, and water. Mix well. Let this cook for six to seven whistles. Set aside.
  4. Heat ghee in a kadhai. Add the chopped onions. Saute till onions become translucent and start browning.
  5. Once the onions are cooked, add the fresh ginger-garlic paste. Stir till the raw aroma of the ginger and garlic disappears.
  6. Add the tomatoes and stir till they melt and assimilate well with the onions.
  7. Wait for the onions to cook and melt completely. If it sticks to the base of the kadhai, add little hot water. Do not burn.
  8. Season with turmeric powder, Kashmiri red chili powder, and cumin powder. Mix well.
  9. Pour in the pressure-cooked dal into this gravy and mix till it all comes together. Check salt and add if required.
  10. Bring the dal to a boil till you reach your desired consistency.
  11. Garnish with fresh garam masala and give it one last stir.
  12. Pat a dollop of ghee on top and enjoy hot with parathas or plain rice. [/directions]

green moong dal

I hope you do try this simple, mouth-watering, and super healthy green moong dal recipe. It is a perfect option for a homely meal filled with health and happiness.

If you have any questions or suggestions, feel free to reach out to me with a comment or connect with me on Instagram or Facebook.

Happy cooking!

Chicken Dak Bungalow

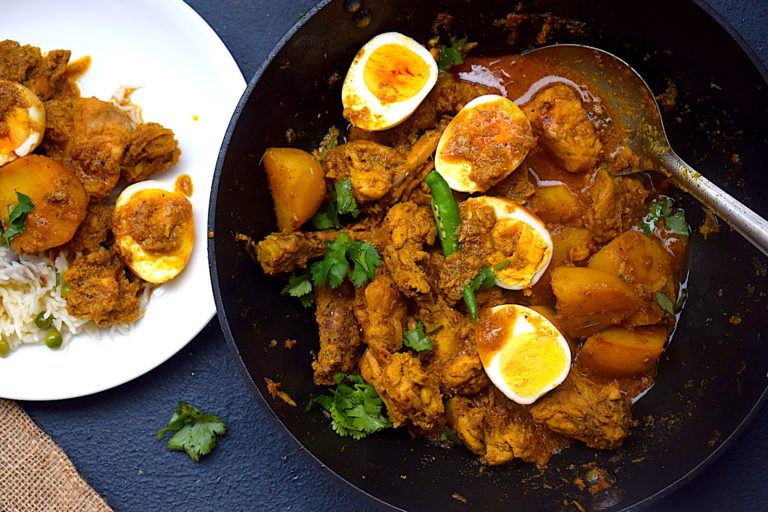
As a true Assamese, my favorite thing to have in any curry is potatoes! Fellow Assamese people will understand what I mean. And Bengali food also uses potato in all its glory, which is why it is one of my favorite cuisines as well. But chicken dak bungalow is all the more special because it has chicken, potatoes and eggs, all in one curry! Sounds like an Eastern dream to me.

Do not get intimidated by the name here. Chicken Dak Bungalow is a heritage recipe from the British era. Dak bungalows refer to the rest houses in the British era that were used to host government officials and other travelers. During these visits, the khansama or the steward would make delicious food using local ingredients for the guests using meat and other vegetables.

chicken dak bungalow

As for my story, I was used to having it at some of my favorite restaurants serving Bengali food. That helped me explore more about this dish and make it for myself at home. It is a simple chicken curry at the end of the day to be very honest. But the key to a delicious chicken dak bungalow lies in its marination. And before I go ahead and share it. I would clearly like to state that this is my own version that I have come to develop from my own understanding of this recipe and my own limited knowledge of food. All I can be sure of is that it is one tasty curry!

Here’s a look at the ingredients and procedure.

Preparation time – 20 minutes

Cook time –  30-40 minutes

Serves – 4 people

[ingredients title=”Ingredients”]

For the marination:

  • Chicken, 1 kg
  • Thick curd, 150 g
  • 1 tbsp cumin powder
  • 1 tbsp coriander powder
  • 1 tbsp ginger paste
  • 2 tsp garlic paste
  • 1 tbsp mustard oil

For the curry:

  • 1 tbsp mustard oil
  • 1 tsp sugar
  • 1 tsp salt
  • 3 hard-boiled eggs
  • 2 potatoes, cut in four cubes each
  • 4 medium onions, thinly sliced
  • 1 tsp turmeric powder
  • 1 tsp black pepper powder
  • 1 cup hot water
  • 2 tsp garam masala
  • Salt to taste [/ingredients]

[directions title=”Directions”]

  1. Wash and pat dry the chicken pieces. Make sure they are dry before you marinate.
  2. In a bowl, add curd, cumin powder, coriander powder, ginger paste, garlic paste and mustard oil with the chicken pieces. Use your hands to mix it all well, ensuring each chicken piece is thoroughly layered with the curd mix.
  3. Cover with a plastic sheet and marinate for at least three hours. Overnight marination works best, but do not marinate for more than ten to twelve hours, otherwise, the chicken might get too soft.
  4. Heat mustard oil in a wok. Add salt and sugar to the oil and give it a light stir. Fry the boiled eggs and potatoes on medium heat till they turn golden. Set aside for later.
  5. In the same kadhai, add some more mustard oil. Once it gets hot and starts to smoke add the onions. Saute for five to eight minutes on medium heat till onions get translucent and brown.
  6. Once the onions are fried well, add the marinated chicken to the kadhai. Gently stir everything together. Continue this till everything comes together really well.
  7. Let the chicken start cooking in its own juices for about ten minutes. Keep the flame on medium and keep stirring from time to time. Ensure the chicken does not stick to the kadhai. Add a little hot water if required.
  8. Once the chicken is cooked halfway, add the fried potatoes to it. Add hot water, cover and cook on medium heat for ten more minutes till the potatoes and chicken are done.
  9. Reach your desired consistency and add the boiled eggs. Serve hot with rice or pulao. [/directions]

chicken dak bungalow

chicken dak bungalow

I hope you do try this simple, mouth-watering chicken dak bungalow recipe. It is a perfect option for guests coming over, or if you want to whip up a feast for your family on a special occasion (or just a Sunday).

If you have any questions, feel free to reach out to me with a comment or connect with me on Instagram or Facebook.

Happy cooking!

Perfectly Sweet, Spicy and STICKY Orange Chicken

It is the season of oranges! I can see them everywhere right now and they are just so delicious and beautiful. I am a big fan of oranges. One of my favorite things to do is to chew on some fresh oranges in the winter sun. Beautiful!

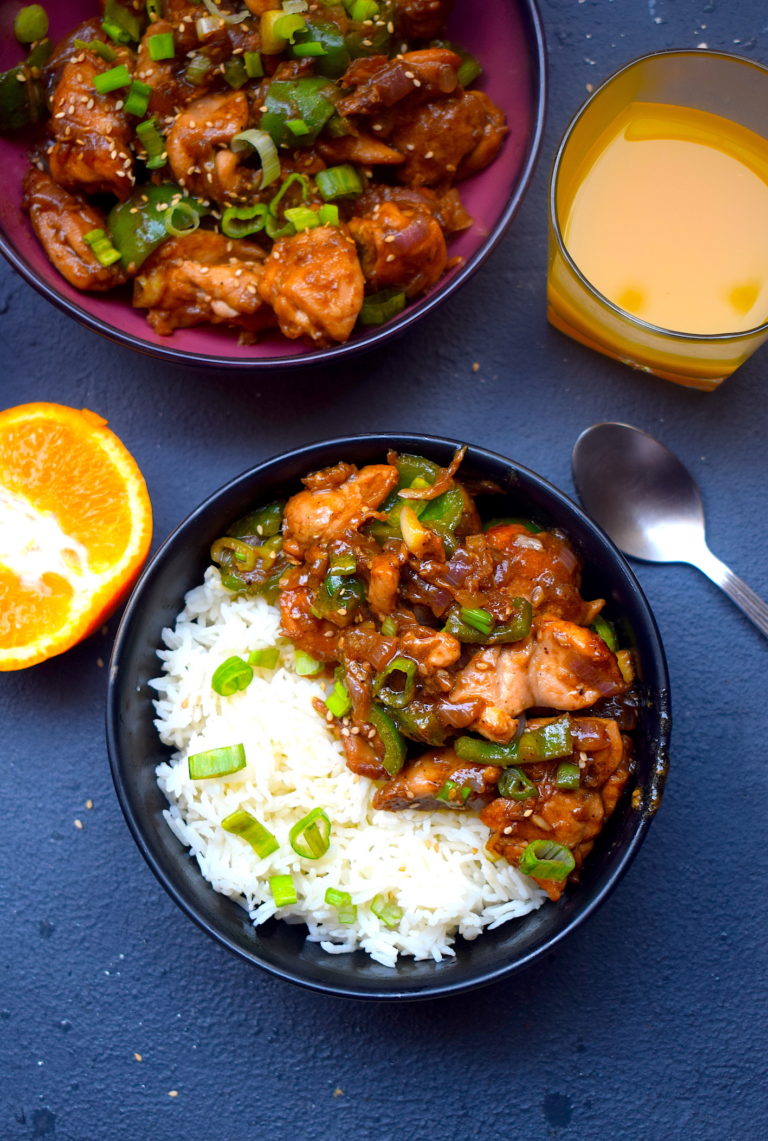
In Delhi, we get a lot of the kinnow variety of orange. Also known as Mandarin, this orange is bright, softer, super sweet and very juicy. I have used freshly squeezed kinnow juice in this recipe. You can use any variety available locally near you.

orange chicken

This orange chicken is one of my favorites. Super simple to make and very aromatic. The combination of brown sugar and orange juice makes for a sticky syrup, which adds a perfect glaze as well as taste to the orange chicken recipe. The chicken is shallow fried here. You can deep fry it as well if you want an extra crispy version.

Here’s a look at the ingredients and procedure.

Preparation time – 20 minutes

Cook time –  30-40 minutes

Serves – 2-3 people

[ingredients title=”Ingredients”]

For marination:

  • Boneless chicken thighs cut into equal pieces, 500 g (make sure they have been patted dry)
  • Fresh ginger paste, 1.5 tsp
  • Fresh garlic paste, 1.5 tsp
  • Sesame oil, 1 tsp
  • Dark soy sauce, 3 tbsp
  • Cornflour, 30g
  • Salt to taste

For the recipe:

  • Vegetable oil, 4 tbsp
  • 2 green chilies, finely chopped
  • 3 medium onions, finely chopped
  • Brown sugar, 1 tsp
  • Crushed garlic, 1 tsp
  • Crushed ginger, 1 tsp
  • 1 medium capsicum, cut in cubes
  • Black pepper powder, 1 tsp
  • Salt to taste
  • 150 ml freshly squeezed orange juice
  • 2 tsp dark soy sauce
  • Chopped spring onion greens for garnish
  • Toasted sesame seeds, for garnish [/ingredients]

[directions title=”Directions”]

  1. Mix the boneless chicken thighs with ginger paste, garlic paste, sesame oil, dark soy sauce, cornflour, and salt. Marinate this for 20 minutes.
  2. Heat 3 tbsp vegetable oil in a wok. Shallow fry the marinated chicken in batches, till they are crispy from all sides. Set aside.
  3. Heat 1 tbsp vegetable oil in another wok. Add the chopped green chilies, followed by the chopped onions. Saute for a minute.
  4. Add the brown sugar and mix well. Saute for another two minutes till onions turn translucent.
  5. Add the ginger and garlic and stir. Cook this till the raw aroma of the ginger and garlic disappears.
  6. Once the onions merge well with the ginger and garlic, add the chopped capsicum. Cook this for another minute.
  7. Season with salt and black pepper powder. Stir well.
  8. Pour in the freshly squeezed orange juice. Cook till it reduces by half.
  9. Wait for the orange juice to turn into a sticky and thick sauce. Add the fried chicken to the mixture.
  10. Gently mix the fried chicken with the rest of the ingredients.
  11. Drizzle in some dark soy sauce and stir well till the color changes to a darker version of the original.
  12. Take the wok off from heat.
  13. Garnish with spring onion greens, sesame seeds, and orange zest.
  14. Serve hot with plain rice or fried rice. Enjoy! [/directions]

orange chicken

orange chicken

orange chicken

I hope you do try this simple, mouth-watering recipe.

If you have any questions, feel free to reach out to me with a comment or connect with me on Instagram or Facebook.

Happy cooking!


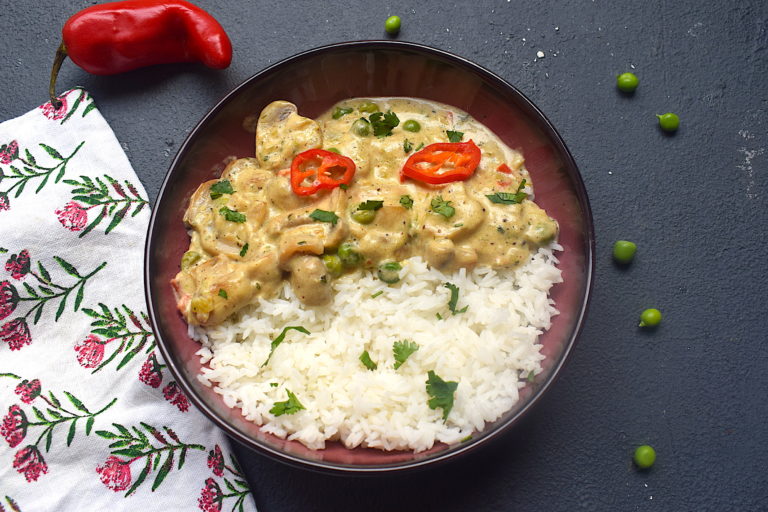
The Easiest & Creamiest Mushroom Stroganoff

Creamy, delicious and comforting – this mushroom stroganoff is the ultimate idea for a meal in a bowl, especially in winters! It takes a handful of ingredients, and gets ready in absolutely no time! A personal favorite of mine, the mushrooms add their own unique flavor to the recipe, and the cream makes it velvety soft. Add a dash of fresh cinnamon powder and you have got yourself a winner!

mushroom stroganoff

I love recipes that accommodate and adjust with local ingredients. This mushroom stroganoff is also highly customizable in my opinion. It’s winters right now so I have used some beautiful red cayenne pepper and some lovely peas that I found at my local market. The flavors that these two simple ingredients add is extraordinary. The idea is to not really play too much with the recipe and let the natural flavors of the seasonal ingredients do their magic. And the results are stunning!

mushroom stroganoff

Traditional stroganoff recipes are usually with beef or chicken. It also does not include garlic and uses stock (chicken or beef) as a base. But this mushroom and peas stroganoff is way easier, as it does not include any stock! Just some good quality cream. The taste and texture are no less when compared to its non-vegetarian counterparts.

The addition of seasonal peas makes the gravy naturally sweet, and the green adds a dash of freshness to the otherwise nude, creamy color. Here’s my homely version of mushroom stroganoff. I hope you try it, especially on one of those extra lazy days.

Preparation time – 15 minutes

Cook time – 20 minutes

Serves – 2 people

[ingredients title=”Ingredients”]

  • 200 g button mushrooms, cut in half
  • 50 g fresh green peas
  • 1 onion, finely chopped
  • 120 ml fresh cream
  • 1 tsp cinnamon powder
  • Salt to taste
  • 4 garlic cloves, finely chopped
  • 100 ml water
  • 1 tbsp butter
  • 1 tsp vegetable oil
  • 1 small cayenne pepper, finely chopped
  • 1 tsp black pepper powder
  • 1 tsp chopped parsley [/ingredients]

[directions title=”Directions”]

  1. Heat oil in a pan. Add butter to it and give it a light stir.
  2. Add the finely chopped garlic and stir. Saute the garlic for about ten seconds in low heat so that it does not get burnt. Next, add half of the chopped cayenne pepper to the oil. Stir for a minute.
  3. Once the garlic and cayenne pepper releases its aroma, add the chopped onion. Saute till onions are translucent and soft.
  4. Dice the mushrooms by cutting them in half and add them to the onions. Add the green peas along with it. Be gentle, stir and do not break them.
  5. The mushrooms will cook in about ten minutes (make sure they are crunchy and not soggy) after which you have to add some warm water. Give it a light stir and let it come to a boil.
  6. Pour in the cream and stir well.
  7. Season with salt and black pepper powder. The reason why we are adding salt towards the end is that doing it, in the beginning, will make mushrooms release all its water and make it soggy.
  8. Let this cook on medium heat till it reduces and you get a thick and creamy consistency.
  9. Garnish with a pinch of freshly ground cinnamon powder and chopped parsley. You can also add freshly chopped coriander leaves if parsley is unavailable.
  10. Serve hot with boiled rice.[/directions]

mushroom stroganoff

mushroom stroganoff

I hope you try this really easy and delicious mushroom stroganoff for yourself and enjoy it as much as I do. If you have any questions, feel free to reach out to me with a comment or connect with me on Instagram or Facebook.

Happy cooking!