Street Style Pad Thai Noodles at Home

Pad Thai noodles is an epic dish. It is not only found in almost every street corner in Thailand, the world has opened its arms and embraced this beautiful noodle dish because of its simplicity and divine taste. I have been a big fan for years now. I whipĀ it up in my kitchen every once in a while. Trust me, it is very easy. Just make sure you have some key ingredients and in no time you can make this recipe for yourself in the comfort of your homes!

pad thai noodles

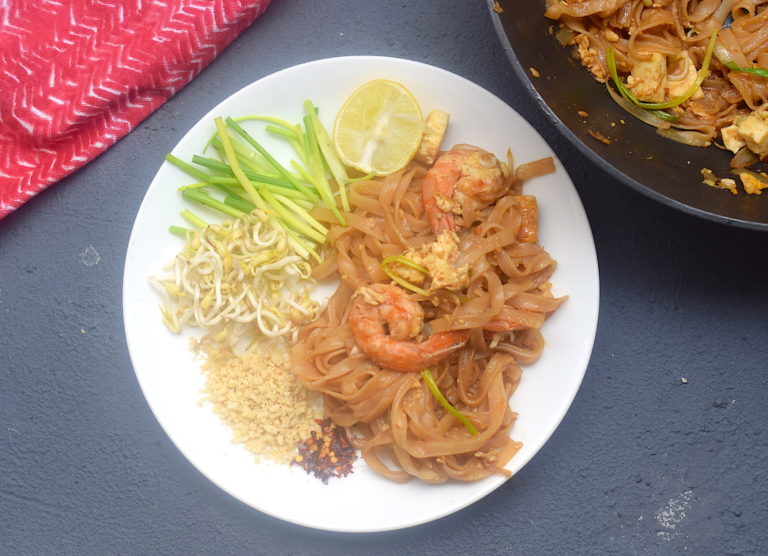
Pad Thai Noodles has it all in terms of taste and texture. Flavors include sweetness, fiery sauces, salt and an equal amount of sourness from lime and vinegar. You can add one or more protein to your pad thai noodles, be it chicken, shrimp or tofu. Eggs are a must add in street style pad thai noodles and they make it extra yum! I have gone ahead and added more than one protein because, why not? šŸ˜€

pad thai noodles

pad thai noodles

The most important ingredient that you most probably might not have are mung bean sprouts. I usually grow them at home, it takes about 3-6 days. They are also available in the market but not so much in India. So you can either grow your own (they are super simple to grow btw) or get it from a store if you wish. I suggest a homemade version because that will be super fresh. I usually make a large batch and store it for weeks in the refrigerator.

So take note of some key ingredients and you will be good to go.

Preparation time – 15 minutes

Cook time – 15 minutes

Serves – 2

[ingredients title=”Ingredients”]

For the sauce:

  • 4 tbsp lime juice
  • 1 tbsp crushed palm sugar/regular sugar
  • 2 tbsp rice vinegar
  • 2 tbsp Sriracha sauce
  • 2 tbsp fish sauce

For the noodles:

  • 1 tbsp vegetable oil
  • 1/2 onion, finely diced
  • 20 g garlic, finely chopped
  • 50 g tofu, cut into cubes
  • 100 g shrimps, deveined and cleaned
  • 2 eggs
  • 100 g flat rice noodles
  • Green onions for garnish
  • A handful of mung bean sprouts
  • 50 g crushed peanuts
  • Chili flakes for garnish
  • Salt to tasteĀ [/ingredients]

[directions title=”Directions”]

  1. Soak the flat rice noodles in warm water for 30 minutes.
  2. Make the pad thai sauce by mixing all the ingredients mentioned – lime juice, rice vinegar, sugar, Sriracha sauce and fish sauce. Mix well and save for cooking.
  3. Heat oil in a wok. Add the garlic and onion and saute for about a minute.
  4. Add the tofu and the shrimp to the wok, and fry for another two minutes. Cook the shrimp one minute on each side.
  5. Shift the tofu and the shrimp to the sides of the wok, clearing out the middle. Break open to eggs into this and let it cook.
  6. Be gentle with the egg and give it a light stir, eventually mixing it up with the rest of the ingredientsĀ in the wok.
  7. Time to add the soaked noodles to the wok and mix well.
  8. Pour in the pad thai sauce to this and mix it all up till every strand of the noodles gets soaked in the sauce.
  9. Once done, add green onions, mung bean sprouts, and crushed peanut for extra crunch. Give it one last toss.
  10. Serve on a plate with lime, bean sprouts, crushed peanut and chili flakes on the side. Serve hot! [/directions]

pad thai noodles

pad thai noodles

pad thai noodles

You will be amazed at how good this simple preparation tastes. Do try and let me know how it came out. Happy cooking!

Thai Basil Chicken

My love for Thai cuisine has only grown recently. I was completely unaware of how amazing Thai food is until I actually started trying it out a lot at restaurants and Thailand itself. And man was I blown away!

The best part about Thai cuisine according to me is its freshness and the use of seasonal produce. There is way too much variety, be it for vegetables, herbs or fruits. Thailand is one place where I would even love to live for a while and learn about their cuisine from the local people. Any sponsors?

chicken recipes

Why this Thai Basil Chicken?

This Thai basil chicken is an explosion of flavours in the mouth. It has all the elements that makes it a winner – sweetness, some fieriness to open your senses, crunch and colour. The use of just the right herbs and sauces make it taste like you’re eating at a professional pan-Asian restaurant. And it makes for a super doable weeknight meal. Here are some more reasons why you need to make this asap:

  • It is quick and super easy to make.
  • Tastes brilliant with some rice.
  • Ingredients can be found in any supermarket.
  • It makes for a wholesome meal.
  • It is healthy.
  • You can customize the flavors as per your wish.

chicken recipes

A pleasant accident!

The background story to this chicken recipe is quite interesting. I had gone to my local farmer’s market on a whim and ended up buying a host of Thai spices and aromatics (along with other unplanned checks on my invisible food list). I was obviously craving for some Thai goodness in my mind. I came home and tried this stir-fry. I must say I was surprised by the results. It’s too good to be true kind of a chicken recipe!

chicken recipes

What kind of basil can you use?

As the name suggests, basil is the star ingredient of this recipe. I absolutely love basil and do not leave any chance to use it in my food. Thai basil chicken is a very common dish in Thailand and found almost everywhere. Thai people usually make it with the holy basil (Indian tulsi) that grows abundantly over there. That is the traditional way of cooking it.

The holy basil is more pungent and sharp in its taste as compared to normal basil. But you can also use Italian basil, and the taste is still marvelous. I personally prefer Italian basil over the Thai basil.

Few techniques to keep in mind

  • Preparing the minced chicken

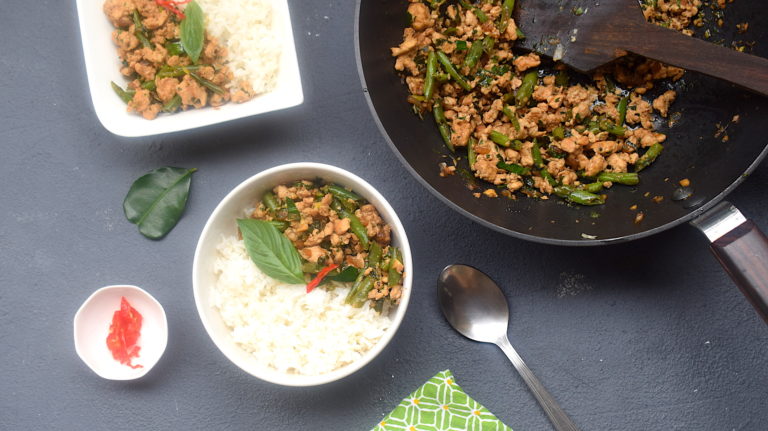
As you can see from the pictures, this recipe used chicken in its minced form. I have minced it myself because that way I know it is as fresh as it can get. Don’t fret already, it’s very simple!

All you have to do is take a chef’s knife and beat the boneless chicken breast till it flattens out. Then you need to mince the breast into tiny pieces by breaking it using vertical force with your knife. It is then cooked with ThaiĀ spices and aromatics, basil and kaffir lime being the best addition. Note them all down and surprise yourself with this amazing chicken recipe.

  • Adding the herbs

This recipe required the addition of two herbs – Kaffir lime leaves and basil leaves. The time of adding both these herbs will vary in the recipe. The addition of Kaffir lime leaves is before the basil leaves as it is a sturdy leaf that does not wilt. And the more you cook it, the more it releases its flavor. So the Kaffir lime leaves can be added to the chicken once it’s half cooked.

The basil leaves, on the other hand, are very tender. So they need to be added right at the end after switching off the flame. This ensures that their freshness is intact and you do not get a recipe with wilted leaves.

  • Use of chili

Over here, I have used just a bit of Naga chili or bhoot jolokia, which is also the hottest chili in the world. But you can add any chili you like. Just make sure it’s hot as this recipe tastes good when spicy. But again, that is also up to your taste. The traditional recipe uses bird’s eye chili, which a super hot Thai chili.

The Recipe

Preparation time – 15 minutes

Cooking time – 30 minutes

Serves – 3

[ingredients title=”Ingredients”]

  • 500 g minced chicken
  • 1 tbsp sugar
  • 1 tbsp oyster sauce
  • 2 tbsp dark soy sauce
  • 1 tbsp fish sauce
  • 150 ml chicken stock
  • 2 tbsp cooking oil
  • 1 large onion, finely chopped
  • 7-8 garlic cloves, finely chopped
  • 2 Thai green bird’s eye chilies, finely chopped
  • 100 g green beans
  • 2 fresh Kaffir lime leaves
  • 50 g basil leaves, finely chopped
  • 1/2 naga chili (bhoot Jolokia)
  • Salt to taste [/ingredients]

[directions title=”Directions”]

  1. Make the Thai sauce first. In a bowl/cup, mix the following and stir well – oyster sauce, dark soy sauce, fish sauce, sugar, and chicken stock. This is the sauce we will use for cooking, and is the highlight of the flavors.
  2. Heat cooking oil in a wok. You can also use sesame oil for extra punch. Add the minced chicken breast and fry it in the oil till it disintegrates completely.
  3. Cook the minced chicken for about five minutes, till the water from the chicken evaporates. Add the onion, garlic, and chopped chilies to the same wok and fry till onions become translucent. You can use any kind of chilies here in case you do not have bird’s eye chili.
  4. Add the green beans to this mix and stir until the chicken is cooked thoroughly.
  5. Season with salt.
  6. Pour in the sauce into the chicken and cook until the meat soaks in the goodness of the liquid. Make sure it does not become too dry.
  7. Roughly chop two fresh Kaffir lime leaves and add to the chicken and give it a slight mix.
  8. Turn the gas off and add the chopped basil to the chicken. Keep stirring till the basil turns into a beautiful dark green color.
  9. Add some Bhoot Jolokia or Naga chili in the end, if you like it extra spicy like me.
  10. Serve with white rice.

[/directions]

chicken recipes

chicken recipes

chicken recipes

I hope you try this recipe out. I have been getting a lot of engagement from the video that I posted on my Instagram and Facebook page. I honestly love this Tha basil chicken recipe and it is so easy to pull it off. You can also make it with pork. Vegetarians can try the same with vegetables or tofu.Ā  And you will feel like you are at a great Thai restaurant.

I am all about quick and tasty dinners. And this, my friends, is the ultimate of all minced chicken recipes that are going to fill you up with comfort and happiness. Do let me know how you like it. Happy cooking! Here’s the video. Do subscribe to my YouTube channel for all my videos.

Related recipe – Street-style Pad Thai Noodles

Shrimp Fettuccine in White Wine Sauce | Dinner Recipes | Slurrp

I love cooking with wine! I love the complexity and flavors that wine can give to define some wonderful sauces. This shrimp fettuccine with white wine is one of my absolute favorite dinner recipes of all times.

dinner recipes

dinner recipes

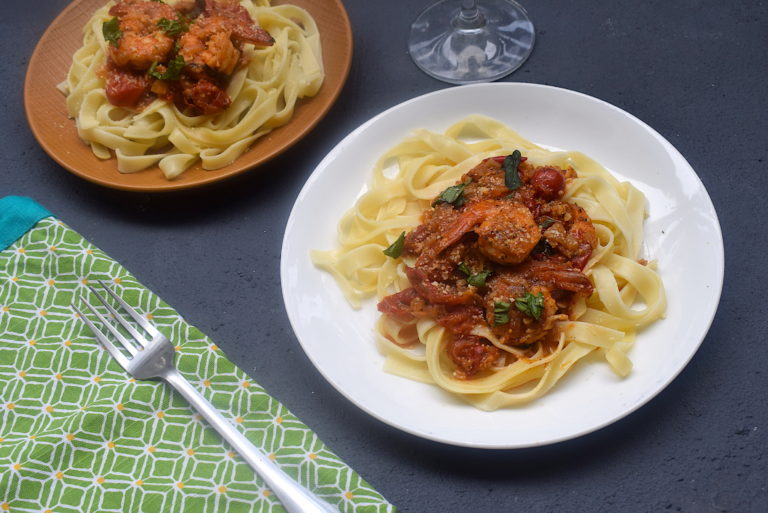
This pasta is comfort food with fresh ingredients. The base of the sauce is a sweet and sour mix of lots of fresh cherry tomatoes, coupled with onions, garlic, and fresh Italian herbs for seasoning. This pasta is also that perfect recipe for your date night. I usually do not mix the cooked fettuccine with the sauce entirely. I rather enjoy mine separatelyĀ as shown below. The perfect crunch of the shrimp fried in garlic butter, that glaze of the olive oil, the hint of fresh basil and thyme, oh this recipe is serious dinner goals!

dinner recipes

dinner recipes

Like all other kinds of pasta, here we cook the fettuccine separately with some aromatics and simultaneously prepare for a basic, yet luxurious sauce to serve with. Let’s get started!

Preparation time – 15 minutes

Cooking time – 30 minutes

Serves – 2Ā 

[ingredients title=”Ingredients”]

  • 250g fettuccine
  • 10 medium sized shrimps
  • 1 tbsp butter
  • 3 tbsp extra virgin olive oil
  • 1 onion, finely chopped
  • 5 garlic cloves, finely chopped
  • 200g ripe cherry tomatoes
  • 150 ml white wine (Chardonnay)
  • 1 tsp fresh ground black pepper powder
  • 7-8 Italian basil leaves, chopped
  • 1 tbsp dried thyme (Use fresh if available)
  • 1/2 cup grated parmesan cheese
  • Salt to taste [/ingredients]

[directions title=”Directions”]

  1. Heat water in a pot. Add salt to it, one bay leaf and a cinnamon stick.
  2. Cook the fettuccineĀ in the water as per the package instructions till al dente. Reserve some of the salty pasta water in a cup to be used for cooking later.
  3. While the pasta is cooking, heat olive oil and butter in another pot. Fry the shrimps in this, three minutes each side. Set them aside.
  4. In the same pot, saute the onions and chopped garlic for a minute. Add the cherry tomatoes to that and cook for another ten minutes till the tomatoes start to crack open.
  5. Once the cherry tomatoes melt, let the reserved pasta water and let it simmer.
  6. Season with salt and black pepper powder. Make sure you do not add too much salt as the fettuccine will already have it.
  7. As the sauce gets slightly thicker, add the white wine and stir gently. At this point, add the fried prawns to the sauce.
  8. Cook this on medium flame till the sauce reduces to a beautiful consistency.
  9. Roughly chop some fresh basil and thyme and add to the sauce. Add the parmesan cheese to the sauce to make it thicker. If at any point you feel like the mixture is getting too thick, add some reserved salty pasta water.
  10. Once you have your desired consistency, turn off the stove.
  11. For plating, add some cooked fettuccine on the plate. Pour the shrimp sauce cooked in white wine on top. Garnish with fresh basil and parmesan. Serve hot.

[/directions]

dinner recipes

dinner recipes

There is a burst of a variety of flavors in each bite of this delicious pasta. It is tangy, sweet, cheesy, and salty, all at the same time. If you like some spice in your pasta, you can add some chili flakes to the sauce.

So cook restaurant level deliciousness in your kitchen with these fresh ingredients and surprise yourself with how easy cooking can be!

dinner recipes

Related recipe: Cacio e Pepe with caramelized mushrooms and onions

For more such recipe videos, do subscribe to me on my YouTubeĀ channel.


30-Minute Mushroom Shakshuka | Eggs | Breakfast Recipes | Slurrp

Looking for some delicious breakfast recipes with eggs? You have surely landed on the right page!

breakfast recipes

This mushroom shakshuka tastes divine. It is a result of experiments with recipes in my kitchen, trying to create recipes with minimal ingredients in the refrigerator. So I decided to make this viral egg recipe with mushrooms. The result was so much better than what I had even imagined.

breakfast recipes

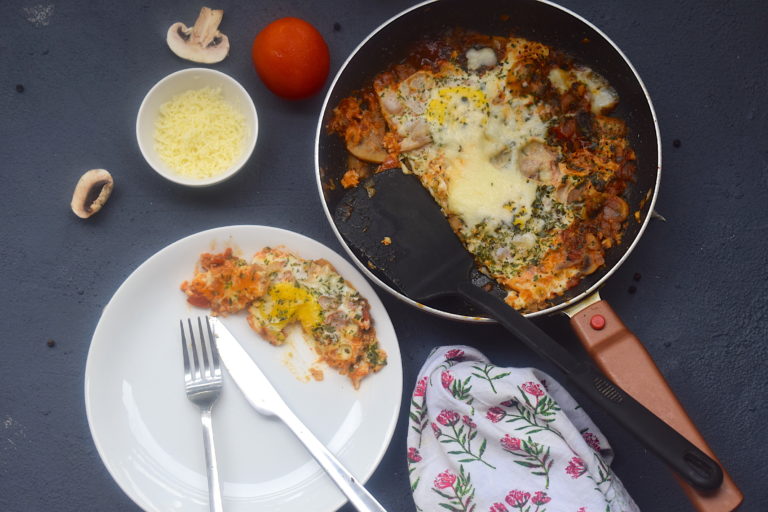
As you may already know, Shakshuka is a Mediterranean dish which poaches eggs in a tomato base, with some basic spices. The best part about shakshuka is that it is a one-skillet dish, where the effort is minimal, the time required is really less and the results are absolutely fabulous. The first time I made shakshuka was in its traditional and simple form, but for this particular breakfast recipe, I have experimented with some ingredients used in basic Italian cooking.

For this breakfast recipe, you will need some fresh button mushrooms and some basic spices. Try it out for yourself.

Preparation time – 10 minutes

Cooking time – 30 minutes

Serves – 2Ā 

[ingredients title=”Ingredients”]

  • 3 eggs
  • 2 tbsp extra virgin olive oil
  • 1 tbsp butter
  • 1 onion, finely chopped
  • 4 garlic cloves, finely chopped
  • 150 g button mushrooms, thickly chopped
  • 4 tbsp sweet chili tomato sauce
  • 3 tomatoes, finely chopped
  • 1 tsp black pepper powder
  • Fresh/dried thyme
  • Fresh/dried basil
  • 50 g grated cheddar cheese
  • Salt to taste [/ingredients]

[directions title=”Directions”]

  1. In a pan, heat olive oil and butter. Add the chopped onions and garlic to it. Saute for about a minute.
  2. Add the tomatoes, saute for about five minutes till they start melting in their own water. Once they are 70% done, add the button mushrooms.
  3. Cook this mixture through. Season with salt and pepper.
  4. Once the mushroom is cooked, add the sweet chili sauce and mix well. To make the sauce thicker, you may also add a splash of water as shown in the video.
  5. Break three eggs and gently put them one by one onto the pan. I have broken the eggs on a bowl separately as you can see, in order to prevent the yolks from breaking.
  6. Cover and cook these eggs in the tomato and mushroom base. Garnish with thyme, basil and lots of grated cheese. I like my yolk to be semi-cooked, so I cover it for about a minute.
  7. Serve hot with some bread!

[/directions]

I hope you try this. It is one of my favorite ways to eat those eggs and like I said, is a must addition to your collection of breakfast recipes.

breakfast recipes

breakfast recipes

You can follow the video below along with the instructions as well. Always love hearing from you so do drop me a comment! šŸ™‚

30 Minute Kerala Style Egg Curry | Indian Recipes | Slurrp

I am a big fan of eggs. I love eggs and I cannot do without them even for a single day. My father still jokes about how obsessed I was with eggs even as a child.

There is this one story he narrates where we had once gone to a neighbor’s house in the middle of a regular evening stroll. In those times, people used to visit each other in the evenings, have tea and generally chit chat about things. The sense of community was quite strong. My father tells me he was carrying me (yes, I was that small) and taken me for a walk. I used to love boiled eggs. Apparently, I saw a few of them on the table in the house.

Since I could not express too well, I started pinching my dad on his neck asking for boiled eggs. My father was just visiting and was embarrassed to give in to my stupid baby demands. So he kept bearing the pain of the pinchings till he could get me back home, all bruised by his own baby. Apparently, I pestered him so much that he could only take a sigh of relief after he boiled me an egg at home. Crazy!

indian recipes

I think I have some cosmic connection with the idea of eating eggs, especially when they are boiled. Needless to say, egg curries are one of my favorite parts about Indian recipes and cooking. Not only are they delicious, but also come together super quick, cook fast and taste unbelievably good! Egg curry is the most luxurious thing you can have even when there is a dearth of time or energy to cook something lavish. This particular version is a must addition to your book of Indian recipes.

indian recipes

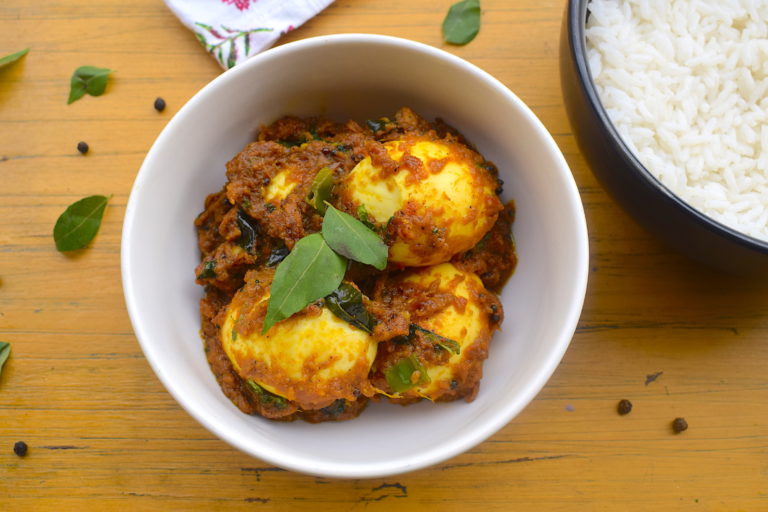
This Kerala style egg curry is my own rendition of how I understand food from Kerala. I am not saying it is 100% authentic, as it is my own version. But what I can claim without an ounce of doubt is that this curry will make you lick your fingers. Made with curry leaves, pure ghee, mustard, onions, coconut milk and fresh Indian spices, this egg curry transports me to a state of complete bliss.

indian recipes

It is very very easy to make, the ingredients are also very basic. So just get them all (I am sure you already have 80% of them right now if you cook Indian food) and start cooking!

Preparation time – 15 minutes

Cooking time – 30 minutes

Serves – 2-3 people

[ingredients title=”Ingredients”]

  • 4 hard-boiled eggs
  • 2 tbsp pure cow ghee (clarified butter)
  • 1 tsp mustard seeds
  • 2 medium-sized onions, ground to a paste
  • 10-12 fresh curry leaves
  • 2 green chilies, finely chopped
  • 1.5 tsp ginger-garlic paste
  • 1 tbsp sugar
  • 100 ml tomato puree
  • 1 tsp turmeric powder
  • 1 tsp black pepper powder
  • 1 tsp cumin powder
  • 150 ml thick coconut milk
  • 1 tsp fresh garam masala
  • Freshly chopped coriander leaves for garnish
  • Salt to taste [/ingredients]

[directions title=”Directions”]

  1. Heat the ghee in a kadhai. Add mustard seeds, let them splutter. Throw in the curry leaves and give it a gentle stir.
  2. Add the finely chopped onions and green chilies. Saute them till they turn brown.
  3. The next step is to add some sugar, which will help caramelize the gravy and also give it a beautiful brown color. It is also for adding sweetness to the gravy.
  4. Next, add 1 tsp of fresh ginger garlic paste. Fry this till the raw aroma of the ginger and garlic disappears.
  5. Time to add the tomato puree. I have made my own here by blanching two tomatoes, peeling the skin off and grinding with a little water. You can do the same or use ready-made puree. Though I prefer it fresh.
  6. Season with salt, turmeric powder, black pepper powder and cumin powder. Cook the mixture thoroughly till all the spices and condiments come together and there is no rawness left.
  7. Once the masala is thoroughly cooked with the onions and tomato puree, add the coconut milk. Give it a gentle stir.
  8. Keep stirring in medium flame for another 5 minutes. Add the boiled eggs into this mixture and coat each egg with the masala. You can add water depending on the consistency that you like. I like mine in a semi-gravy form.
  9. Season with some fresh garam masala and coriander just before taking it off the heat. Enjoy with some hot parathas, rotis or rice.

[/directions]

indian recipes

Indian recipes

I hope you try this recipe. It is one of my favorite and like I said, is a must addition to your collection of Indian recipes.

If you like this, do try it. You can follow the video along with the instructions as well. Always love hearing from you so do drop me a comment! šŸ™‚


Banana Flower with Potatoes

A banana is not just a super fruit. Every part of the banana tree can be used for something or the other.

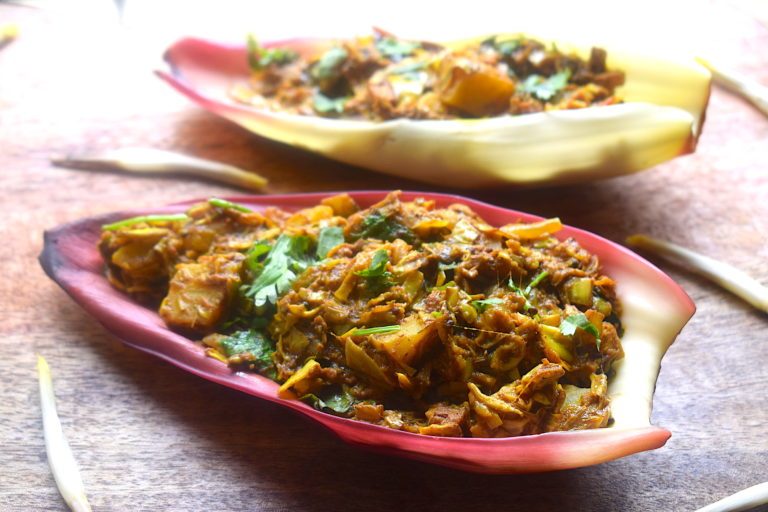
Banana leaves have been used as natural plates to eat food on for generations. The branches of the banana are used during pujas in Hindu households, as also to carry earthen lamps for decoration during Diwali. The best part for me is the banana flower, which is not just tasty but offers a host of health benefits.

banana flower

Banana flower is a delicacy in many parts of Southeast Asian countries. It is consumed raw, steamed or cooked with other vegetables. It is a rich source of iron and helps keep blood pressure in check. It wards off infections and has antioxidant properties. It is also a superfood for women’s health as it acts as a natural cure for cystic acne, PMS problems, reduction in menstrual bleeding and a flawless skin! So many good reasons to have this superfood on the plate, right?

I have seen and eaten it a lot throughout my childhood in my own culture, and I remember how we used to compare its taste to that of meat as children. This recipe is a traditional Assamese preparation that I have grown up eating, but I have added a slight twist of my own.

banana flower

Here’s the recipe, do watch the video for a more detailed look into the de-flowering and the chopping of the various parts of the banana flower.

Preparation time – 30 minutes

Cooking time – 60 minutes

Serves – 4

[ingredients title=”Ingredients”]

  • 1 whole banana flower, finely chopped (see deflowering steps above/in the video)
  • 4 tbsp mustard oil
  • 1 tbsp mustard seeds
  • 10-12 fresh curry leaves
  • 2 onions, finely chopped
  • 2 green chilies, chopped
  • 1 tsp ginger garlic paste
  • 1 tsp black pepper powder
  • 1 tsp turmeric powder
  • 1 tsp coriander powder
  • 1 tsp cumin powder
  • 2 medium tomatoes, finely chopped
  • 2 medium potatoes, chopped in cubes
  • 500 ml water
  • 1 tsp fresh garam masala
  • Freshly chopped coriander leaves for garnish
  • Salt to taste [/ingredients]

[directions title=”Directions”]

Deflowering the banana:

Deflowering a banana flower before cooking can be tricky, which is why I have included it in the recipe video. The outer pink petals are mostly left out and used for plating instead. It makes for a very pretty sight. There are two parts which are going to be used in the subzi –Ā the small flowers within the pink petals and the white banana heart in the middle.

Preparing the tiny flowers within the pink petals take patience, as each stem and petal inside the flower needs to be discarded, which is quite a time-consuming task. After removing the stems, the tiny white flowers are then finely chopped up and added to the subzi, along with the heart of the flower.

I would suggest that you dip the banana flower and the tiny flowers in lemon water before chopping them up. This will help reduce the glue that exists within the flower, reduce bitterness (if any) and also save it from browning.

Cooking instructions:

  1. Heat mustard oil in a kadhai. Add mustard seeds, let them splutter. Throw in the curry leaves and give it a gentle stir.
  2. Add the finely chopped onions and green chilies. Saute them till they turn brown.
  3. Next, add 1 tsp of fresh ginger garlic paste. Fry this till the raw aroma of the ginger and garlic disappears.
  4. Season with salt, turmeric powder, black pepper powder, coriander powder and cumin powder. Cook the mixture thoroughly till all the spices and condiments come together and there is no rawness left.
  5. Finely chop two medium tomatoes and add them once the onions are cooked and assimilated well with the spices. Cook the tomatoes for another five minutes till they merge into perfect harmony with the onions. Add a splash of water if required.
  6. Wash the potatoes thoroughly and add to the onion and tomato mixture, followed by the addition of the chopped banana flower. Since the potatoes and banana flower are raw, we need to cook them through. Keep frying the two for another five minutes, till all the water releases. The tomatoes will release more water of its own, which can be a base for the potatoes and banana flower to cook in.
  7. Keep stirring in medium flame for another 10 minutes, till you think the subzi has been fried well. Banana flower takes some time to cook. Since we haven’t boiled it in the pressure cooker before adding it to the curry, we will cook it for a longer duration in the kadhai. Add 500 ml water to the subzi, give it a gentle stir and cover it up. Let the subzi cook for a good 20 minutes in medium to low heat.
  8. Remove lid after twenty minutes, and give it a light stir. You can add more water depending on the consistency that you want. I like mine in a semi gravy, not too thick, not too thin.
  9. Season with some fresh garam masala and coriander before taking it off the heat. Enjoy with some hot parathas, rotis or dal rice.

[/directions]

banana flower

banana flower

banana flower

banana flower

I hope you try this recipe. It is one of my favorite and like I said, is a must addition to our palettes for its health benefits.

If you like this, do try it. You can follow the video along with the instructions as well. Always love hearing from you so do drop me a comment! šŸ™‚


Malai Matar Mushroom

Mushrooms are something I somehow always manage to have in my refrigerator. What’s not to like about them? They are worth devouring, cook in minutes, are low in calories and high in nutrition! And let’s not forget how versatile they are. Mushrooms go with pasta, eggs, pizza toppings, lasagnas,…the list is endless. Perhaps this is why most of my veg recipes, irrespective of cuisine has mushrooms in it.

veg recipes

But using mushroom might get tricky when it comes to Indian food. The options most of us are open to are also very limited, with the usual masala mushroom, mushroom do-piaza etc. Honestly, I am not a very big fan of mushroom in Indian gravies. Except for this semi gravy of malai matar mushroom which I am about to share here.

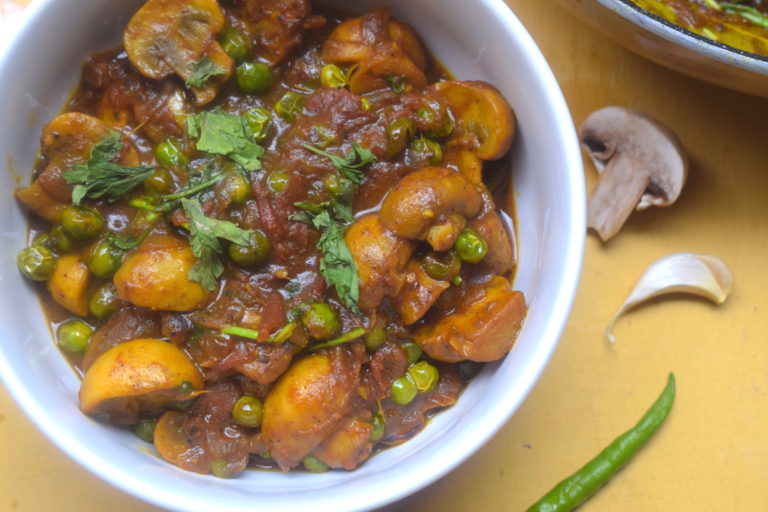
The secret to this veg recipe is that it is not as heavy as one might imagine it to be. This version is in fact very light, as it involves the addition of coconut milk which gives it a creamy texture. The other masalas are the usual onions, ginger, garlic, chilies, lots of tomatoes and the standard spices that go into Indian gravies. The prep time is also very less, and it makes for a great and quick dinner recipe, served hot with some flaky parathas.

veg recipes

The peas I have used here are fresh. I do not champion using frozen peas (or anything frozen for that matter). Because the peas are fresh and raw, I add them first and cook them through before adding the mushroom. This is because if you add the peas and mushrooms together, the latter will actually start melting since it takes just about ten minutes to cook. It is also important to use big chunks of mushroom into the gravy as it will anyways shrink down to half its size after cooking. I always use button mushrooms in Indian cooking. It is easily available and it has its own crunch that I feel goes well in Indian cooking.

Preparation time – 15 minutes

Cooking time – 30 minutes

Serves – 3

[ingredients title=”Ingredients”]

  • 250 g button mushrooms, each cut in half
  • 200 g fresh peas
  • 2 large onions, finely chopped
  • 2 green chilies, slit in half
  • 1 tbsp ginger garlic paste
  • 1 tsp sugar
  • 2 tbsp cooking oil
  • 2 bay leaves
  • 1 tsp turmeric powder
  • 1 tsp black pepper powder
  • 1 tsp cumin powder
  • 2 medium tomatoes, finely chopped
  • 100 ml thick coconut milk
  • 1 tsp fresh garam masala
  • Freshly chopped coriander leaves for garnish
  • Salt to taste [/ingredients]

[directions title=”Directions”]

  1. Heat oil in a kadhai. Add the bay leaves, followed by the finely chopped onions. Saute the onions till they turn brown.
  2. Add the sugar to the onions. The sugar will help the onions cook faster, add a caramelized taste and also give a dazzling brown color to the recipe. Add the slit green chilies into this and saute for another two to three minutes in medium flame.
  3. Next, add 1 tsp of fresh ginger garlic paste. Fry this till the raw aroma of the ginger and garlic disappears.
  4. Season with salt, turmeric powder, black pepper powder and cumin powder. Cook the mixture thoroughly till all the spices and condiments come together and there is no rawness left.
  5. Finely chop two medium tomatoes and add them once the onions are cooked and assimilated well with the spices. Cook the tomatoes for another five minutes till they merge into perfect harmony with the onions. Add a splash of water if required.
  6. Wash the peas thoroughly and add it to this onion and tomato mixture. Since the peas are raw, we need to cook them through before adding the rest of the ingredients. Saute the peas for a few minutes with the onions and tomatoes. Ā The tomatoes will release more water of its own, which can be a base for the peas to cook in.
  7. Once the peas are 70 percent cooked, add the button mushrooms. Gently saute the mushrooms into the rest of the mixture. Make sure each mushroom gets coated in the masalas in the kadhai.
  8. After a while, the oil will start to separate from the mixture in the kadhai. This is when you need to add the coconut milk. Give it a gentle stir. Cover and cook this on low heat for ten minutes.
  9. Remove lid after ten minutes, and give it a light stir. Season with some fresh garam masala and coriander before taking it off the heat. Enjoy with some hot parathas or rotis.

[/directions]

This is a semi gravy version. Based on the consistency you’d like, you can add some water to get a gravy version as well. But in my experience, this subzi tastes best when slightly dry.

veg recipes

veg recipes

I hope you like this preparation and add it to your collection of Indian veg recipes. Do let me know how it turns out for you. I will be happy to answer any questions you might have about this or any other recipe. Just drop in a comment or write to me at slurrpilicious@gmail.com

I hope you try out this malai matar mushroom recipe soon.If you do, let me know how it turned out for you.

If you have any questions, suggestions or feedback, please leave me a comment here. Or connect with meĀ Instagram,Ā FacebookĀ orĀ YouTube.

Happy cooking!

Cacio e Pepe With Caramelised Mushrooms and Onions | Dinner Recipes | Slurrp

The first time I actually heard about Cacio e Pepe was sometime in 2016 when I stumbled upon a YouTube video about the rage going on. I was so intrigued by it that I kept myself updated with everything I could lay my hands on about this new recipe on the block.

Turns out, Cacio e Pepe is very common in Roman households and is one of the most favorite homecooked recipes for Romans. It had just not entered the world of restaurants yet.

Not the case anymore, though.

cacio e pepe

Back then, I read about how Cacio e Pepe had taken over social media, with all the biggies in the food world talking about it, and also introducing it in their restaurants. This very same dish was termed New York’s “trendiestĀ dish of 2016!”

2016 was still a formative year in pasta learning for me, so it was hard for me to believe that a pasta with three ingredients can become so popular. But all my doubts were erased when I started making it for myself.

cacio e pepe

I know I make a LOT of pasta, and I cannot get enough of it. Having said that, I can also very comfortably now express that Cacio e Pepe is one of my favorite ways to make pasta. And oh boy, is it delicious!

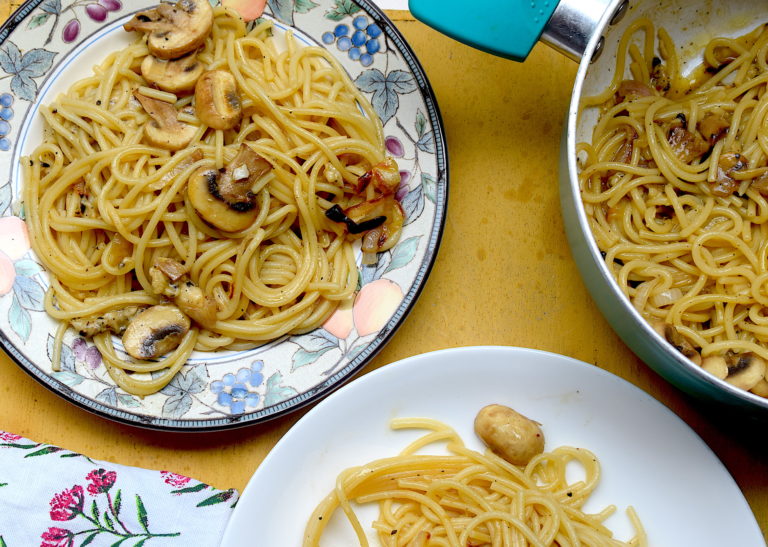
The sharpness of the freshly ground pepper, the magic of the reserved pasta water, the juicy spaghetti and the sinfulness of the cheese – what’s not to like? And to top it off, it goes with my constant need for tasty food that gets ready in the least amount of time and effort. And the usage of super fresh ingredients for that extra punch. A perfect dinner recipe indeed.

cacio e pepe

Coming back to facts about its origin, Cacio e Pepe is actually a Roman pasta recipe, cacio referring to cheese and pepe,Ā to pepper.

It is traditionally served with square cut spaghetti or tonnarelli in Rome. Some chefs also prefer using rigatoni. I have used thick spaghetti, and it made a perfect recipe for me as I could slur(r)p up the cheesy goodness. Get the pun?

It is absolutely necessary that the pepper is fresh.Ā So grind some fresh peppercorns into a powder to use here. Store bought black pepper powder will not bring out the taste freshly ground pepper will. The cheese used in the original Cacio E Pepe is Pecorino Romano. If you do not have this particular variety, you can use parmesan too.

So here is my version of Cacio e Pepe as a home cook, with no knowledge of culinary technicalities of the restaurant world. But I do have a lot of practice of making it a vital part of my dinner recipes.

[ingredients title=”Ingredients”]

  • 100 g spaghetti
  • 15 tbsp extra virgin olive oil
  • 80 g butter
  • 2 medium onions, finely chopped
  • 200 g button mushroom, each cut in half
  • 2 tbsp finely chopped garlic
  • 2 tbsp freshly crushed black pepper powder
  • 1-liter water
  • 100 g grated parmesan cheese
  • Salt to taste [/ingredients]

[directions title=”Directions”]

  1. Heat water in a pot. Add half a handful of salt to it. Addition of salt is very important in making pasta, and experts say that enough salt should be added to the water, and it should almost taste like saline water. Once the water comes to a boil, add the spaghetti and cook as per package instructions till al dente. Reserve about 100 ml of this hot, salty pasta water to be used later.
  2. While the spaghetti is cooking away, heat about 3 tbsp olive oil in a pan. Add 1 tbsp butter to it so that it doesn’t burn. Place the chopped onions on one side of the pan and the button mushrooms on the other. Fry this while stirring occasionally till the mushrooms and onions caramelize and turn into a beautiful brown color. Season with salt.
  3. In another pot, add almost 12 tbsp olive oil (remember this is going to be the base of this simple dish, and therefore the oil required is quite a lot). To this, add the finely chopped garlic and freshly ground pepper powder. Make sure you add the ingredients before the oil is too hot, as the flavors need to get infused into the oil. Keep the flame on low, and turn it to medium once the flavor assimilates into the olive oil.
  4. At this point, add the reserved salty pasta water, followed by 20 g butter to the olive oil infused with garlic and black pepper. Give it a good stir to mix everything together.
  5. Add the cooked spaghetti into this mixture, and stir. Let the spaghetti take in the flavors in that fluid. Switch off the fire once you see a good consistency. Add a generous helping of the parmesan cheese and mix it into the pasta. And serve hot! You may garnish with some parsley if you like.

[/directions]

cacio e pepe

cacio e pepe

Want more such pasta secrets? Grab them all here.

If you like this, do try it. You can follow the video along with the instructions as well. Always love hearing from you so do drop me a comment! šŸ™‚

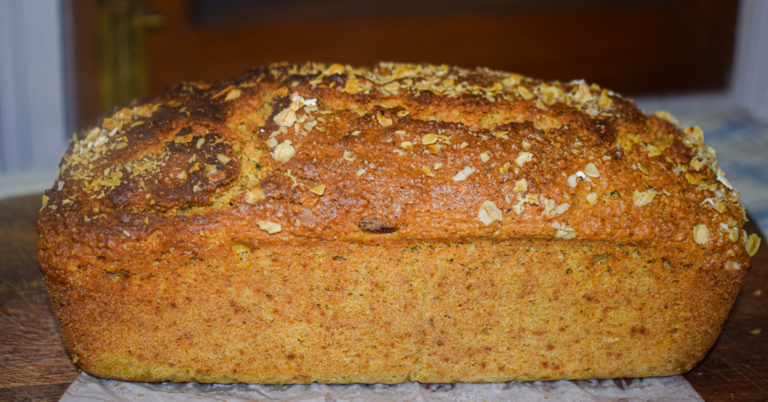
Mango Oatmeal Bread

The best part of Indian summers to me is the abundance of mangoes that I get to see everywhere. India is home to more than a thousand varieties of mangoes, and it is undoubtedly the king of all fruits. Mango season has started again this year and I thought of sharing a unique mango based recipe with you guys – a delicious and healthy Mango Oatmeal Bread.

mango oatmeal bread

If you love desserts and you want to make it in a healthier way, this bread recipe is meant for you. This mango oatmeal bread tastes so good that it is almost unbelievable that it is filled with fiber and health. I have used zero all purpose flour and the entire base is made with oats. Yes, you read it right! I love the nutty flavor of this bread, and the subtle hint of mango makes it a must try!

This recipe uses fresh mango pulp. Every bite comes with the frangrance of mango – it is not overpowering at all, but absolutely delicious. The oat flour gives the cake a dense texture, but it’s also soft and moist as you cut into it. For flavouring I have used fresh cinnamon powder and vanilla essence. They shine in this simple recipe. The dry fruits add a lot more flavour and crunch to the bread. All in all, it’s a beautiful bread and I highly recommend you try it this mango season.

mango oatmeal bread

Since this is made with fresh mango pulp, it needs to be consumed immediately. Do not keep it for more than two days as it might perish sooner and refrigerate it immediately once it cools down. It is a perfect tea time partner. I make this variant for my parents who avoid sugar, and they have also given this a green signal!

Preparation time – 30 minutes

Cook time – 60 minutes

Serves – 6

[ingredients title=”Ingredients”]

  • 4 cups oat flour
  • 2 eggs (at room temperature)
  • 1 tsp vanilla essence
  • 2/3 cup melted butter (cooled down)
  • 1 cup powdered sugar
  • 1/2 cup warm milk (full fat preferred)
  • 1/4 cup dry fruitsĀ (cashews, raisins, almonds)
  • 1 tsp baking powder
  • 1 tsp baking soda
  • 1 tbsp cinnamon powder
  • 1 cup fresh mango pulp [/ingredients]

Oat flour is nothing but oats ground to a fine powder in a grinder. For an extra nutty flavor, you can also slightly toast the oats on a pan before grinding.

[directions title=”Directions”]

  1. Mix the wet ingredients first – In a glass bowl, whisk in two eggs, vanilla essence and melted butter. Add in warm milk to this, little by little. Whisk continuously in the process.
  2. Next, mix the dry ingredients together – In another glass bowl, mix oat flour, sugar, baking powder, baking soda, cinnamon powder and dry fruits together.
  3. Add the dry ingredients slowly and in parts to the wet egg base (watch the video below). Make sure everything gets mixed in complete harmony, with no lumps or unevenness in the consistency. The end batter should be a thick one as shown in the video.
  4. Once the batter is ready, add the fresh mango pulp into it and mix till it distributes evenly into the batter.
  5. Grease the baking tray with oil/butter. Pour in the batter. Sprinkle some oats on top.
  6. Pre-heat your oven at 180 degrees. Bake this bread for 50-60 minutes. Once done, allow it to cool completely before serving. Enjoy! [/directions]

This is a delicious way to eat those fresh and ripe mangoes, and a perfectly healthy bread, which is also gluten-free! If you want to avoid the sugar completely, go ahead and add some honey or jaggery for the sweetness. You can also add some dates and other kinds of dry fruits such as walnuts if you like!

mango oatmeal bread

mango oatmeal bread

mango oatmeal bread

More such baking delights:

The ULTIMATE Fudgy Brownies

Chocolate Cake

I hope you try out this delicious and unique mango oatleam bread for yourself. It’s aboslutely divine. If you have any questions, feel free to reach out to me with a comment or connect with me on Instagram or Facebook. For all my videos, you can subscribe to me on YouTube.

Happy baking!

Prawn Malai Curry | Indian Food | Slurrp

This is for all you seafood lovers out there!

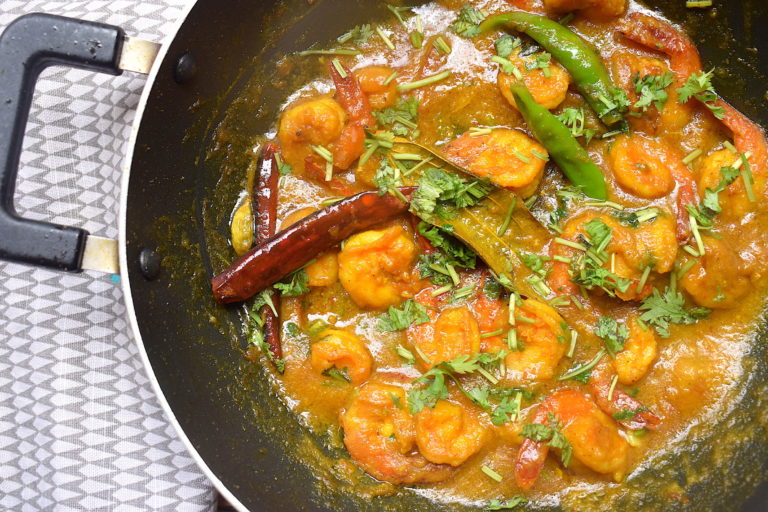
Prawn Malai curry has to be one of the tastiest, creamiest and easiest prawn curry recipes. It is a favorite in Bengali cuisine. I have loved this gravy since a child and I always thought it must be very complicated to make. The preparation just seems overwhelming, but the recipe is quite basic. Once I learned about the recipe, I realized how simple it is. Just a handful of fresh ingredients is what is needed and you can make this luxurious gravy for yourself at home.

prawn malai curry

Prawn malai curry is my go-to comfort meal when I crave for seafood flavors on my plate. I have been making it for years now and it just does not fail to surprise me every time. The traditional prawn malai curry is prepared with tiger prawns. But I feel it goes just as well with medium prawns that I have used here. You can follow the same steps using tiger prawns as well.

prawn malai curry

Try this at home and see it for yourself.

Serves: 2

INGREDIENTS

250 gms prawns

2 tbsp mustard oil

1 large onion, ground toĀ a paste

1 tbsp ginger garlic paste (fresh)

4 green chilies

1 tsp fresh Bengali garam masala

1/2 cup thick coconut milk

Freshly chopped coriander leaves, for garnish

Salt to taste

1 tsp turmeric powder

1 tsp cumin powder

1 bay leaf

2 cardamoms

2 cloves

1 small cinnamon stick

2 dried red chilies

prawn malai curry

PROCEDURE

  • Wash the prawns thoroughly and devein them. Once they are clean and dry, marinate them with salt and turmeric. Mix well and set it aside for about an hour (I have kept the tail on in my prawns as I feel it enhances the taste. You can remove it if you want).
  • Heat mustard oil in a pan. Fry the marinated prawns for about three minutes each side. Once done, set them aside for later.
  • In another kadhai, heat mustard oil. Once the oil reaches a smoking point, add a bay leaf, two dried red chilies, two cardamoms (elaichi), one small cinnamon stick (dalchini) and two cloves (laung). Give it a light stir.
  • Add the onion paste to this and fry for about a minute.
  • Add one teaspoon sugar to the onions. The sugar will help the onions cook faster and also give it a beautiful brown color.
  • Throw in the fresh ginger garlic paste to this and fry till the raw aroma completely disappears.
  • Add fresh cumin (jeera) powder turmeric powder.
  • Season with salt and mix well. Add a splash of water if required.
  • Once the onions are completely cooked, add the coconut milk. Stir gently till the gravy comes to a boil.
  • Add the fried prawns to this creamy gravy. Mix well. Add some water, depending on the consistency you want.
  • At this point, throw in four whole green chilies into the gravy and cover it. Cook this for ten minutes in low flame. The green chilies add a wonderful flavor to the final gravy, without making it extremely spicy.
  • Remove lid and add fresh Bengali garam masala. I usually make my own garam masala where I grind freshly roasted cardamom, cinnamon, and cloves together. This enhances the flavor of this dish and takes it to a whole new level.
  • Give the gravy one last stir. Garnish with freshly chopped coriander leaves. Serve hot with steamed white rice.

prawn malai curry

prawn malai curry

More Indian Curry Recipes:

Shahi aloo dum

Assamese Egg Curry

For more such delightful food, follow me onĀ Facebook,Ā Instagram,Ā TwitterĀ and YouTube.