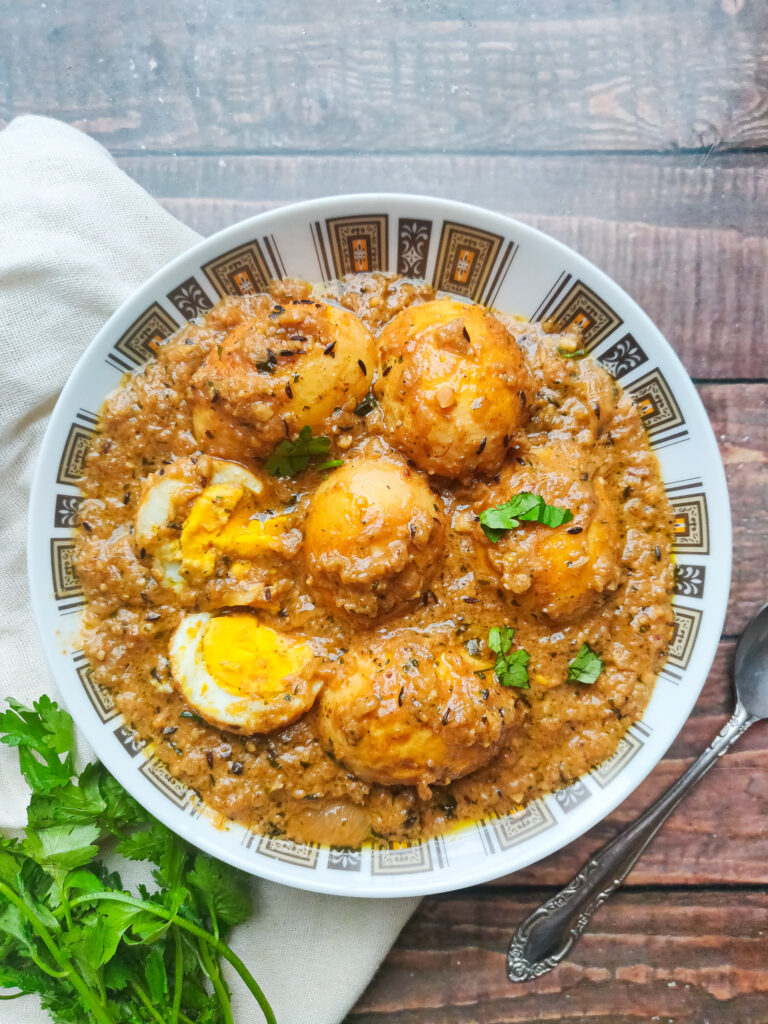
Egg Korma

This egg korma recipe is a delicious blend of royal ingredients that make for a luxurious treat with boiled eggs. A perfect meal for a weekend or when guests drop by, this egg korma tastes amazing with some parathas, or dry fruit pulao. Eggs are hard boiled and then added to a creamy gravy with cashews, curd and whole spices. The gravy is white and devoid of any spices that add colour such as Kashmiri red chilli powder or turmeric.

egg korma

Boiling the Eggs

Egg curries are made with hard boiled eggs. Once boiled, these eggs are poked with a fork or slits are made on the skin so that the eggs absorb all the flavours of the gravy. To get this egg curry right, it is important to boil the eggs well, so that they do not disintegrate while frying or when they are added to the gravy.

Here are the tips I always follow that can help you become a pro at boiling eggs specifically meant for an egg curry.

– Add salt to water

Whenever you boil eggs, the first thing to do is to use a wide mouthed pot. Fill it up with water so that the eggs can be submerged completely in the water. Once the water starts to boil, add about two teaspoons of salt to it. Addition of salt prevents the eggs from cracking.

– Boil the water before adding the eggs

Now let this water come to an aggressive boil before you add the eggs. Adding the eggs to room temperature water can give them a shock when the temperature rises, causing the skin to stick to the shell. So add the eggs only when the water is boiling hot.

– Be gentle

Because we need to add the eggs to a boiling pot of water, you must be gentle. Raw eggs break very easily so make sure you use a spoon to gently place the eggs into the boiling water. Do not let go of the spoon till you drop the egg right at the bottom.

– Check the timing

After placing the eggs into the pot of boiling water, I let it boil on high flame for exactly ten minutes. Remove the eggs and place it immediately in ice cold water so that it stops cooking. De-shell the eggs after ten minutes.

egg korma

egg korma

Let’s take a look at the recipe.

Preparation time – 30 minutes

Cook time – 30 minutes

Serves – 3

[ingredients title=”Ingredients”]

  • 6 hard boiled eggs
  • 2 tbsp mustard oil
  • 2 tbsp ghee
  • 1 cinnamon stick
  • 2 green cardamoms
  • 1 black cardamom
  • 2 bay leaves
  • 2 dried red chillies/fresh green chillies
  • 1/2 tsp cumin seeds
  • 2 cloves
  • 5 black peppercorns
  • 2 cups finely chopped onions
  • 1 tbsp ginger garlic paste
  • Salt to taste
  • 1 tsp cumin powder
  • 2 tsp coriander powder
  • 1/2 tsp black pepper powder
  • 1/4 tsp garam masala
  • 4 tbsp whisked curd
  • 12 cashews ground to a paste with some water
  • 1 tbsp crushed Kasuri methi
  • Chopped coriander leaves for garnish  [/ingredients]

[directions title=”Directions”]

  1. Boil 6 eggs for 10 minutes and set aside.
  2. Poke the eggs with a fork.
  3. Heat oil in a kadhai and fry the hard boiled eggs till they are golden brown. Set them aside.
  4. Add some ghee in the same kadhai and lower the heat.
  5. Temper the oil with the whole spices – dried red chillies, bay leaves, green cardamom, black cardamom, cinnamon stick, cumin seeds, cloves and black peppercorns, Stir for a few seconds. Do not burn.
  6. Add the finely chopped onions and saute on medium heat till they start to turn soft and their rawness fades. Do not brown them too much.
  7. Once the onions are translucent, add the ginger garlic paste. Saute till the raw aromas fade completely.
  8. Season with salt, cumin powder and coriander powder. Mix well.
  9. Add a splash of  water to make sure the masala does not stick to the bottom.
  10. Fry on medium heat till onions are cooked completely and oil starts to release from the sides.
  11. Pour the beaten curd and cashew paste and mix well till everything combines well.
  12. Once you see oil releasing from the sides, add the fried eggs to the semi gravy and mix well. Let the boiled eggs soak up all the flavours.
  13. Add hot water and mix well. Cover and cook on low flame for 10 minutes or until you reach your desired gravy consistency.
  14. Season with some freshly crushed black pepper powder. Mix well.
  15. Garnish with some crushed Kasuri methi and coriander leaves give it one last mix.
  16. Serve hot with parathas or dry fruit pulao. [/directions]

egg korma

egg korma

Hope you try out this one pot vegetable pulao in your own kitchen.

Feel free to reach out for feedback, suggestions or connect with me on Instagram or Facebook. Subscribe to my YouTube channel for all my videos and upcoming recipes.

Vegetable Pulao

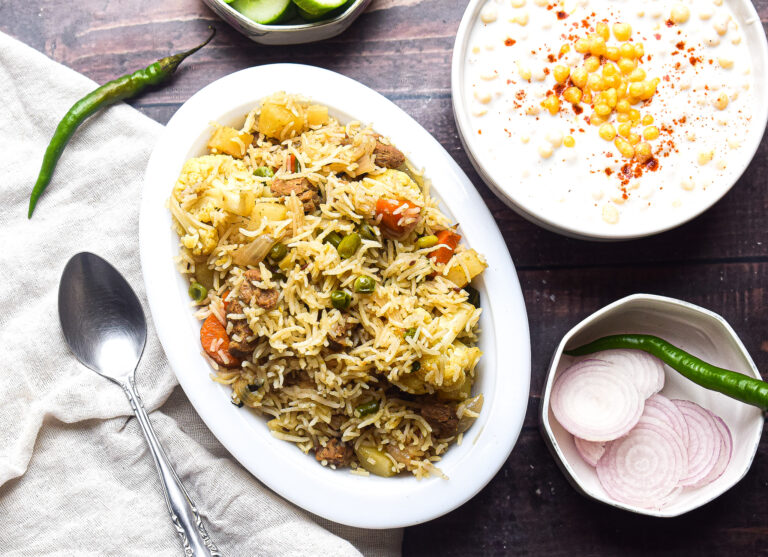
Vegetable pulao is a medley of colourful vegetables with rice and some basic spices. It can be paired with different curries or enjoyed as it is with some raita. Vegetable pulao makes for a wholesome and healthy meal, especially when you have a shortage of time in your hands. It also makes for a great lunch box idea.

This vegetable pulao can be made in a single vessel or pot. You can also use the pressure cooker and cook it for one whistle. The amount of time it takes to took in a pot is almost the same as a pressure cooker. Soaking the rice in advance helps to cook it faster, and makes it fluffy and light.

Making the Perfectly Fluffy Rice

Soaking

For this pulao, find yourself the best quality long grained basmati rice. Wash the rice thoroughly with water till its clear. Next, soak it for exactly 30 minutes in room temperature water. After that, strain the water and keep the rice as dry as possible. I used a sieve to release the water and keep it undisturbed. Do not soak for more than 30 minutes as the rice will become too wet and will cook very fast, and end up sticking to each other. Soaking for longer duration might also break the rice. Soaking is an essential pre-requisite to get the perfectly fluffy rice that you see in this egg pulao.

Correct water quantities

Next is the perfect amount of water for the rice to cook. I have added the exact measurements for this recipe, but the usual and easy rule to follow is – For every cup of rice that you use, use half cup more water than that. For example, if you use 1 cup of rice, use 1.5 cups of water. If you use 2 cups of rice, use 2.5 cups of water. And the water should always be hot if you’re making the rice in a pot. Otherwise, the temperature difference might ruin the rice. This rule applies only if you soak the rice for 30 minutes before cooking it.

Low flame and rest

Lastly, perfectly fluffy rice is always cooked in low flame. If you’re making rice in a pot, make sure you cover and cook it in the lowest flame possible. And once its done, do not serve immediately. Turn off the gas and let it rest for another 10-15 minutes. This will give the perfect edge to the rice and make it bloom to its best ability.

vegetable pulao

vegetable pulao

Let’s take a look at the recipe.

Preparation time – 30 minutes

Cook time – 30 minutes

Serves – 3

[ingredients title=”Ingredients”]

  • 1 cup rice
  • 2 tbsp ghee
  • 1 tbsp ghee for garnish
  • 2 medium onions
  • 3 cardamoms
  • 1 inch cinnamon stick
  • 1 bay leaf
  • 1 star anise
  • 3 cloves
  • 8 peppercorns
  • 1 tsp cumin seeds
  • 2 slit green chillies (add more if you want it extra spicy)
  • 1 tsp garlic paste
  • 1 tbsp ginger paste
  • 1 cup cauliflower florets
  • 1/2 cup carrots
  • 1/3 cup green beans
  • 1/2 cup potatoes
  • 1/4 cup green peas
  • 1/2 cup soaked soya chunks
  • 1 tsp cumin powder
  • 1 tbsp coriander powder
  • 1.5 tbsp salt (or adjust as per taste)
  • 1.5 cups hot water
  • 10-12 fresh mint leaves for garnish [/ingredients]

[directions title=”Directions”]

  1. Wash the rice thoroughly till water comes clear. Soak the rice for 30 minutes.
  2. Heat ghee in a pan. Once hot, temper with cumin seeds, bay leaf, star anise, cloves, peppercorns, cinnamon stick, cardamoms and slit green chillies. Saute for a few seconds till they release their aroma.
  3. Add the finely chopped onions. Saute for a few minutes till they turn translucent. We do not want to turn them brown.
  4. Once the onions are translucent, add the ginger and garlic paste. Saute on medium flame till the raw aromas disappear.
  5. Add the hardy vegetables first – cauliflower florets, carrots and potatoes.
  6. Fry the vegetables with the rest of the ingredients for a few minutes.
  7. Add the peas and the soaked soya bean nuggets. They add a lot of flavour. Mix the well with the rest of the ingredients.
  8. Season with salt, cumin powder and coriander powder.
  9. Once everything is well combined, add the soaked rice and gently mix it with the rest of the ingredients. Be gentle as you do not want to break any grains.
  10. Pour hot water, give everything a gentle mix and cover and cook on low flame for 30 minutes.
  11. Once done, take flame off and let it rest for atleast 15 more minutes.
  12. Garnish with some fresh mint leaves and a generous drizzle of ghee.
  13. Serve hot with some raita or curry of your choice. [/directions]

vegetable pulao

vegetable pulao

Hope you try out this one pot vegetable pulao in your own kitchen.

Feel free to reach out for feedback, suggestions or connect with me on Instagram or Facebook. Subscribe to my YouTube channel for all my videos and upcoming recipes.

Dahi Chicken

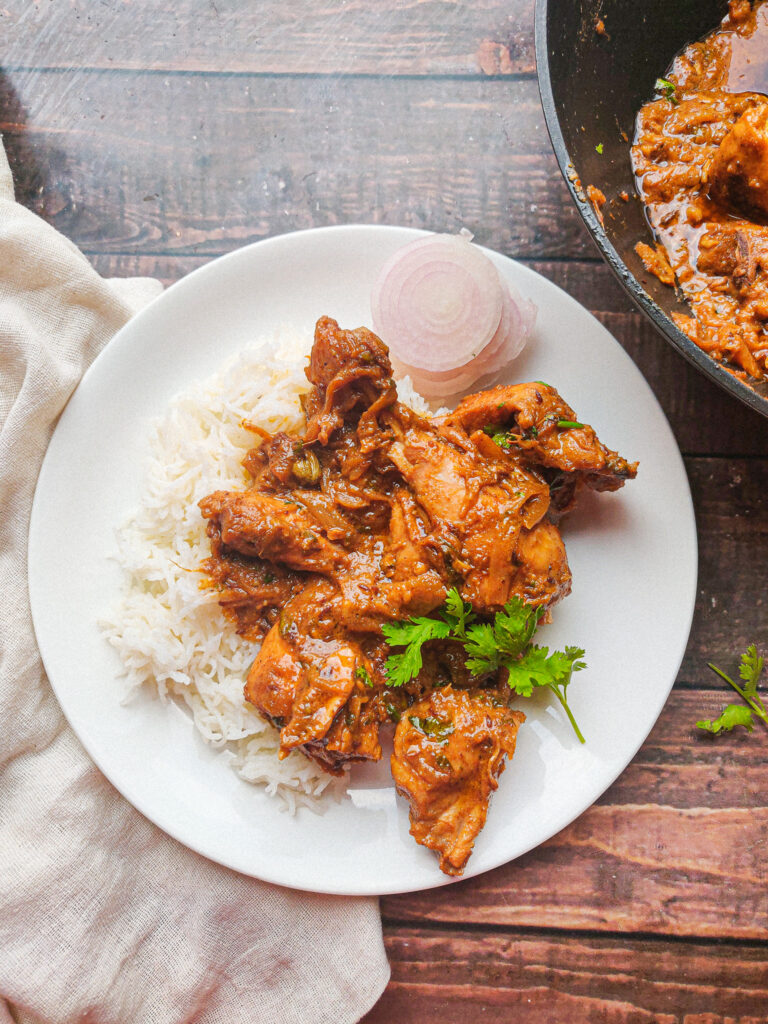
A delicious and super easy recipe that combines yogurt or dahi (yogurt) and chicken, this dahi chicken curry pairs perfectly well with rice, pulao or parathas. It comes together real quick with some very basic and simple ingredients that are most likely lying in your pantry right now. There are no tomatoes added in this chicken curry, as the yogurt takes care of the sour element. 

This dahi chicken is a recipe that I find comfort in on most weekends. The recipe requires a minimalistic approach in terms of ingredients, but comes out fabulous. The yogurt is whisked and allowed to marinate with the chicken for about 30 minutes before the cooking process starts. And then it is all cooked till chicken pieces are soft and succulent, along with basic spices found in an Indian kitchen.

dahi chicken

dahi chicken

Let’s take a look at the recipe.

Preparation time – 30 minutes

Cook time – 40 minutes

Serves – 3

[ingredients title=”Ingredients”]

  • 500 g chicken, curry cut pieces
  • 200 g dahi or yogurt, whisked till smooth
  • Salt to taste
  • 1 tsp Kashmiri red chilli powder
  • 3 tbsp oil
  • 1 tsp cumin seeds
  • 1 bay leaf
  • 1 inch cinnamon stick
  • 1 black cardamom
  • 3 cardamoms
  • 3 cloves
  • 2 large onions, finely sliced
  • 2 green chillies, finely chopped
  • 1 tbsp coriander powder
  • 1 tsp cumin powder
  • 1/2 tsp fennel powder
  • 1/2 tsp black pepper powder
  • 1/4 tsp garam masala
  • 400 ml hot water
  • 2 tbsp fresh coriander leaves, finely chopped [/ingredients]

[directions title=”Directions”]

  1. Wash the chicken and pat dry with a kitchen towel.
  2. Marinate the chicken with whisked dahi or yogurt, salt and Kashmiri red chilli powder. Mix well and let it rest for atleast 30 minutes.
  3. Heat oil in a kadhai. Once hot, temper with cumin seeds and whole spices – bay leaf, cinnamon stick, green cardamom, black cardamom and cloves. Stir it for a few seconds till you can smell the aroma.
  4. Add the onions and chopped green chillies. Fry the onions till golden brown and translucent.
  5. Add the ginger garlic paste and saute till the raw aromas disappear.
  6. Once done, add the marinated chicken and fry for 10 minutes on high heat. All the excess water from the yogurt should evaporate.
  7. Season with cumin powder, coriander powder, fennel powder and black pepper powder. Mix well.
  8. Cover and cook on low flame for ten minutes.
  9. Pour hot water for the making the gravy.
  10. Add some finely chopped coriander leaves into the gravy and allow it to come to an aggressive boil.
  11. Cover and allow the chicken to cook completely. Put the flame at low.
  12. Season with garam masala and give it one last mix.
  13. Garnish with finely chopped coriander leaves.
  14. Serve hot with jeera rice, pulao, plain rice or parathas/naan. [/directions]

dahi chicken

dahi chicken

Hope you try out this delicious dahi chicken in your own kitchen.

Feel free to reach out for feedback, suggestions or connect with me on Instagram or Facebook. Subscribe to my YouTube channel for all my videos and upcoming recipes.

Prawn Fried Rice

This Prawn Fried Rice is an easy way to whip dinner up in 30 minutes. Juicy, plump prawns with a slight tinge of garlic, along with fluffy eggs and crunchy vegetables, this fried rice is simple, easy to pull off, wholesome and a whole lot delicious. The taste of this recipe will further enhance with butter, so you can use that instead of oil.

This prawn fried rice is a perfect weeknight meal that you can toss up with leftover rice. To save more time, you can always keep chopped vegetables in your fridge and use them as and when you want to whip up a fried rice.

What Kind of Rice Should I Use?

While you can use any kind of rice for this recipe (depending on availability), I prefer using small grained aromatic rice that is typically used in Chinese fried rice recipes. You can use jasmine rice or any broken white rice. To get the best texture and even distribution of flavours, it’s better if the rice is cold and a day old. This prevents any kind of breakage and prevents the fried rice from turning into a ball of mush.

A Complete Meal

This prawn fried rice is a complete and wholesome meal – you have the rice for satiety, colourful vegetables for aesthetics and health, and of course, the juicy prawns and fluffy eggs for protein. You can make some chilli oil or spring onion oil on the side, and it would make for a fantastic meal.

prawn fried rice

prawn fried rice
A few points to keep in mind:

* The prawns need to be cooked just right, overcooking makes them rubbery.

* The vegetables need to find that perfect balance between cooked, and still crunchy.

* Keep all the ingredients ready as things move really fast.

* Cook on high flame preferably on a wok.

* Use a day old rice which is cold. Hot rice will stick and not lead to separate grains.

prawn fried rice

Let’s dive into the recipe.

Preparation time – 10 minutes

Cook time – 30 minutes

Serves – 3

[ingredients title=”Ingredients”]

For the scrambled eggs:

  • 2 eggs
  • 2 tbsp oil/butter
  • A pinch of salt
  • A pinch of black pepper powder

For the prawns:

  • 350 g prawns, cleaned, deveined and patted dry with kitchen towel
  • Salt to taste
  • 1/4 tsp black pepper powder
  • 3 tbsp oil/butter
  • 1 tsp finely chopped garlic

For the final fried rice (in the same wok):

  • 1 tbsp oil (for the veggies)
  • 2 cups cooked rice (preferably a day old)
  • 1/4 cup green peas
  • 1/4 cup finely chopped carrots
  • Salt to taste
  • 1/4 tsp black pepper powder
  • 1 tbsp dark soy sauce [/ingredients]

[directions title=”Directions”]

  1. Clean and devein the prawns. Pat them dry with a kitchen towel and keep ready.
  2. Keep all the rest of the ingredients within arm’s distance as everything moves really fast in this recipe.
  3. Crack open two eggs in a bowl. Season with salt and a pinch of black pepper powder and whisk till smooth.
  4. Heat oil in a wok. Once it gets hot, pour the eggs and gently scramble for a minute. Do not overcook or leave the eggs raw. They should be soft and fluffy, while cooked uniformly. Set them aside.
  5. In the same wok, heat some more oil, or butter. Add the prawns and fry for a minute till they start to turn pink.
  6. Add the finely minced garlic and season with salt and black pepper powder.
  7. Mix everything together and cook the prawns till they are soft (another 3-4 minutes).
  8. Once the prawns are nicely cooked, transfer them to one side of the wok and add the vegetables on the other side.
  9. Fry the vegetables on one side of the wok for two to three minutes. They should be slightly cooked, yet remain crunchy.
  10. Mix everything together and cook for another minute.
  11. Add the cooked white rice and disintegrate softly into the rest of the ingredients.
  12. Once every grain of rice is separate and well combined with the prawns and the vegetables, pour some dark soy sauce.
  13. Season with salt and black pepper powder and add the scrambled eggs.
  14. Give everything one last mix.
  15. Garnish with finely chopped spring onion greens and serve hot. [/directions]

prawn fried rice

prawn fried rice

Hope you try out this delicious recipe in your own kitchen.

Feel free to reach out for feedback, suggestions or connect with me on Instagram or Facebook. Subscribe to my YouTube channel for all my videos and upcoming recipes.

Kadhai Paneer

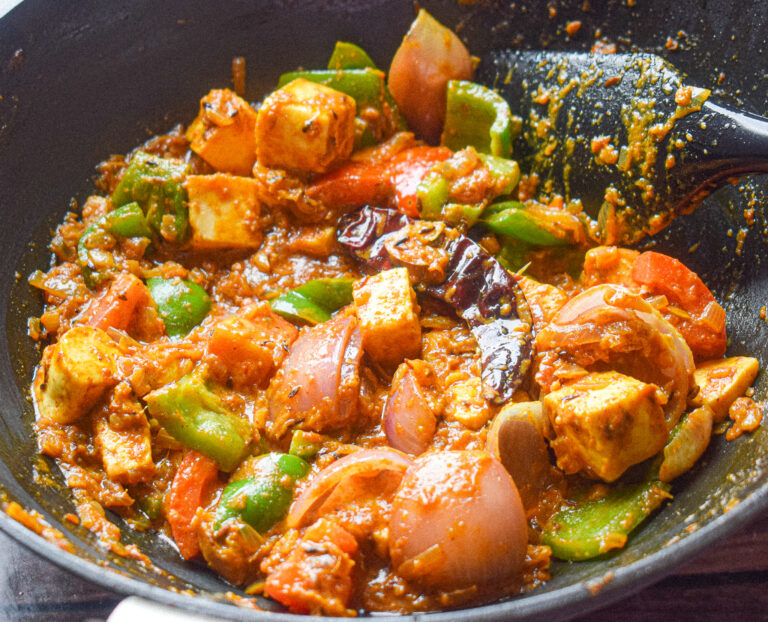
Kadhai Paneer is a very popular vegetarian recipe that we love to order whenever we are eating out at a restaurant or a dhaba. Soft paneer or cottage cheese pieces are dunked in a flavourful base of onions, spices, tomatoes and green capsicum.

What sets kadhai paneer apart from other popular paneer preparations such as paneer butter masala, is the crunch in every bite. Onions, green capsicum and tomatoes are tossed in oil separately and added to the gravy right in the end.

These vegetables are cooked till they char a little from the sides and their crunch remains intact.

A lot of people assume kadhai paneer must be hard to prepare at home. But I have a recipe that can be followed easily and you can get restaurant like kadhai paneer right in your kitchen.

kadhai paneer

kadhai paneer

Let’s dive into the recipe.

Preparation time – 20 minutes

Cook time – 30 minutes

Serves – 4

[ingredients title=”Ingredients”]

  • 200 g paneer, cut into cubes
  • Salt and a pinch of Kashmiri red chilli powder to marinate the paneer
  • 2 tbsp oil – to fry the vegetables and the paneer
  • 2 tbsp oil for the gravy
  • 1 tsp cumin seeds
  • 2 cloves
  • 1 inch cinnamon stick
  • 1 bay leaf
  • 2 cardamoms
  • 3 black peppercorns, slightly crushed
  • 1/2 cup finely chopped onions
  • 1 cup fresh tomato paste
  • 1 tbsp ginger garlic paste
  • 1/4 cup tomato, cut in cubes
  • 1/2 cup capsicum, cut in cubes
  • 1/2 cup onion, cut in large chunks and separated
  • Salt to taste (for the gravy)
  • 1/4 tsp turmeric powder
  • 1/4 tsp Kashmiri red chilli powder
  • 1 tbsp freshly ground coriander powder
  • 1 tsp freshly ground cumin powder
  • 1/2 tsp garam masala [/ingredients]

[directions title=”Directions”]

  1. Cut the paneer into cubes. Marinate with salt and red chilli powder.
  2. Heat oil in a kadhai. Fry the paneer cubes till slightly golden brown from all sides. Set aside for later.
  3. In the same kadhai, add some more oil.
  4. Add the onions and green capsicum. Fry on high flame for two to three minutes till they get slightly roasted in the hot oil. Set aside for later.
  5. Pour some more oil in the same kadhai. Temper with cumin seeds and let them crackle.
  6. Throw in the whole spices – bay leaf, dried red chilli, cinnamon, cloves and cardamom. Stir for ten seconds. Lower the flame to prevent burning.
  7. Add finely chopped onions and saute till the onions become tender. We do not want to brown the onions here, just cook them till they aren’t raw anymore.
  8. Once the onions turn translucent, add the ginger garlic paste. Saute this till the raw aroma of the ginger and garlic fades completely.
  9. Pour the fresh tomato paste into the onion mix. This tomato paste is raw and hence needs to be cooked for a while till its completely cooked.
  10. Cook the tomatoes on medium flame till they are completely cooked. The oil will start to release from the sides and that’s when you know the tomatoes are done.
  11. Season this masala with salt, turmeric powder, cumin powder, Kashmiri red chilli powder and coriander powder. Mix well till the spices assimilate into the gravy.
  12. Pour hot water and let the gravy come to a boil. The tomatoes and onions should melt into the gravy. Add more water if required.
  13. Add some fresh cream to the gravy to thicken it, lighten its colour and make it decadent.
  14. Once the gravy is uniform and cooked completely, add diced tomatoes, fried onions, capsicum and fried paneer. Mix well.
  15. Discard the bay leaf and cinnamon at this stage.
  16. Finally, garnish with garam masala and crushed kasuri methi (dried fenugreek leaves).
  17. Give it one last mix and enjoy with hot naans or tandoori roti. [/directions]

kadhai paneer

kadhai paneer

Hope you try out this delicious recipe in your own kitchen.

Feel free to reach out for feedback, suggestions or connect with me on Instagram or Facebook. Subscribe to my YouTube channel for all my videos and upcoming recipes.

Kasuri Methi Chicken

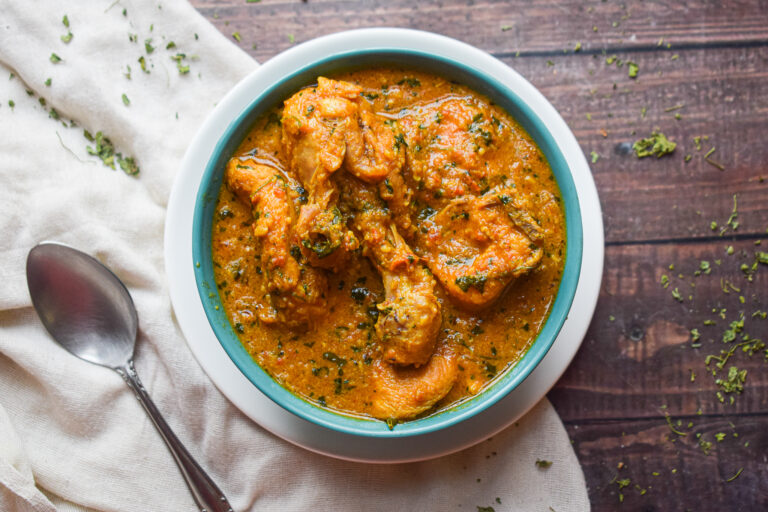
Here’s a chicken curry recipe that is very different from the usual. This Kasuri methi chicken is a royal and luxurious chicken curry, which is also somehow very light. A perfect meal for the weekend, this curry can be mopped up with naan, laccha parathas, jeera rice or plain pulao. A little bit of salad and raita on the side will make the meal absolutely flawless.

As the name suggests, kasuri methi or dried fenugreek leaves make for a very crucial ingredient in this recipe. In usual Indian curries that utilise the flavour and aroma of kasuri methi, this recipe uses it in slight abundance. The kasuri methi is crushed and added right in the last five minute as the curry bubbles away.

kasuri methi chicken

kasuri methi chicken

Apart from the kasuri methi itself, there are several other ingredients that lead to the depth of flavour, texture and colour in this kasuri methi chicken recipe. Cashew paste or cashew cream, along with desiccated coconut adds that royal touch to this silken gravy, and so much flavour along with it. The rest of the ingredients are regular chicken curry ingredients – onions, tomatoes, ginger garlic paste and freshly ground spices.

kasuri methi chicken

Let’s dive into the recipe.

Preparation time – 20 minutes

Cook time – 40 minutes

Serves – 3

[ingredients title=”Ingredients”]

  • 500 g chicken
  • 3 tbsp oil
  • 1 tbsp ghee
  • 1/2 cup onion paste
  • 2 green chillies, slit in half
  • 1 tbsp ginger garlic paste
  • 1 bay leaf
  • 1 inch cinnamon stick
  • 2 cardamoms
  • 2 cloves
  • 1/4 cup desiccated coconut
  • 1 cup fresh tomato paste
  • Salt to taste
  • 1/2 tsp turmeric powder
  • 1 tsp Kashmiri red chilli powder
  • 1 tbsp coriander powder
  • 1 tsp cumin powder
  • 10 cashews, ground to a paste with water
  • 1/4 tsp garam masala
  • 400 ml hot water
  • A handful of crushed kasuri methi [/ingredients]

[directions title=”Directions”]

  1. Heat oil and ghee in a kadhai.
  2. Add the whole spices and stir them into the oil for a few seconds.
  3. Add the onion paste carefully and stir for a few minutes. The rawness of the onions should fade completely before we add anything else. Do not burn.
  4. Add slit green chillies and ginger garlic paste and cook for another few minutes till its rawness disappears.
  5. Next, add the desiccated coconut and fry on medium to low flame for another three minutes.
  6. Throw in a splash of water to prevent the masala from sticking to the pan.
  7. Stir till the oils of the coconut starts to release.
  8. Pour in the fresh tomato paste and stir well.
  9. Let the tomatoes cook completely. You will know it’s done when the oil starts to release from the sides. Do not burn.
  10. Season with salt, Kashmiri red chilli powder, turmeric powder, cumin powder and coriander powder.
  11. Cook the masala for 3-4 minutes on medium to low flame.
  12. Put the chicken pieces and mix everything together, till every piece of chicken is coated well into the masala.
  13. Fry the chicken for 5-6 minutes.
  14. Add the cashew paste and stir for another few minutes.
  15. Cover and cook on low flame for ten minutes, or till the chicken is tender.
  16. Pour hot water and let the curry come to a roaring boil.
  17. Once you reach your desired consistency for the curry, garnish with garam masala and kasuri methi or dried fenugreek leaves. Stir for a minute and let it boil for another two minutes.
  18. Serve hot with naan, tandoori roti or jeera rice. [/directions]

kasuri methi chicken

kasuri methi chicken

Feel free to reach out for feedback, suggestions or connect with me on Instagram or Facebook. Subscribe to my YouTube channel for all my videos and upcoming recipes.

Chicken Gravy Noodles

For all those who’ve been following my work for a while might be aware of my nostalgia with the food I grew up eating. One is obviously the food from my own home and heritage and the other is the food we would go out as a family to eat once in a blue moon. Eating out was not as often as it is now. We had one or two places that the family loved and would frequent on special occasion. And my pick would always be a Pan Asian restaurant (which we would refer to as Chinese restaurant).

Guwahati has some real gems when it comes to Chinese food and the taste is very unique till this date. I make it a point to eat at my favourite places whenever I’m there. I also miss their food when I’m away. My most favourite meal back home is a delicious chicken gravy noodles. It’s an order we’ve been making for decades now, and I still love it as much as I used to as a child. Even more if possible.

chicken gravy noodles

I always wondered if I could replicate these flavours in my own kitchen but would get intimidated. But after my last visit home, I decided to give it a shot. And after two attempts and some research, I hit the brief!

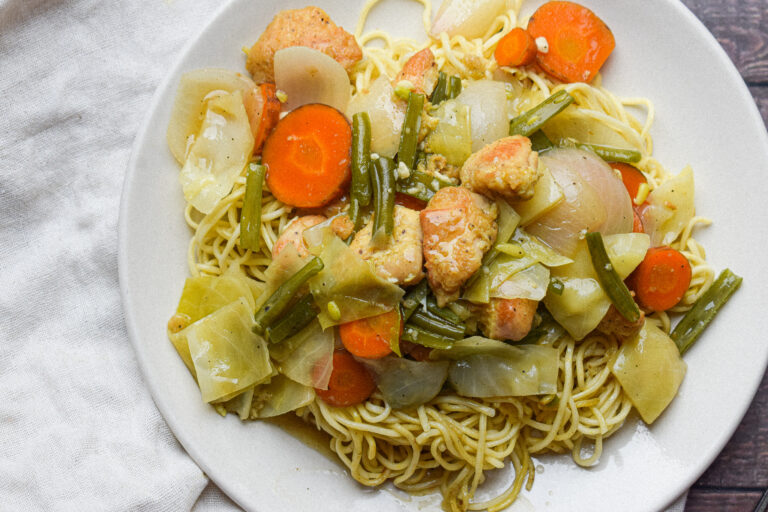
These chicken gravy noodles are so delicious! It requires a couple of extra steps but the results are so worth it. Crispy bits of egg noodles, juicy and flavourful chicken chunks and a broth loaded with colourful vegetables. I am not a huge fan of loud cooking, and such subtle flavours make me weak on my knees. This is the food I grew up experiencing outside my home and I am really happy to be sharing the recipe with you.

Let’s take a look at the steps to make these delicious chicken gravy noodles and make them taste like your choicest restaurant.

Key Ingredients in these Chicken Gravy Noodles

– Chicken

We use boneless chicken cubes in this recipe. The chicken is first marinated in salt, black pepper powder, cornflour and an egg. It needs to sit for 10 minutes before we fry each piece until its golden brown and crispy on the outside, and soft and juicy on the inside. This chicken goes into the final broth.

– Chicken Stock

Chicken stock is a very vital element in this recipe. It lends the quintessential restaurant flavour to the broth, making it rich and full of rich flavour. I make my own chicken stock by boiling chicken with bones in a pot of water with salt and a little garlic till cooked. You can also use ready made chicken cubes from the market.

– Vegetables

I love the addition of vegetables in this recipe. I have used carrots, french beans, onions and cabbage. You can also add mushrooms, potatoes, bokchoy and peppers. The vegetables soak all the flavours from the chicken stock and are cooked till soft, but not mushy. The cabbage and onions still need to have some crunch in them in the final bite.

– Egg Noodles

I have used egg noodles in this recipe, which is also the predominant choice in most restaurants. The egg noodles are first cooked in salted water till done. They are then layered with some neutral oil so that they do not stick to each other.

This final step elevates this recipe is when the egg noodles are fried on a wok till bits of them turn crispy.

Since this recipe is a homemade version, I have used less oil as compared to restaurants. The crispy bits add texture to the recipe and make the noodles an extra bit special.

chicken gravy noodles

chicken gravy noodles

Preparation time – 30 minutes

Cook time – 45 minutes

Serves – 3

[ingredients title=”Ingredients”]

For chicken marination:

  • 200 g boneless chicken cubes
  • 1 tsp salt
  • 1/2 tsp black pepper powder
  • 2 tbsp cornflour
  • 1 small egg
  • 3 tbsp oil for frying

For the fried noodles:

  • 150 g egg noodles, cooked as per package instructions
  • 3 tbsp oil

For the gravy:

  • 3 tbsp oil
  • 3 tbsp finely chopped garlic
  • 1 medium onion
  • 2 medium carrots
  • 100 g green beans
  • 800 ml chicken stock
  • Cornflour slurry (3 tbsp cornflour mixed with 5 tbsp water)
  • Salt to taste
  • 1/2 tsp black pepper powder
  • Chopped spring onion greens for garnish [/ingredients]

[directions title=”Directions”]

  1. Boil water in a large pot. Let it come to a boil and add some salt to it. Cook the noodles as per package instructions and drain all the water out in a sieve.
  2. Rub the cooked noodles with some oil so that they do not stick to each other. Use any neutral oil like canola oil or sunflower oil.
  3. Pat the chicken pieces completely dry with a paper towel. Marinate with salt, black pepper powder, cornflour and egg. Let it rest for ten minutes.
  4. Heat oil in a wok and let it get really hot. Fry the chicken pieces without crowding them in the wok. Let them turn crispy and golden brown in a uniform manner. The chicken should also be cooked from the inside. Once done, set aside.
  5. In the same wok, remove the bits of chicken left and add more oil. Place the noodles on the wok and cook them till they turn crispy on the bottom. Make sure you do not burn them.
  6. Once the bottom is nice and crispy, flip gently and cook the other side for another 2-3 minutes. Set the noodles aside.
  7. Heat oil in the same wok and add the finely chopped garlic once hot. Fry the garlic on high heat for a minute. Once they start to brown a little, add the onions and fry for another minute.
  8. Add the rest of the vegetables, fried chicken and stir. Season with salt and black pepper powder. Saute the vegetables for another five minutes.
  9. Pour the chicken stock onto the wok and let it come to a boil.
  10. Allow the vegetables and chicken to cook in the broth. Do not let them turn mushy, they can still have a slight bite to them.
  11. Once the vegetables are cooked, make a cornflour slurry and pour it over the broth. Mix well and allow it to thicken to your desired consistency.
  12. Garnish with spring onion greens.
  13. To plate, place the fried noodles first and then pour the delicious chicken and vegetable gravy on top. Serve hot! [/directions]

chicken gravy noodles

chicken gravy noodles

I hope you try the recipe to these delicious chicken gravy noodles. This recipe is very close to my heart and the most comforting thing I make for myself and my family. It is a great recipe to make when you have people coming over. I keep the noodles and gravy separately and guests can serve themselves.

If you have feedback or suggestions. leave them below in the comments section. You can also connect with me on Instagram or Facebook. Subscribe to my YouTube channel for all my videos and upcoming recipes.

 Assamese Style Cabbage Potato Fry

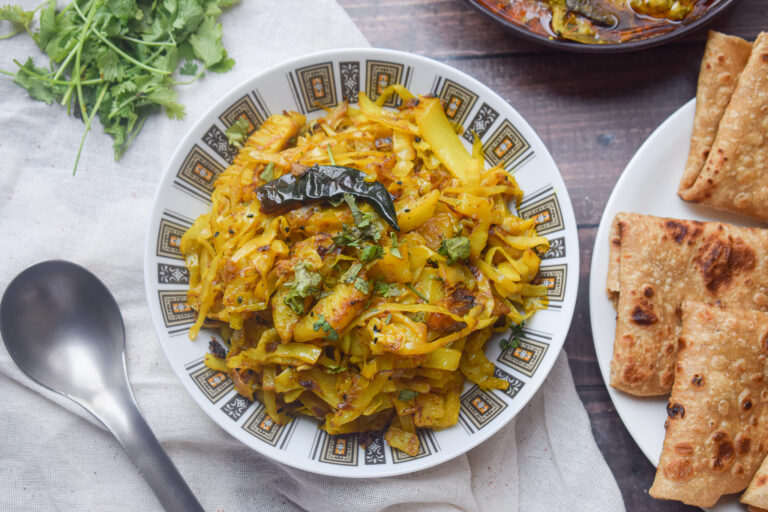
This Assamese Style Cabbage Potato Fry recipe is the perfect example to prove that Indian recipes aren’t as complicated and as time consuming as they are widely believed. It takes less than 30 minutes to whip up this delicious, fresh, and wholesome vegan Indian dish. Just like all Assamese vegetable stir-fries, this cabbage fry is also very simple and quick and devoid of tomatoes or excessive spices. We do not even use too much of red chilli powder in our cooking which helps most vegetable fries acquire a very subtle and simple flavour. It is super easy to put together as well as digest.

Cold Pressed Mustard oil is the medium of cooking in most Assamese and northeastern parts of India. It is a pungent and spicy oil with lends its own flavour to the stir-fries and curries. Tempered with dried red chilli and nigella seeds, it has a beautiful and subtle flavour throughout, and the roasted potatoes go perfectly well with the cabbage and add that element of satiety. You don’t need much. Just a few spices, oil, veggies, salt. You toss everything around, let it steam in its own juices, and you are done.

assamese style cabbage potato fry

assamese style cabbage potato fryThis recipe is extremely versatile and you can add more vegetables like peas or carrots or completely replace cabbage and potatoes with any vegetables of your choice and have yourself a brand new delicious dish. Cabbage is also an extremely healthy vegetable packed with nutrients and vitamins. It also assists in weight loss. Cabbage might not be your favourite vegetable but you make it this way and you’ll change your mind! Known as patta/bandh gobhi aloo sabzi in India, it’s easy, fresh, and wholesome. This is a perfect vegetarian delight to pair up with a bowl of hot rice and dal to take your comfort meal up a notch.

It is also important to cut the vegetables for the stir fry appropriately. Slice the cabbage as thin as possible and cut the potatoes into thin ¼ inch strips. Since cabbage cooks very quickly and potatoes take time, larger potato strips might leave you with cooked cabbage and raw potatoes. 

Why make this stir-fry?

  • Super quick and easy to make.
  • Needs the most basic off-the-shelf ingredients found easily in your pantry.
  • A versatile and adaptable recipe that can be recreated with any other vegetables. 
  • Super healthy and nutritious.
  • Foolproof
  • Extremely flavourful.

assamese style cabbage potato fry

Preparation time – 15 minutes

Cook time – 30 minutes

Serves – 3

[ingredients title=”Ingredients”]

  • 1 medium cabbage – shredded/thinly sliced
  • 2 medium onions – thinly sliced
  • 3 medium potatoes – cut into medium strips
  • 1 dried red chilli
  • 1 tsp. Nigella seeds/kalonji/kaljeera
  • 1 tsp. Fresh ginger paste
  • ¼ tsp. Turmeric powder
  • 1 tsp cumin powder
  • 2 tsp coriander powder
  • Salt to taste
  • Fresh coriander leaves for garnish [/ingredients]

[directions title=”Directions”]

  1. Take a fresh medium cabbage and start by removing the stem. Cut it in half, locate the stem which is slightly harder than the rest of the cabbage and make a triangular cut to get rid of the stem.
  2. Cut each of the halves into further halves and begin slicing. Slice as thin and even as possible and keep aside.
  3. Peel and wash your potatoes. Slice the potatoes into ¼th inch slices and then cut them into medium thick strips.  If the potato strips are too thick, you will end up with uncooked potatoes and cooked cabbage.
  4. Put the potato strips in a bowl of clean water for 5 minutes to get rid of the excess starch. 
  5. Now get your onions and cut them into thin slices.
  6. Once the vegetables are nicely chopped, heat a pan over medium heat.
  7. Add mustard oil to the pan and let it heat till it smokes.
  8. Once the oil is well heated, throw in the nigella/kalonji/kaljera seeds and the dried red chili.
  9. Saute for a few seconds.
  10. Add in your thinly sliced onions and saute them with the tempering, stirring occasionally to ensure they cook evenly.
  11. When the onions begin to become slightly golden-brown, add in your fresh ginger paste. Combine well and let it cook for another minute or two.
  12. Once the onions become softer, through in the potatoes.
  13. Stir for a minute and then add the thinly shredded cabbage.
  14. Turn the heat down to low and stir well to combine everything.
  15. Cover and allow it to cook on low flame for about 5 minutes.
  16. Keep the flame low throughout the process. 
  17. It is now time to add in our powdered spices. Season your stir-fry with coriander powder, cumin powder, turmeric powder, and salt.
  18. Give it a very good mix and make sure everything is well combined with the spices.
  19. Cover again and cook on low flame till the cabbage is tender.
  20. Take off the lid and give it a good mix, check if the potatoes are done.
  21. Cover it again for another 5 minutes and let it cook on low flame.
  22. Turn off the heat and mix it well and voila! There you have your simple yet flavourful Assamese style cabbage potato stir fry ready to be enjoyed in less than 30 minutes. [/directions]

assamese style cabbage potato fry

This is definitely one of my most favourite stir-fries. Serve it with a hot bowl of plain or tadka dal and a steaming plate steamed or jeera rice or simply pair it up with plain phulkas to whip yourself a plate of delicious comfort food filled with the goodness of health. I hope you try this recipe and fall in love with it.

Feel free to reach out for feedback, suggestions or connect with me on Instagram or Facebook. Subscribe to my YouTube channel for all my videos and upcoming recipes.

Assamese Aloo Bhaji

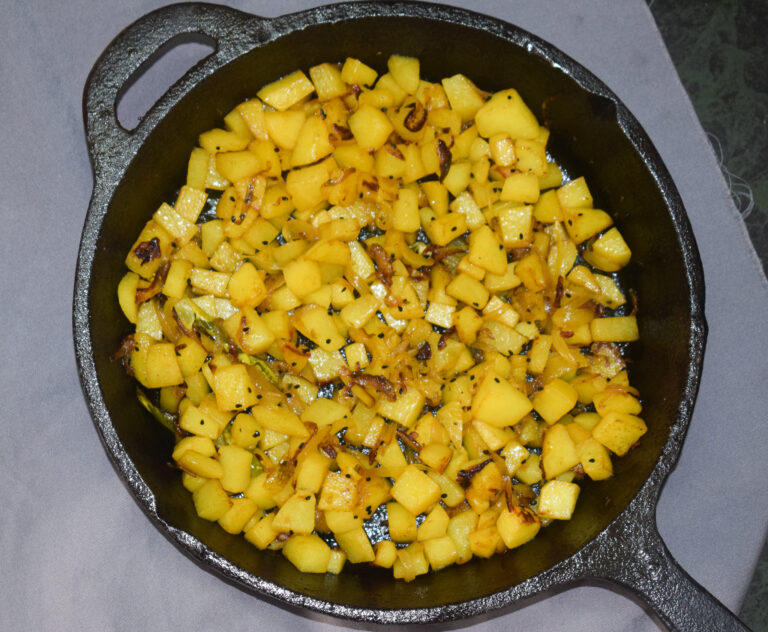
Aloo bhaji or aloo fry is a very important part of a typical plate of comfort food paired with dal and rice all throughout several states of India. Every state has a signature style of making aloo fry, however, the taste only varies slightly be it Assamese or Bihari or Bengali style, and is loved by everyone. This typical Assamese-style potato fry goes really well with luchi (made from maida), poori (made with whole wheat), paratha, and rice. The showstopper of the recipe is the nigella or kalonji seeds. This is such an easy recipe with barely 5-6 ingredients that can be found easily in all Indian kitchens and it comes together in 15 minutes tops.

This aloo bhaji is a common companion to all our breakfast, lunch, and dinner requirements. It is a forever-welcomed and -loved delicacy for kids and ‘adult kids’ who are vegetable haters and aloo-lovers.

aloo bhaji

This simple and hearty potato fry is comfort food for me. I made this today and served it with some piping hot dal and rice. So simple to make and so delicious, this potato fry recipe is very nostalgic. It reminds me of my childhood when I used to eat this with luchis or deep-fried flatbreads. Every Indian household makes this in its own way. My way is super simple, with a handful of ingredients. Great to go with rotis or puris in a lunchbox, this potato fry is also kid-friendly. I hope you try my version that has a hint of garlic, the kick of green chili, and lots and lots of happiness in the form of big bites. 

Potatoes are the Hero

Potatoes are one of the most versatile vegetables when it comes to Indian cuisine and it is delicious. One of the biggest reason why potatoes are so famous in India is that it goes well with almost everything. For Indians, it is one of the main ingredients of any dish. Right from your Aloo Paratha to the delicious Samosa and Vada Pav to the tikkis.

Indians love their potatoes in every form – be it boiled, roasted, baked, or fried. Vegetables form an important part of the traditional Indian vegetarian diet and potatoes invariably form a part of it. Either as an addition to the vegetable/curry or eaten separately in the form of fried fritters, potatoes are a staple in our diet. Potatoes also add satiety to an otherwise light vegetable or meat preparation, making the meal filling.

Let’s take a look at the recipe for this simple aloo bhaji.

aloo bhaji

aloo bhaji

Preparation time – 10 minutes

Cook time – 30 minutes

Serves – 3

[ingredients title=”Ingredients”]

  • 2 tbsp mustard oil
  • 1 slit green chilli
  • ½ tsp. Nigella or kalonji seeds
  • 3 garlic cloves – finely chopped
  • 1 large onion – finely sliced
  • 4 large potatoes – chopped into cubes
  • ½ tsp. Turmeric powder
  • Salt to taste [/ingredients]

[directions title=”Directions”]

  1. In a thick bottomed pan or an iron cast pan/kadhai, heat some mustard oil. Let it smoke.
  2. Add the slit green chili, nigella/kalonji seeds, and chopped garlic to the oil and temper for a few seconds.
  3. Add in the sliced onions once the garlic begins to brown.
  4. Saute the onions with the tempering, stirring occasionally.
  5. When the onions start browning, throw in the chopped potatoes.
  6. Mix everything well until combined.
  7. Saute the potatoes on low to medium flame for a few minutes.
  8. Once the potatoes are about 30% done, season them with some salt and turmeric powder and mix gently until well combined.
  9. Cover the potatoes and cook them on low heat for about 5 minutes.
  10. Take the lid off and give it a gentle mix.
  11. Cover again and cook on low flame for another 5 minutes.
  12. Give it one last mix and there you have your Assamese style aloo bhaji ready in just 15-20 minutes. [/directions]

aloo bhaji

So this is my take on the recipe and I’d love for you to try it soon. ‘A bowl of piping hot rice with a ladle or two of plain dal and this aloo fry’- if this isn’t comfort food, I don’t know what is. 

Feel free to reach out for feedback, suggestions or connect with me on Instagram or Facebook. Subscribe to my YouTube channel for all my videos and upcoming recipes.

Potol Aloo Korma

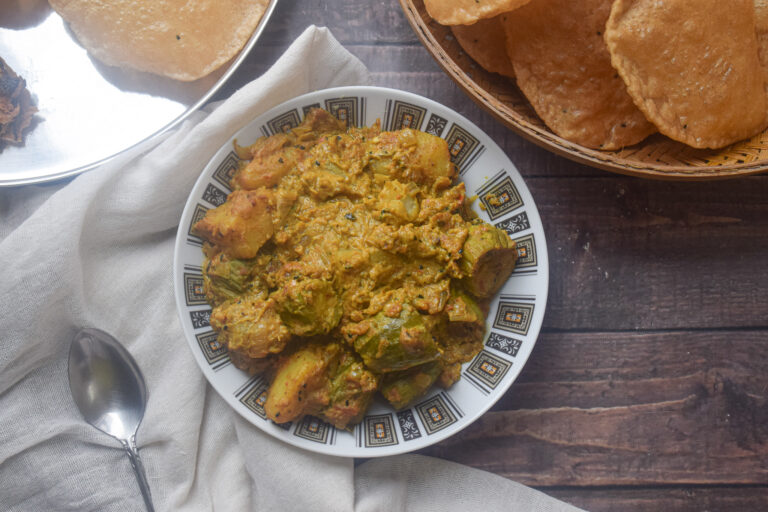
Potol Aloo Korma is a rich and creamy Bengali curry made with potol/parwal or pointed gourd. This korma is a thick, semi-dry gravy with the sweetness and richness of cashews that beautifully complement the tartness of tomatoes. The combination of aloo potol/parwal or potatoes and the pointed gourd is very famous and a fairly regular one in the Indian states of Bengal, Assam, and Bihar and is prepared in its own unique way everywhere.

This Potol Aloo Korma, however, is not a common vegetarian preparation that goes on the menu on a regular daily basis. It is a special intricate dish prepared on special occasions or on nights when the light and plain curries bore you. 

potol aloo kormaPotol or pointed gourd is a nutritious vegetable with a crunchy and chew outer layer and mushy interior. Its crunch and bite complement the mushy texture of potatoes. This dish is a perfect choice if you’re looking to create something exquisite and fancy with regular vegetables. I absolutely love this recipe.  Just mop up this royal vegetable preparation off with some butter naan, rumali roti, or plain parathas, and you’ve got yourself a heavenly meal.

Tips To Perfect This Potol Aloo Korma Recipe

  • Cut the potol and potatoes into big chunks. This helps retain the bite and crunch in all the vegetables and prevents them from getting mushy and soggy in the curry.
  • The korma is cooked in two batches. In the first batch, we fry our potatoes and potol in a way that they are cooked properly as well as have a crunch to them. This will help the vegetables in holding their shape and texture and not getting overcooked in the final curry.
  • The second step is to cook the highlight of this potol aloo korma recipe – its luscious gravy. The base of this gravy is a mixture of beaten curd and cashew cream. The cashew cream is made fresh by soaking some cashews in hot water for 30 minutes and grinding them with a few tablespoons of water or milk to get a thick paste. These two ingredients change the whole flavour profile and texture of this delicious recipe. The other ingredients are normal Indian curry items such as onions, ginger-garlic paste, and the usual spices – coriander, cumin, turmeric, black pepper, garam masala, and red chili powder. All these spices harmonise and create a recipe so delicious, it will make you lick your fingers!

potol aloo korma

Preparation time – 20 minutes

Cook time – 40 minutes

Serves – 3

[ingredients title=”Ingredients”]

  • 7 pointed gourds – each cut in half.
  • 3 medium potatoes, cut into cubes
  • 3 tbsp mustard oil
  • 2 cardamom
  • 1 dried red chilli
  • 1-inch cinnamon stick
  • 1 bay leaf
  • 1/4 tsp nigella seeds/kalonji
  • 1 slit green chilli (add more if you want it spicy)
  • 2 cloves
  • 1 tsp sugar (optional)
  • Salt to taste
  • 2 tbsp whisked curd
  • 12 cashews, ground to a paste with 2tbsp milk/water
  • 1.5 cup finely chopped onions
  • 2 cups tomato puree (fresh)
  • Salt to taste
  • 1 tbsp ginger-garlic paste
  • 1 tsp turmeric powder
  • 1 tsp cumin powder
  • 2 tsp coriander powder
  • 1 tsp fennel powder
  • 500 ml hot water
  • 1 tbsp Kasuri methi
  • 1/4 tsp garam masala [/ingredients]

[directions title=”Directions”]

  1. Start by chopping off both ends of the pointed gourds. Scrape each pointed gourd with the help of a knife to get rid of the outer layer. 
  2. Cut each of the potol in half and keep aside.
  3. Heat mustard oil in a deep dish pan or kadhai and let it smoke.
  4. Add in the potatoes cut in cubes and fry, stirring occasionally till they turn slightly brown.
  5. Take the potatoes out of the pan and set them aside.\
  6. In the same oil, add the chunks of pointed gourd and fry for about 5 minutes, stirring occasionally.
  7. Once done, take the fried pointed gourds out and set them aside.
  8. In the same heated pan, add in the whole spices – bay leaves, dry red chili, green cardamom, cinnamon stick, and cloves.
  9. Add in the nigella or kalonji seeds and one slit green chili.
  10. Fry them for a few seconds.
  11. Throw in the finely chopped onion and give it a good stir to combine it with the tempering.
  12. Saute the onions, stirring occasionally till they turn translucent.
  13. At this point add in the sugar. However, it is optional and you can totally skip it.
  14. Fry the onions till they turn nice and golden brown. 
  15. Now add in the fresh ginger-garlic paste, combine it well with the onions and cook thoroughly until the raw smell of garlic is lost.
  16. Once the onions, ginger garlic are done, it’s time to add in our dry spices – salt, turmeric powder, coriander powder, cumin powder, fennel powder.
  17. Cook the dry spices for a few minutes. Now add in a dash of hot water to homogenize the spices well.
  18. To this, we will now add the fresh tomato puree.
  19. Mix it well with everything and cover and cook it on low flame for 5 minutes.
  20.  Once the tomato mixture is properly cooked, add in the beaten/whisked curd, followed by the cashew paste.
  21. Combine well and cook for a few minutes.
  22. Now, add the fried potatoes and potol to the curry.
  23. Give it a good mix such that all the chunks of vegetables are coated in the luscious creamy gravy.
  24. Add in 500ml of hot water and cook till the potatoes are soft and you attain your desired consistency.
  25. Finally, top it up with some crushed dried Kasuri methi and garam masala powder.
  26. Mix well and take it off the heat. [/directions]

potol aloo korma

potol aloo korma

It makes the perfect vegetarian delicacy for a get-together menu or just another Sunday night. Pair it with some vegetable pulao or butter naan and you’re good to go. Do try this recipe and trust me, you are going to fall in love with it. 

Feel free to reach out for feedbacks, suggestions or connect with me on Instagram or Facebook. Subscribe to my YouTube channel for all my videos and upcoming recipes.